
Integration Guide
The steps for technical integration of Snap are explained below.
Preparation
NoteIn this section, Midtrans Sandbox environment is used to test the integration process.
Sign up for a Midtrans Merchant Administration Portal (MAP) account, to get your API Keys for Sandbox environment and to test integration.
Retrieve Sandbox mode API keys that will be used for this guide.
Integration Steps Overview
- Acquire Snap transaction token on your backend
- Display Snap payment page on frontend
- Customer perform payment on payment page
- Handling payment status update on your backend
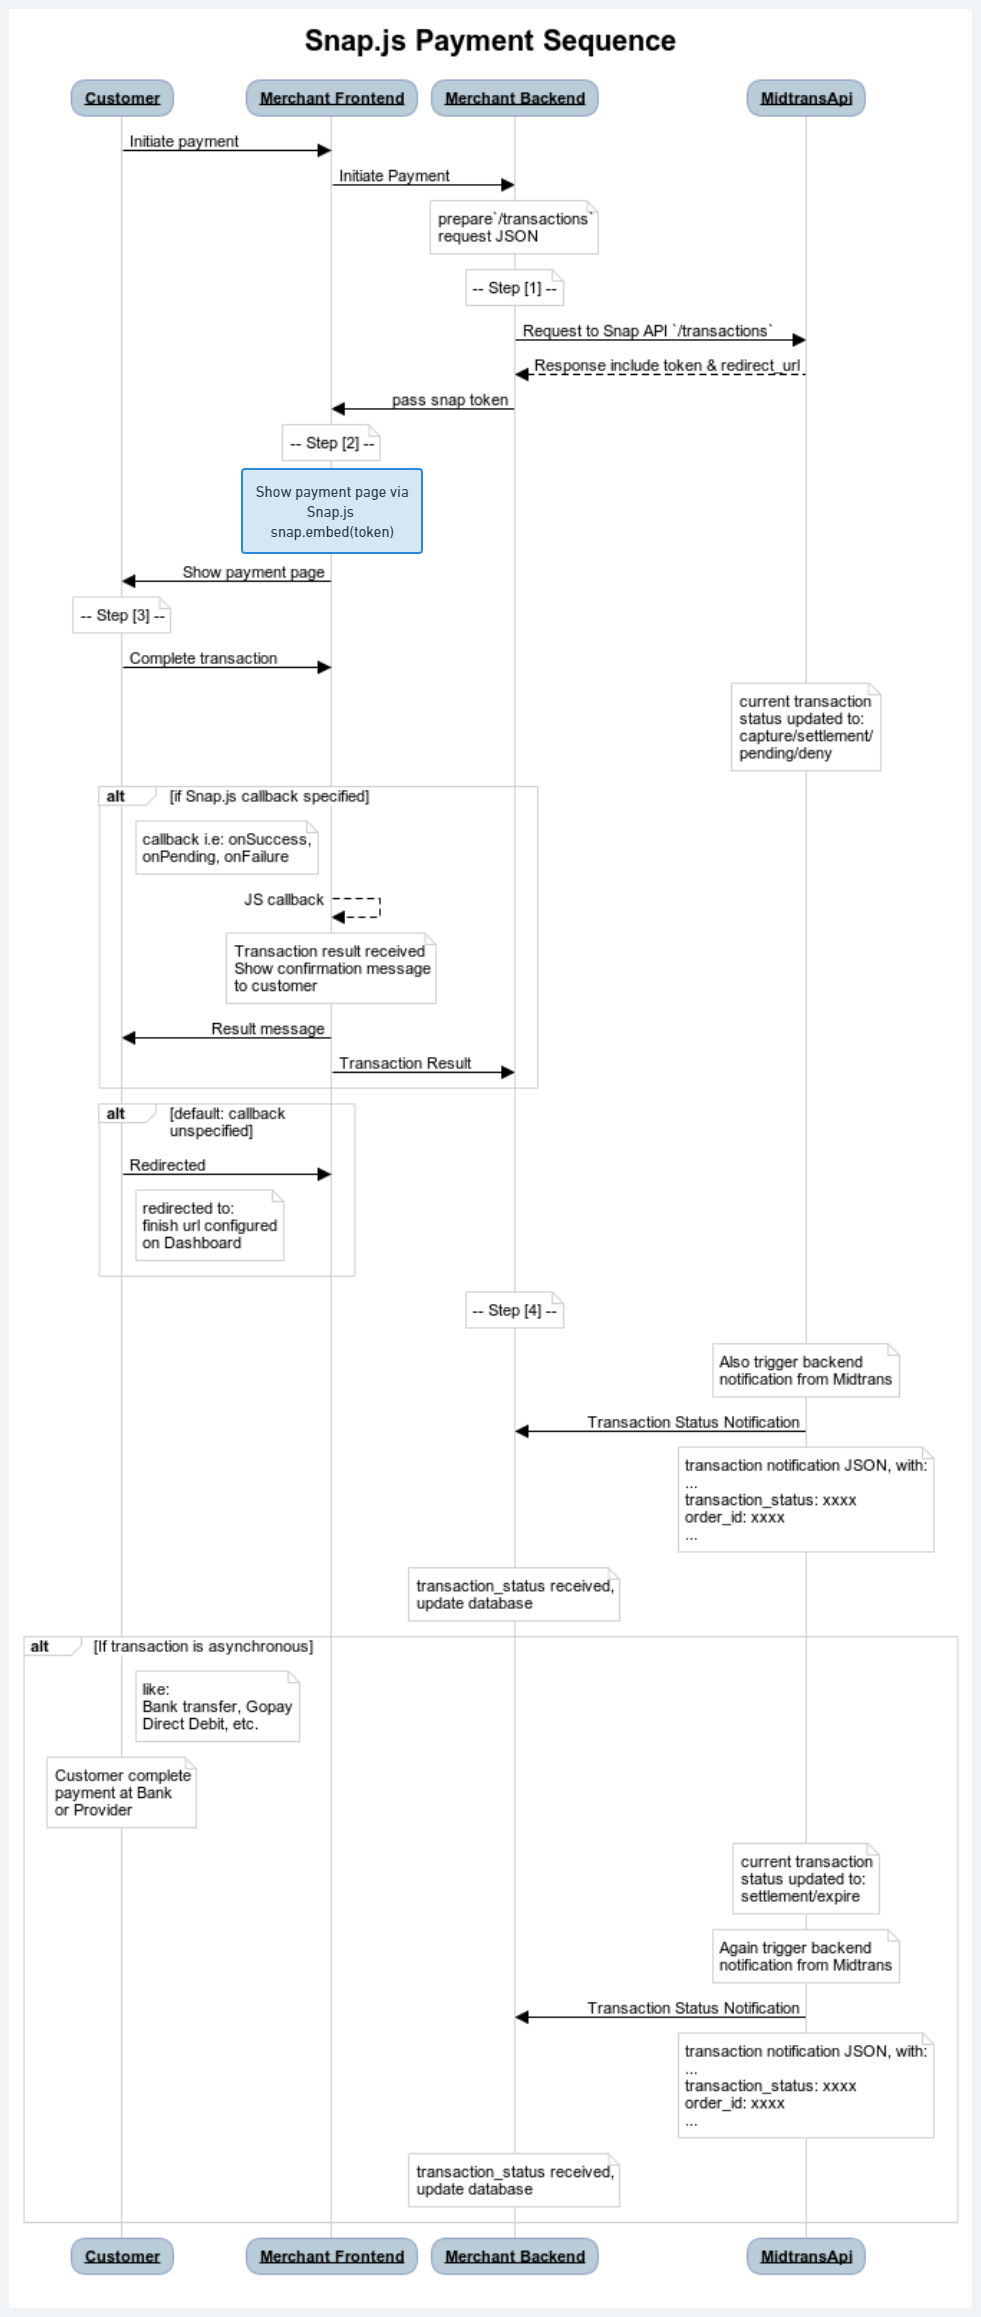
Sequence Diagram
The overall Snap end-to-end payment process is illustrated in following sequence diagram:
Snap Popup Mode

Snap Redirect sequence diagram
Snap Embedded Mode
Snap Redirect sequence diagram
Snap Redirect Mode

Snap Redirect sequence diagram
You can also refer to various step by step implementation walkthrough here.
1. Acquiring Transaction Token on Backend
API request should be done from merchant backend to acquire Snap transaction token by providing payment information and Server Key. There are at least three components that are required to obtain the Snap token which are explained in the table given below.
| Element | Description |
|---|---|
Server Key | API server key. For more details, refer to Retrieving API Access Keys |
order_id | Unique transaction order ID, defined from your side. One ID could be used only once for the order of the material. Allowed character are Alphanumeric, dash(-), underscore(_), tilde (~), and dot (.) String, max 50. |
gross_amount | Total amount of transaction, defined from your side. Integer. When creating 1st transaction, the gross_amount is still required. |
Charge API Sample Request
Endpoints
| Environment | Method | URL |
|---|---|---|
| Sandbox | POST | https://app.sandbox.midtrans.com/snap/v1/transactions |
| Production | POST | https://app.midtrans.com/snap/v1/transactions |
HTTP Headers
| Accept | application/json |
| Content-Type | application/json |
| Authorization | Basic AUTH_STRING |
AUTH_STRING: Base64Encode("YourServerKey"+":")
Midtrans API validates HTTP request by using Basic Authentication method. The username is your Server Key while the password is empty. The authorization header value is represented by AUTH_STRING. AUTH_STRING is base-64 encoded string of your username and password separated by colon symbol (:). For more details, refer to API Authorization and Headers.
Sample Request to Obtain Transaction Token
curl -X POST \
  https://app.sandbox.midtrans.com/snap/v1/transactions \
  -H 'Accept: application/json'\
  -H 'Authorization: Basic U0ItTWlkLXNlcnZlci1UT3ExYTJBVnVpeWhoT2p2ZnMzVV7LZU87' \
  -H 'Content-Type: application/json' \
  -d '{
    "transaction_details": {
        "order_id": "YOUR-ORDERID-123456",
        "gross_amount": 10000
    },
    "credit_card":{
        "secure" : true
    },
    "customer_details": {
        "first_name": "budi",
        "last_name": "pratama",
        "email": "[email protected]",
        "phone": "08111222333"
    }
}'
/*Install Midtrans PHP Library (https://github.com/Midtrans/midtrans-php)
composer require midtrans/midtrans-php
Alternatively, if you are not using **Composer**, you can download midtrans-php library
(https://github.com/Midtrans/midtrans-php/archive/master.zip), and then require
the file manually.
require_once dirname(__FILE__) . '/pathofproject/Midtrans.php'; */
//SAMPLE REQUEST START HERE
// Set your Merchant Server Key
\Midtrans\Config::$serverKey = 'YOUR_SERVER_KEY';
// Set to Development/Sandbox Environment (default). Set to true for Production Environment (accept real transaction).
\Midtrans\Config::$isProduction = false;
// Set sanitization on (default)
\Midtrans\Config::$isSanitized = true;
// Set 3DS transaction for credit card to true
\Midtrans\Config::$is3ds = true;
$params = array(
'transaction_details' => array(
'order_id' => rand(),
'gross_amount' => 10000,
),
'customer_details' => array(
'first_name' => 'budi',
'last_name' => 'pratama',
'email' => '[email protected]',
'phone' => '08111222333',
),
);
$snapToken = \Midtrans\Snap::getSnapToken($params);/*Install midtrans-client (https://github.com/Midtrans/midtrans-nodejs-client) NPM package.
npm install --save midtrans-client*/
//SAMPLE REQUEST START HERE
const midtransClient = require('midtrans-client');
// Create Snap API instance
let snap = new midtransClient.Snap({
// Set to true if you want Production Environment (accept real transaction).
isProduction : false,
serverKey : 'YOUR_SERVER_KEY'
});
let parameter = {
"transaction_details": {
"order_id": "YOUR-ORDERID-123456",
"gross_amount": 10000
},
"credit_card":{
"secure" : true
},
"customer_details": {
"first_name": "budi",
"last_name": "pratama",
"email": "[email protected]",
"phone": "08111222333"
}
};
snap.createTransaction(parameter)
.then((transaction)=>{
// transaction token
let transactionToken = transaction.token;
console.log('transactionToken:',transactionToken);
})/*Install midtrans-java (https://github.com/Midtrans/midtrans-java) library.
If you are using Maven as the build automation tool for your project,
please add the following dependency to your project's build definition (pom.xml).
<dependencies>
<dependency>
<groupId>com.midtrans</groupId>
<artifactId>java-library</artifactId>
<version>3.0.0</version>
</dependency>
</dependencies>
If you are using Gradle as the build tool for your project,
please add the following dependency to your project's build definition (build.gradle).
dependencies {
implementation 'com.midtrans:java-library:3.0.0'
}
You can also check the functional test
(https://github.com/Midtrans/midtrans-java/blob/master/library/src/test/java/com/midtrans/java/CoreApiTest.java) for more examples.
*/
//SAMPLE REQUEST START HERE
import com.midtrans.Midtrans;
import com.midtrans.httpclient.SnapApi;
import com.midtrans.httpclient.error.MidtransError;
import java.util.HashMap;
import java.util.Map;
import java.util.UUID;
import org.json.JSONObject;
public class MidtransExample {
public static void main(String[] args) throws MidtransError {
// Set serverKey to Midtrans global config
Midtrans.serverKey = "YOUR_SERVER_KEY";
// Set value to true if you want Production Environment (accept real transaction).
Midtrans.isProduction = false;
// Create params JSON Raw Object request
public Map<String, Object> requestBody() {
UUID idRand = UUID.randomUUID();
Map<String, Object> params = new HashMap<>();
Map<String, String> transactionDetails = new HashMap<>();
transactionDetails.put("order_id", idRand);
transactionDetails.put("gross_amount", "265000");
Map<String, String> creditCard = new HashMap<>();
creditCard.put("secure", "true");
params.put("transaction_details", transactionDetails);
params.put("credit_card", creditCard);
return params;
}
// Create Token and then you can send token variable to FrontEnd,
// to initialize Snap JS when customer click pay button
String transactionToken = SnapApi.createTransactionToken(requestBody())
}
}
#Install midtransclient(https://github.com/Midtrans/midtrans-python-client) PIP package
#pip install midtransclient

#SAMPLE REQUEST START HERE

import midtransclient
# Create Snap API instance
snap = midtransclient.Snap(
    # Set to true if you want Production Environment (accept real transaction).
    is_production=False,
    server_key='YOUR_SERVER_KEY'
)
# Build API parameter
param = {
    "transaction_details": {
        "order_id": "test-transaction-123",
        "gross_amount": 200000
    }, "credit_card":{
        "secure" : True
    }, "customer_details":{
        "first_name": "budi",
        "last_name": "pratama",
        "email": "[email protected]",
        "phone": "08111222333"
    }
}

transaction = snap.create_transaction(param)

transaction_token = transaction['token']
/*Import Midtrans Go module package to your project. Via terminal:
go get -u github.com/midtrans/midtrans-go
and/or on your project code:
import (
"github.com/midtrans/midtrans-go"
"github.com/midtrans/midtrans-go/coreapi"
"github.com/midtrans/midtrans-go/snap"
"github.com/midtrans/midtrans-go/iris"
)*/
//SAMPLE REQUEST START HERE
// 1. Initiate Snap client
var s = snap.Client
s.New("YOUR-SERVER-KEY", midtrans.Sandbox)
// Use to midtrans.Production if you want Production Environment (accept real transaction).
// 2. Initiate Snap request param
req := & snap.RequestParam{
TransactionDetails: midtrans.TransactionDetails{
OrderID: "YOUR-ORDER-ID-12345",
GrossAmt: 100000,
},
CreditCard: &snap.CreditCardDetails{
Secure: true,
},
CustomerDetail: &midtrans.CustomerDetails{
FName: "John",
LName: "Doe",
Email: "[email protected]",
Phone: "081234567890",
},
}
// 3. Execute request create Snap transaction to Midtrans Snap API
snapResp, _ := s.CreateTransaction(req)Using Postman
Postman is an API development tool which is used to build, test and modify APIs. You can view our Postman Collection with the steps given below.
- Download and open Postman.
- Use this button to import our Postman Collection.

- Navigate to
1.a. SNAP transaction token request (minimum). - For more details, refer to Postman Collection.
Please check Midtrans available language libraries for other language samples.
TipsYou can include more information such as
customer_details,item_details, and so on. It is recommended to send more details regarding the transaction, so that these details will be captured on the transaction record. Which can be viewed on the Midtrans Dashboard.
Learn more on why this API request should be securely managed from your backend.
Successful Sample Response
{
  "token":"66e4fa55-fdac-4ef9-91b5-733b97d1b862",
  "redirect_url":"https://app.sandbox.midtrans.com/snap/v2/vtweb/66e4fa55-fdac-4ef9-91b5-733b97d1b862"
}
Status Codes and Errors
| Status Code | Description | Example |
|---|---|---|
| 201 | Successful creation of Snap token. | "token":"66e4fa55-fdac-4ef9-91b5-733b97d1b862" |
| 401 | Failed to create a token, as wrong authorization is sent. | "Access denied, please check client or server key" |
| 4xx | Failed to create a token, as wrong parameter is sent. Follow the error_message and check your parameter. | "transaction_details.gross_amount is not equal to the sum of item_details" |
| 5xx | Failed to create a token, because of Midtrans internal error. Most of the time this is temporary, you can retry later. | "Sorry, we encountered internal server error. We will fix this soon." |
2. Displaying Snap Payment Page on Frontend
To display Snap payment page within your site, there are two methods to choose.
Redirection Method
You can use redirect_url retrieved from backend in the previous step to redirect customer to url hosted by Midtrans. Useful if you do not want (or unable) to implement via snap.js. Learn more in this alternative section.
You can also use WebView to display Snap payment page within your mobile app - also useful if you're looking to implement in cross platform applications (e.g Flutter or React) or native applications (SDK method is also available and recommended for native app - see guide here).
Javascript Method
Tips
- If you are using frontend framework such as ReactJS and struggling to include the script tag, please refer to this recommendation.
- To ensure that Snap modal is displayed correctly on a mobile device, please include the viewport meta tag inside your
<head>tag. The most common implementation is as follows :
<meta name="viewport" content="width=device-width, initial-scale=1">- Optionally, you can also use JavaScript callbacks to handle payment events triggered from customer finishing interaction with Snap payment page on frontend.
Include snap.js library into your payment page HTML. The table given below describes the components which are required to display Snap payment page.
| Element | Description |
|---|---|
| Client Key | The Client Key. For more details refer to Retrieving API Access Keys |
snap.js url | https://app.sandbox.midtrans.com/snap/snap.js |
transaction token | Retrieved from backend in previous step |
Enter your Client Key as the value of data-client-key attribute in snap.js script tag.
There are two ways to display Snap's UI modal in your web/app, first is by embedding Snap modal within your web/app's page (Embedded mode) or by displaying the modal as an overlay on your web/app's page (Pop up mode). Refer to sample implementations of Embedded mode and Pop up mode.
Embedded Mode
You can embed Snap modal within your page using this method. See how it will look like below, or try the demo here. Check also our integration recipe for step by step implementation walkthrough.
Snap Embedded - Web Implementation
Snap Embedded - Mobile Implementation via Mobile View
Embed Snap Modal
Steps to implement :
- Create an empty div with the desired ID, e.g.
<div id="snap-container"></div>. This div is where the SNAP application will be placed. - Add snap.embed('${snap-token}', { embedId: ${your div id, for example snap-container} }). This will ensure that SNAP is correctly embedded and rendered within the div you previously set up.
<html>

<head>
  <meta name="viewport" content="width=device-width, initial-scale=1">
  <!-- @TODO: replace SET_YOUR_CLIENT_KEY_HERE with your client key -->
  <script type="text/javascript"
		src="https://app.stg.midtrans.com/snap/snap.js"
    data-client-key="SET_YOUR_CLIENT_KEY_HERE"></script>
  <!-- Note: replace with src="https://app.midtrans.com/snap/snap.js" for Production environment -->
</head>

<body>
  <button id="pay-button">Pay!</button>

  <!-- @TODO: You can add the desired ID as a reference for the embedId parameter. -->
  <div id="snap-container"></div>

  <script type="text/javascript">
    // For example trigger on button clicked, or any time you need
    var payButton = document.getElementById('pay-button');
    payButton.addEventListener('click', function () {
      // Trigger snap popup. @TODO: Replace TRANSACTION_TOKEN_HERE with your transaction token.
      // Also, use the embedId that you defined in the div above, here.
      window.snap.embed('YOUR_SNAP_TOKEN', {
        embedId: 'snap-container'
      });
    });
  </script>
</body>

</html>
<html>
<head>
<meta name="viewport" content="width=device-width, initial-scale=1">
<!-- @TODO: replace SET_YOUR_CLIENT_KEY_HERE with your client key -->
<script type="text/javascript"
src="https://app.stg.midtrans.com/snap/snap.js"
data-client-key="SET_YOUR_CLIENT_KEY_HERE"></script>
<!-- Note: replace with src="https://app.midtrans.com/snap/snap.js" for Production environment -->
</head>
<body>
<button id="pay-button">Pay!</button>
<!-- @TODO: You can add the desired ID as a reference for the embedId parameter. -->
<div id="snap-container"></div>
<script type="text/javascript">
// For example trigger on button clicked, or any time you need
var payButton = document.getElementById('pay-button');
payButton.addEventListener('click', function () {
// Trigger snap popup. @TODO: Replace TRANSACTION_TOKEN_HERE with your transaction token.
// Also, use the embedId that you defined in the div above, here.
window.snap.embed('YOUR_SNAP_TOKEN', {
embedId: 'snap-container',
onSuccess: function (result) {
/* You may add your own implementation here */
alert("payment success!"); console.log(result);
},
onPending: function (result) {
/* You may add your own implementation here */
alert("wating your payment!"); console.log(result);
},
onError: function (result) {
/* You may add your own implementation here */
alert("payment failed!"); console.log(result);
},
onClose: function () {
/* You may add your own implementation here */
alert('you closed the popup without finishing the payment');
}
});
});
</script>
</body>
</html>Learn more about Snap's Javascript Callback here and Snap's Javascript optional parameters here..
To make the modal blends more seamlessly to your website, is it possible to hide Snap's modal header that shows your merchant/display name. To do so, go to Dashboard > Snap Preference > Theme and Logo > then untick Use Header.
Adjusting Snap Modal Dimension
- The default width and height are set to 320px and 560px, which are the minimum sizes that meet our application standards.
- Size of snap-container div can be adjusted by adding height and width via CSS. Note that Snap-container size can only be enlarged, but not make it smaller than the default width and height to ensure that customers can easily make payments and ensure all functionality works properly.
- We also ensure responsiveness by using flexbox, which sets the width to 100% and follows the flex behavior of its parent. This ensures that the Snap content is appropriately displayed and preserved on smaller devices.
Additional Implementation Notes
- Unlike in Pop Up mode; in Embedded mode, X button in the modal is intentionally removed to prevent users from accidentally exiting after making a payment. However, merchant can still close the Snap window by using the hide() method covered in Snap Pop Up guide. Learn more here.
- It is not possible to have two different types of Snap instances open simultaneously. If Snap Popup is currently active, Snap Embed cannot be displayed. To switch between the two methods, you will need to hide the active instance using the hide method.
- It is possible to hide the header section in Snap modal that shows your merchant/display name. To do so, go to Dashboard > Snap Preference > Theme and Logo > then untick
Use Header.
Pop Up Mode
Display the Snap Checkout modal by overlaying it over your page (pop up). Start the payment process by calling window.snap.pay with transaction token.
<html>
  <head>
    <meta name="viewport" content="width=device-width, initial-scale=1">
    <!-- @TODO: replace SET_YOUR_CLIENT_KEY_HERE with your client key -->
    <script type="text/javascript"
      src="https://app.sandbox.midtrans.com/snap/snap.js"
      data-client-key="SET_YOUR_CLIENT_KEY_HERE"></script>
    <!-- Note: replace with src="https://app.midtrans.com/snap/snap.js" for Production environment -->
  </head>

  <body>
    <button id="pay-button">Pay!</button>

    <script type="text/javascript">
      // For example trigger on button clicked, or any time you need
      var payButton = document.getElementById('pay-button');
      payButton.addEventListener('click', function () {
        // Trigger snap popup. @TODO: Replace TRANSACTION_TOKEN_HERE with your transaction token
        window.snap.pay('TRANSACTION_TOKEN_HERE');
        // customer will be redirected after completing payment pop-up
      });
    </script>
  </body>
</html>
<html>
<head>
<meta name="viewport" content="width=device-width, initial-scale=1">
<!-- @TODO: replace SET_YOUR_CLIENT_KEY_HERE with your client key -->
<script type="text/javascript"
src="https://app.sandbox.midtrans.com/snap/snap.js"
data-client-key="SET_YOUR_CLIENT_KEY_HERE"></script>
<!-- Note: replace with src="https://app.midtrans.com/snap/snap.js" for Production environment -->
</head>
<body>
<button id="pay-button">Pay!</button>
<script type="text/javascript">
// For example trigger on button clicked, or any time you need
var payButton = document.getElementById('pay-button');
payButton.addEventListener('click', function () {
// Trigger snap popup. @TODO: Replace TRANSACTION_TOKEN_HERE with your transaction token
window.snap.pay('TRANSACTION_TOKEN_HERE', {
onSuccess: function(result){
/* You may add your own implementation here */
alert("payment success!"); console.log(result);
},
onPending: function(result){
/* You may add your own implementation here */
alert("wating your payment!"); console.log(result);
},
onError: function(result){
/* You may add your own implementation here */
alert("payment failed!"); console.log(result);
},
onClose: function(){
/* You may add your own implementation here */
alert('you closed the popup without finishing the payment');
}
})
});
</script>
</body>
</html>Learn more about Snap's Javascript Callback here and Snap's Javascript optional parameters here..
After following the steps given above, the sample Snap page is displayed as shown below.

Or try the demo here.
After the payment is completed, customer is redirected back to Finish URL. It is specified on Midtrans Dashboard, under menu Settings > Snap Preference > System Settings >Finish URL .
3. Updating Snap Preference
Make sure to update your Snap Preference to customize and prepare your Snap Checkout integration, from your branding, active payment methods, payment expire time to callback URL.
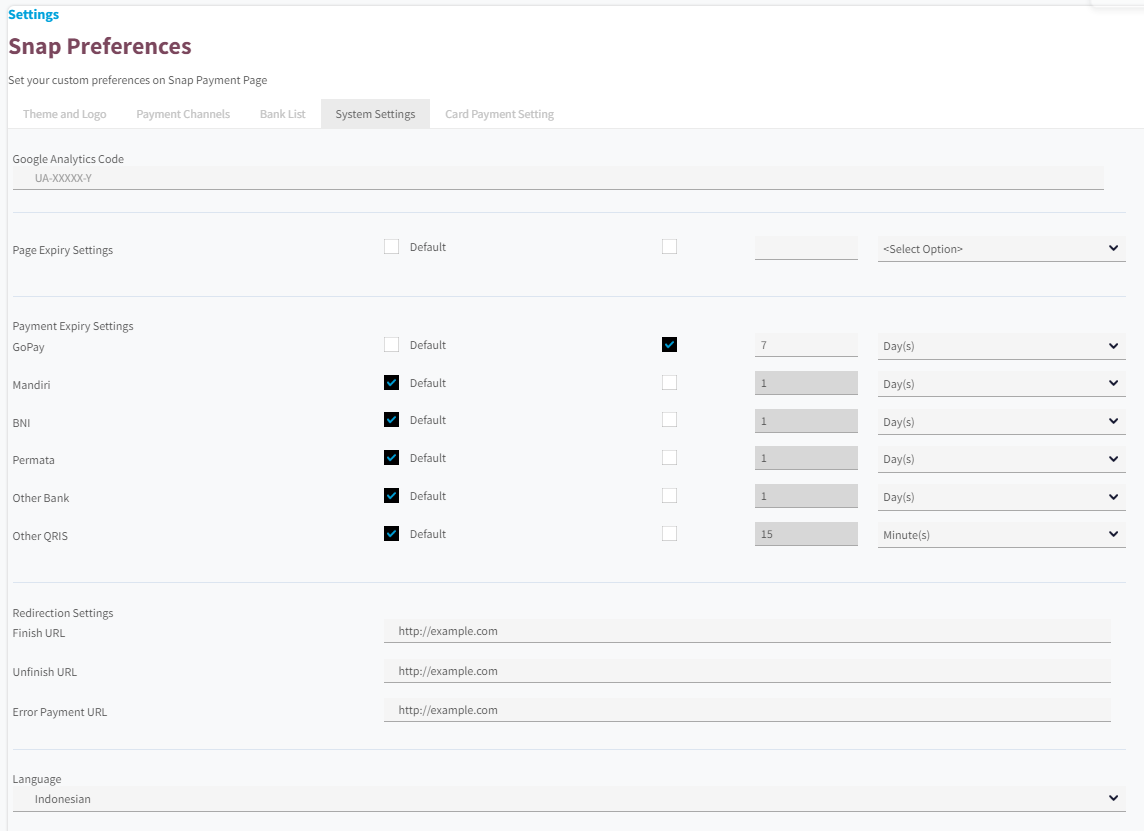
Update Redirection SettingsMake sure to at least update your Redirection Settings (Finish URL, Unfinish URL, Error URL) to make sure your customers will be redirected properly after finishing a payment. If you don't set it up here, you'll need to pass your Finish URLs as part of your Snap token creation requests.
4. Creating Test Payment
Create a test payment to make sure you have integrated Snap successfully. Following are the test credentials for Card payment.
| Name | Value |
|---|---|
| Card Number | 4811 1111 1111 1114 |
| CVV | 123 |
| Exp Month | Any month in MM format. For example, 02 |
| Exp Year | Any future year, in YYYY format. For example, 2025 |
| OTP/3DS | 112233 |
In addition to that, there are various payment methods available on Snap. You can choose any one of them to create a test payment. For more details, refer to Testing Payments on Sandbox.
5. Handling After Payment
When the transaction status changes, customer is redirected to Redirect URL and Midtrans sends HTTP notification to the merchant backend. This ensures that you are updated of the transaction status securely.
HTTP POST request with JSON body will be sent to your server's Notification URL configured on dashboard.
Configuring Payment Notification URL
To configure the Payment Notification URL, follow the steps given below.
- Login to your MAP account.
- On the Home page, go to SETTINGS > CONFIGURATION.
Configuration page is displayed. - Enter Payment Notification URL.
- Click Update.

The URL is updated and a confirmation message is displayed.
HTTP(S) Notification/Webhooks
Learn more here.
Next Step
Taking Action of Payment
Learn how to handle events of payment completed by customer and other status changes here.
Snap Advanced Feature
Learn the various useful features that are provided by Snap API here.
Transaction Status Cycle and Action
Learn how transaction status can change, and what are the available actions to take here.
Sample Codes
Integration sample codes are also available on our GitHub repos.
Alternative way to Display Snap Payment Page via Redirect
Alternatively, you can also use redirect_url retrieved from backend in the 1st step to redirect customer to payment page hosted by Midtrans. This is useful if you do not want or can not display payment page on your web page via snap.js.
Additionally, you can configure where customer will be redirected after the payment page, by: Login to your MAP/Midtrans Dashboard account, then go to SETTINGS > CONFIGURATION. Then please configure the Finish, Unfinish, Error Redirection URLs.
Learn more here on configuring Snap Redirect url configuration, after clicking that link please choose the Snap Redirect (Alternative) tab.
Configuring Finish Redirect URL
To configure the Finish Redirect URL, follow the steps given below.
- Login to your MAP account.
- On the Home page, go to SETTINGS > CONFIGURATION.
Configuration page is displayed. - Enter Finish, Unfinish, and Error Redirect URL with your landing page url.
- Click Update. A confirmation message is displayed.

The Finish Redirect URL is configured.
Display Snap via Mobile App’s WebView
Displaying Snap payment page within WebView can be a quick and easy way to get a payment page on your mobile app. Learn more about Displaying Snap via WebView here.
To further minimize implementation, instead of implementing Snap pop-up via snap.js, you can use Snap's redirect_url to be displayed within the WebView.
You can check demo of Snap displayed via WebView here.
-->
Updated 9 months ago