
Merchant Administration Portal - Disbursement Features
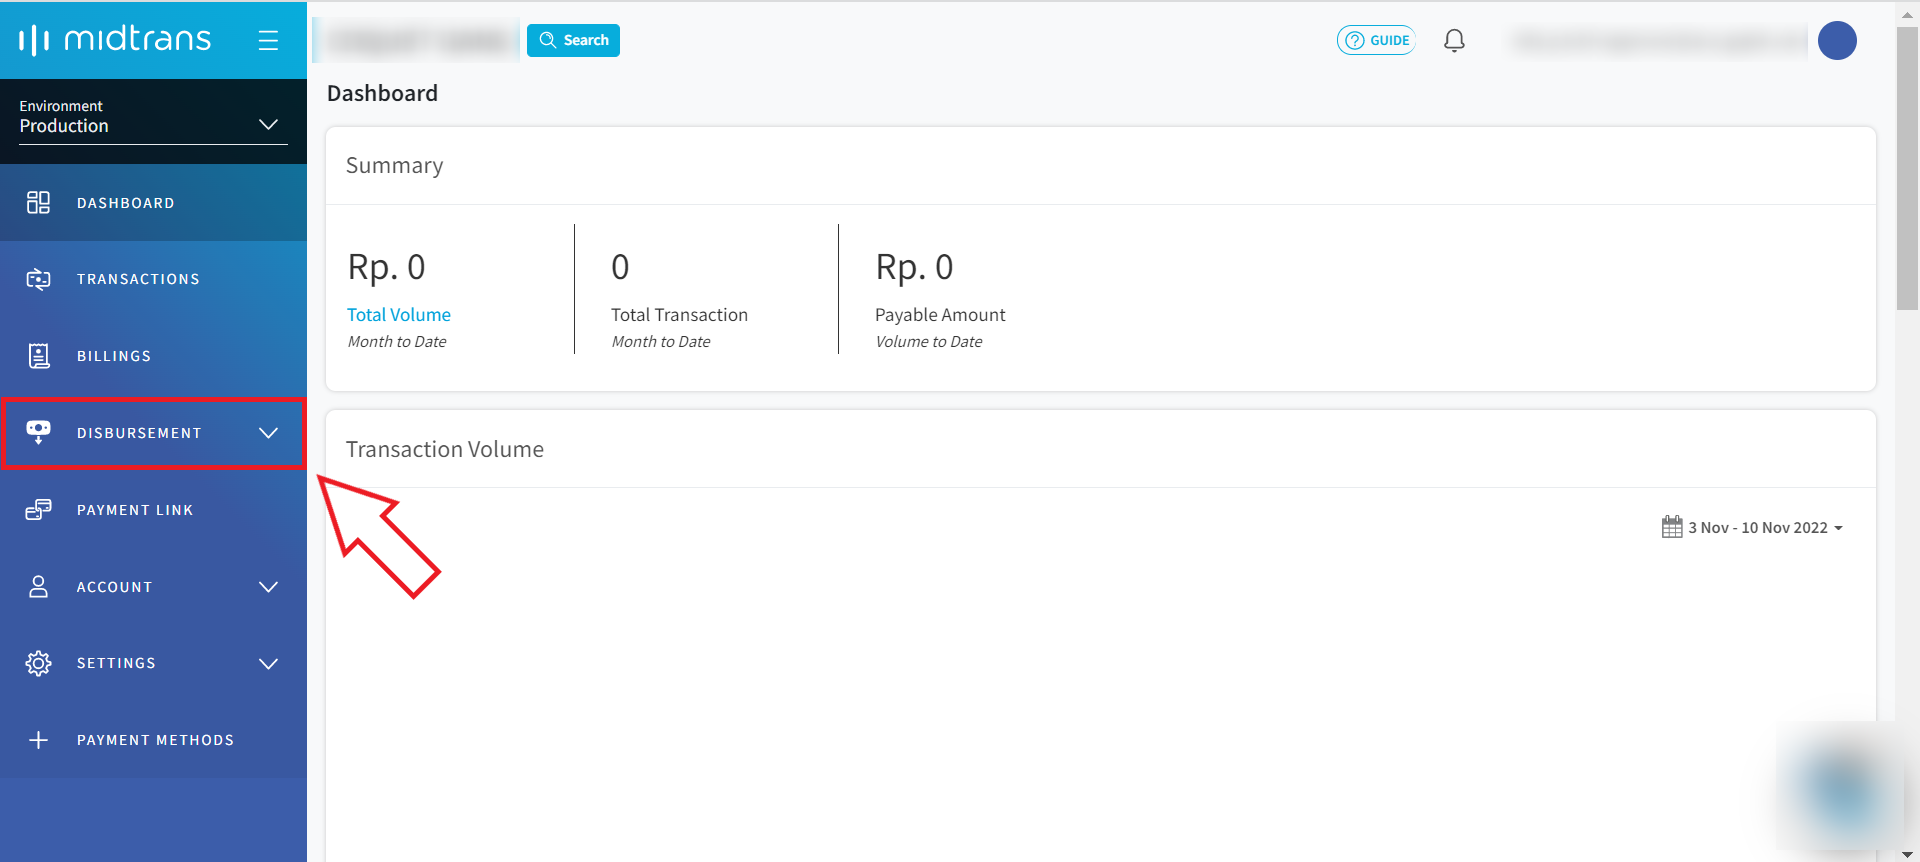
You can only see the Disbursement menu on the navigation bar (left side of the dashboard) when your user role is Creator, Approver, or Admin.
Content List
- How to create Disbursement (user role Creator)?
- How to approve or reject Disbursement requests (user role Approver)?
- How to find the Disbursement statement and export the data?
- How to find my Disbursement request and export the data?
- How do I save my beneficiary/receiver list?
- How to create a new user into your Merchant Account (user role Admin)?
- How to verify the receiver's bank account?
- How do I add balance to the Disbursement account, as the source of funds for disbursement?
- How to find your access keys?
- How to configure Two-factor Authentication (2FA)?
- How to change my notification URL?
- How to change my balance threshold?
- How to request a Sandbox account for Disbursement?
How to create Disbursement (user role Creator)?
You can only access this feature if your user role is Creator.
-
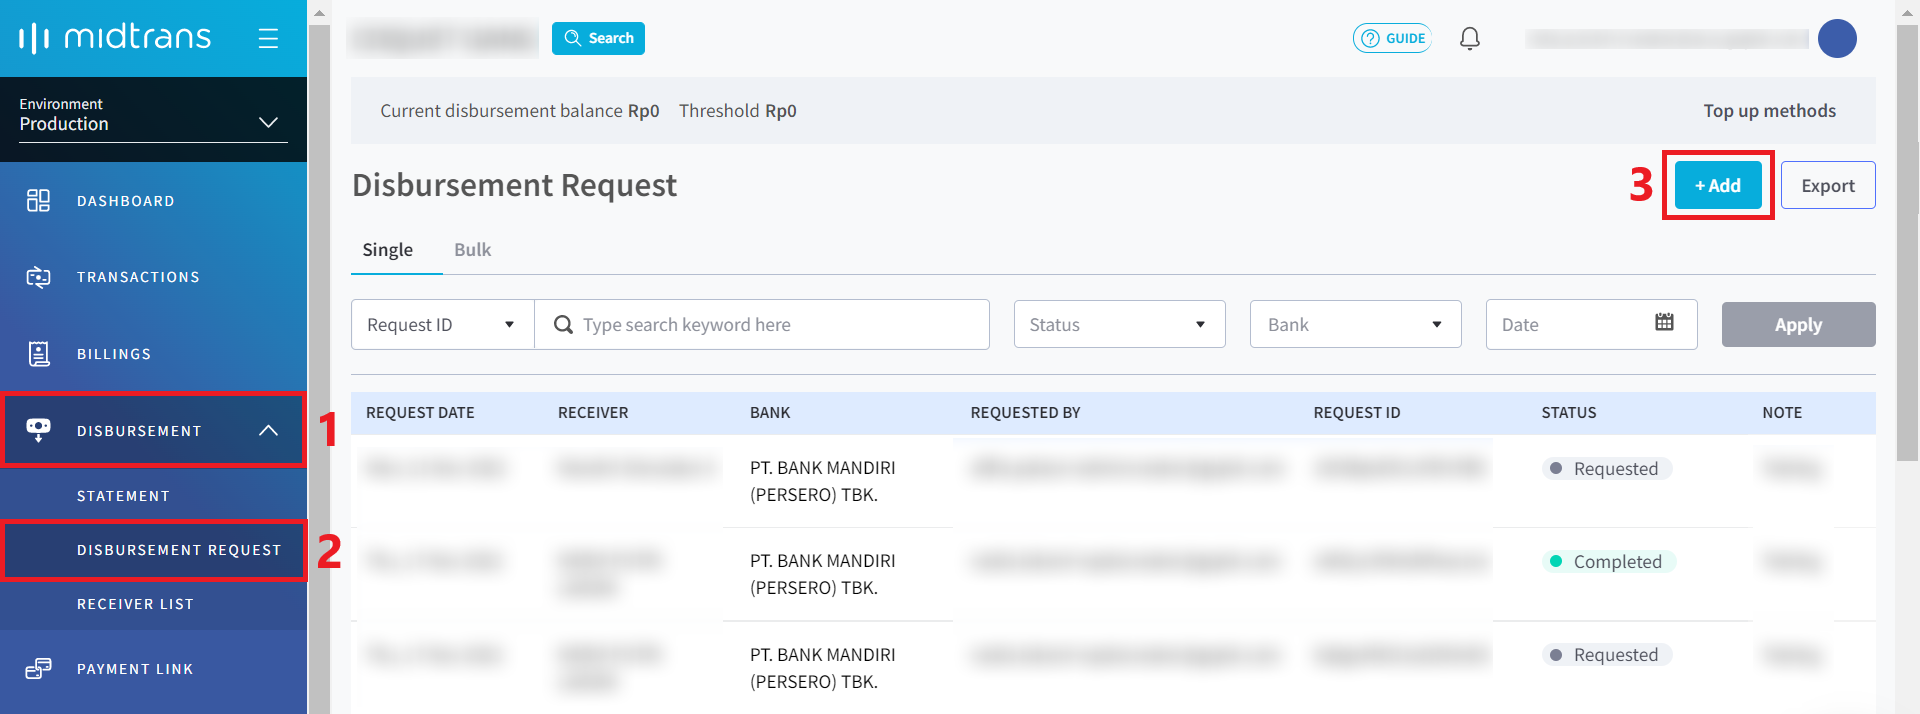
Click on the Disbursement menu on the navigation bar.
-
Click Disbursement Request.
-
Click +Add button on the right side of the dashboard.
-
You can add one by one on the Single tab or bulk by uploading a CSV file on the Bulk tab.
Single Bulk 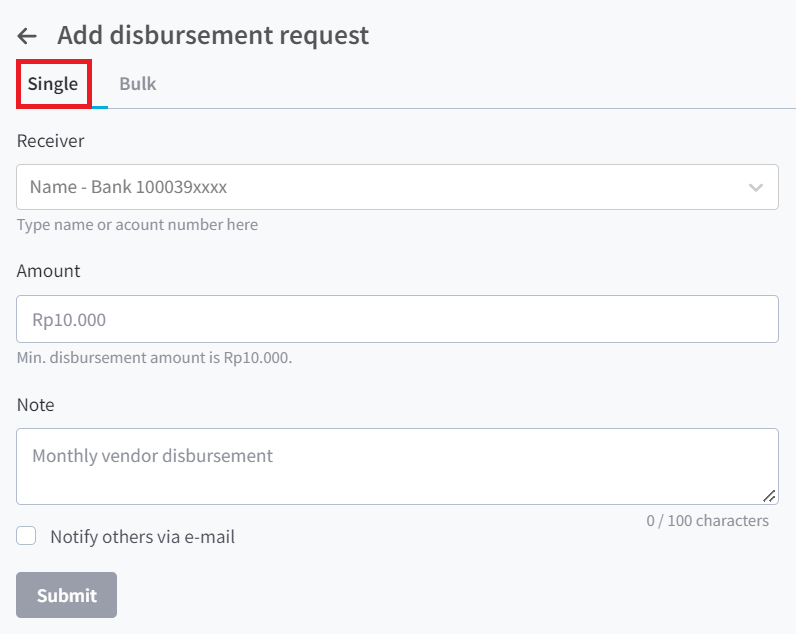
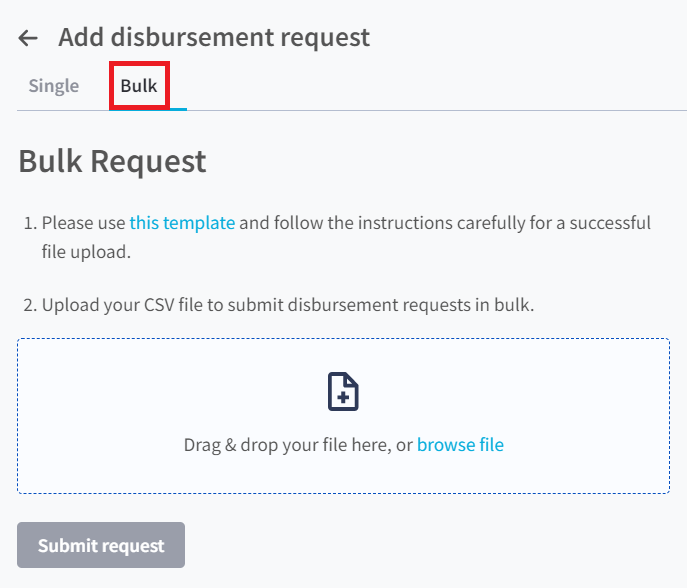
Note 📝If you choose bulk, please download the template provided on the Bulk tab, follow the instructions and upload the csv file.
How to approve or reject Disbursement requests (user role Approver)?
You can only access this feature if your user role is Approver.
For Single Disbursement, follow these steps:
-
Click on the Disbursement menu on the navigation bar.

-
Click Waiting for Approval.
-
Click Single Disbursement.
-
Check the details.
-
Click on the BLUE BUTTON to Approve and the RED BUTTON to Reject the Disbursement request.
For Bulk Disbursement, follow these steps:
- Click on the Disbursement menu on the navigation bar.
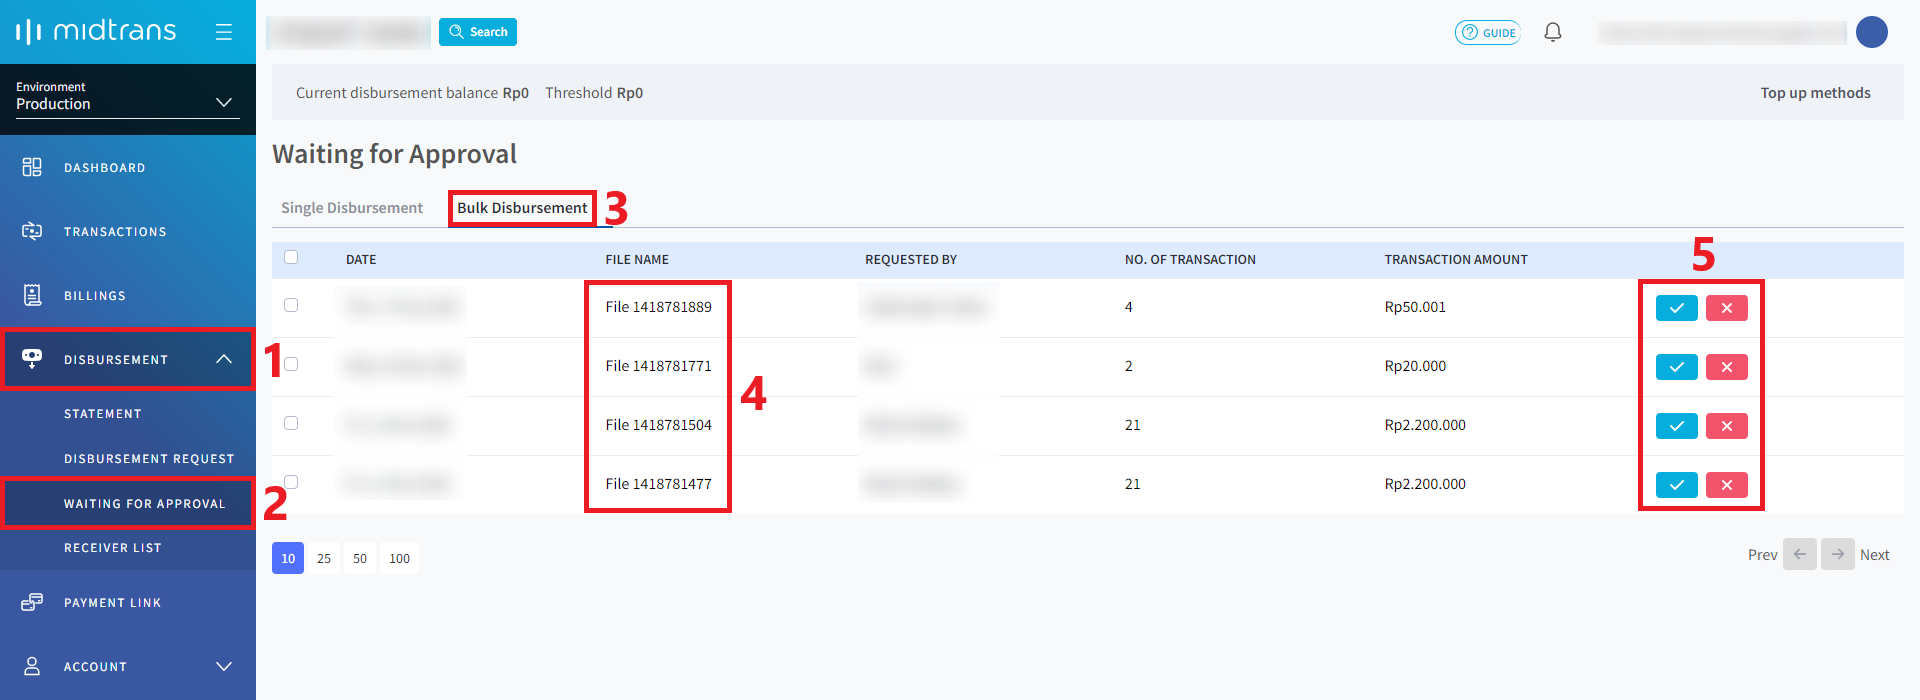
- Click Waiting for Approval.
- Click Bulk Disbursement.
- Click on the File Name to check the details.
- Click on the BLUE BUTTON to Approve and the RED BUTTON to Reject the Disbursement request.
How to find the Disbursement statement and export the data?
Disbursement statement menu serves the same function as "Top Up History" in the old IRIS dashboard; the only difference is that the name has changed. You can use it to see your Top Up History or download it as a report.
-
Click on the Disbursement menu on the navigation bar.
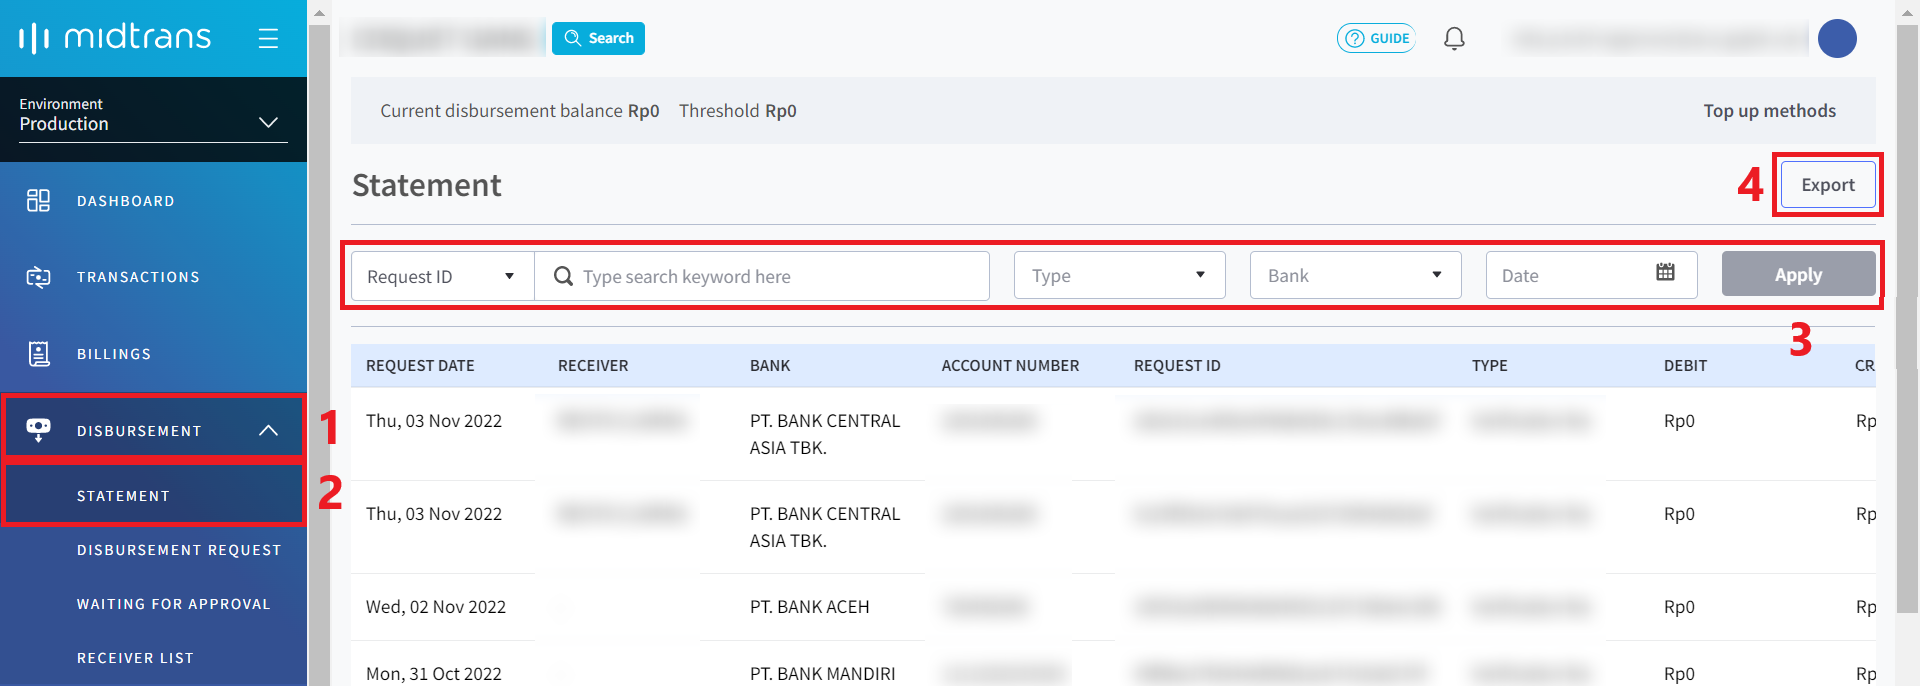
-
Click Statement.
-
If you need a specific report, you can apply any filter/search you need, then click Apply.
-
Click on the Export button on the right side of the dashboard.
-
Choose the dates. You can only export within 30 days range, with the maximum period up to the last 6 months

-
Click Send to e-mail. The exported data as CSV file will be sent to your registered e-mail.
How to find my Disbursement request and export the data?
-
Click on the Disbursement menu on the navigation bar.
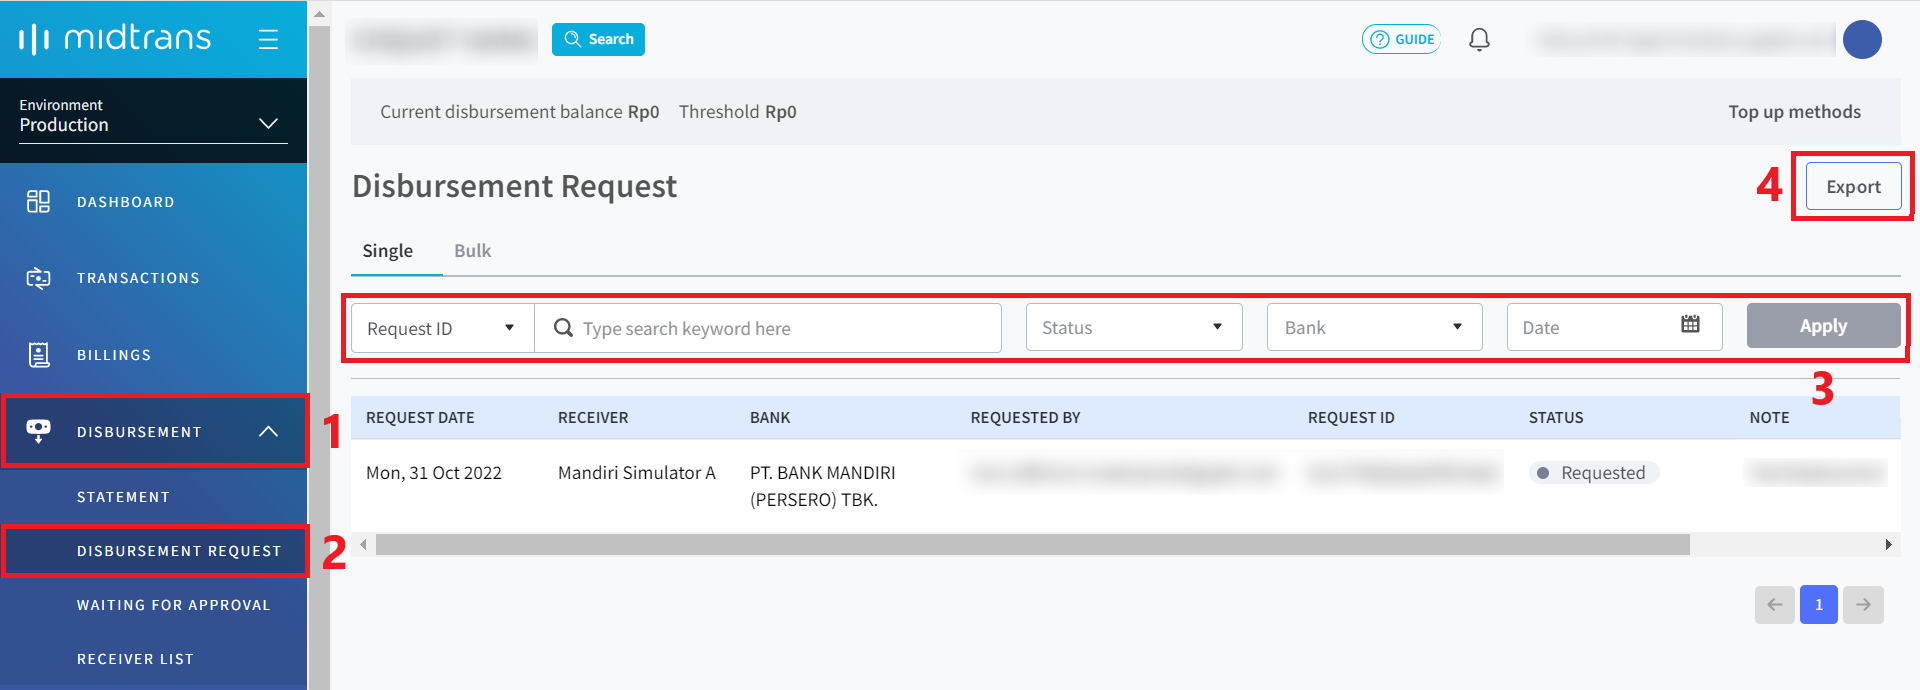
-
Click Disbursement Request.
-
If you need a specific report, you can apply any filter/search you need, then click Apply.
-
Click on the Export button on the right side of the dashboard.
-
Choose the dates. You can only export within 30 days range, with the maximum period up to the last 6 months.
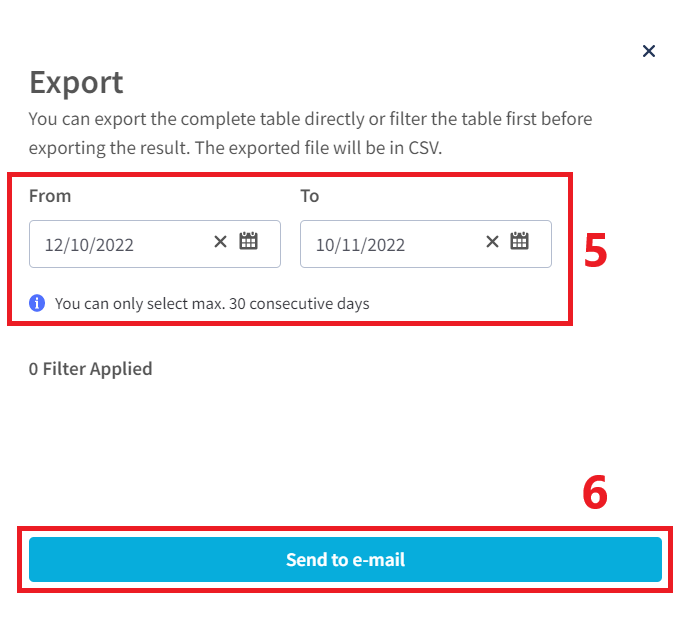
-
Click Send to e-mail. The exported data as CSV file will be sent to your registered e-mail.
How to check Disbursement Status?
To check disbursement status, please follow these steps:
- Click on the Disbursement menu on the navigation bar.
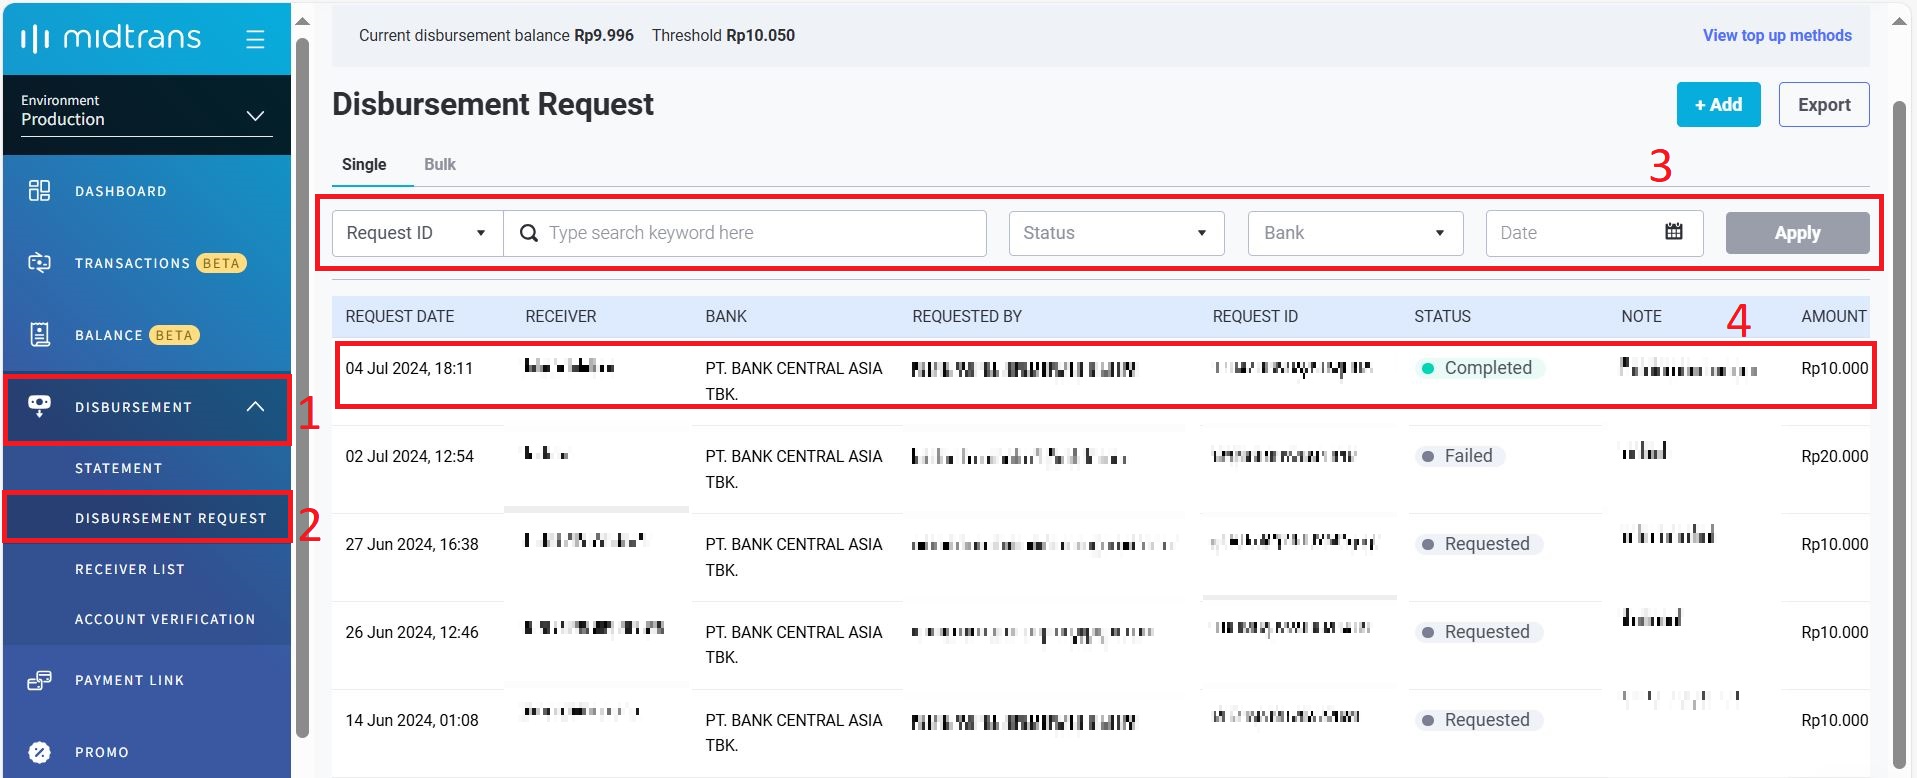
- Click Disbursement Request.
- You can use any search filter as as you need, like specific Status, Request ID, Bank, or creation Date. Click Apply to initiate the search.
- To view the disbursement details, click on one row of the displayed data in the table.
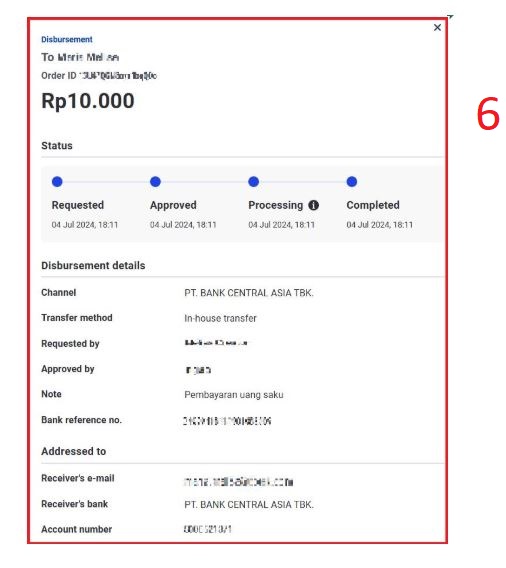
- Then, the disbursement details will be displayed.
- You can see the Order ID and the amount nominal.
- In the Disbursement details part, you can see the disbursement details including: the Channel, the transfer method, Requested by (the disbursement requester), Approved by (the approver), the note, and the Bank reference no.
- In the Addressed to part, you can see the Receiver's email, the Receiver's bank, and the Account number.
- The Status of the disbursement can be seen above the disbursement detail part.
As alternative to the Disbursement menu on the navigation bar, you can also check the disbursement status through Transactions menu. The steps of checking the disbursement status through Transactions menu:
- Click on Transactions menu on the navigation bar.
- Apply Filter.
- For Transaction type, choose Disbursement.
- Choose the Status you need.
- Click on Add filter. After that, you can see the disbursement transaction.
- To view the disbursement details, click on one row, for example click on the Order ID. The disbursement details will be displayed.

You can also search the specific Order ID on Transactions menu. The steps of checking the disbursement status by searching the specific Order ID on Transactions menu:
- Click on Transactions menu on the navigation bar.
- Find the order ID you need.
- Click Apply.
Status of Disbursement on Dashboard
Below is the clarification on the statuses displayed in the Dashboard and their description:
| Status Name | Description |
|---|---|
| Requested | The disbursement transaction has been created but is awaiting review and approval. This is the initial stage where the disbursement request is logged in the system but has not yet been acted upon by an approver. |
| Rejected | This disbursement status indicates that the disbursement request was reviewed and denied. |
| Approved | This disbursement status shows that the disbursement has been reviewed and approved but is not yet in processing. |
| Processing | This disbursement status indicates that the disbursement is currently being executed (e.g., in transfer to the bank or under other system processing) |
| Completed | This disbursement status signifies that the disbursement has been successfully processed and the funds have been transferred. |
| Failed | This disbursement status indicates that the disbursement attempt was unsuccessful due to an error, such as insufficient balance, incorrect bank details, or technical issues. |
The User Role of Customer Service (CS) for Disbursement Transactions
Customer Service (CS) should be able to view disbursement transactions on the Transaction Page without requiring the Approver or Creator roles.
How do I save my beneficiary/receiver list?
-
Click on the Disbursement menu on the navigation bar.
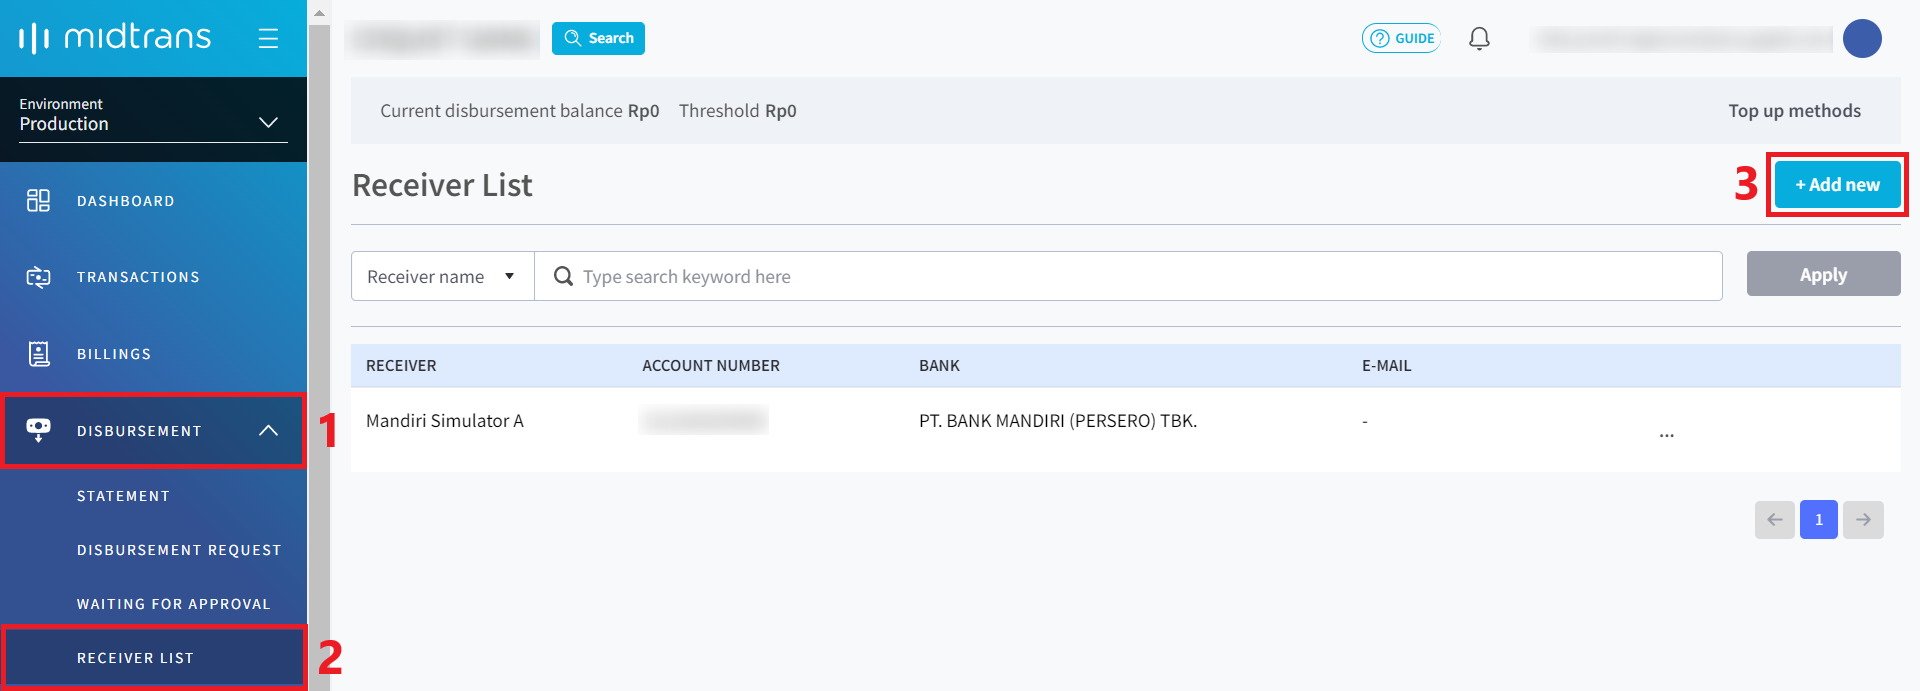
-
Click Receiver List.
-
Click +Add new button on the right side of the dashboard.
-
You can add one by one on the Single tab or bulk by uploading a CSV file on the Bulk tab.
Single Bulk 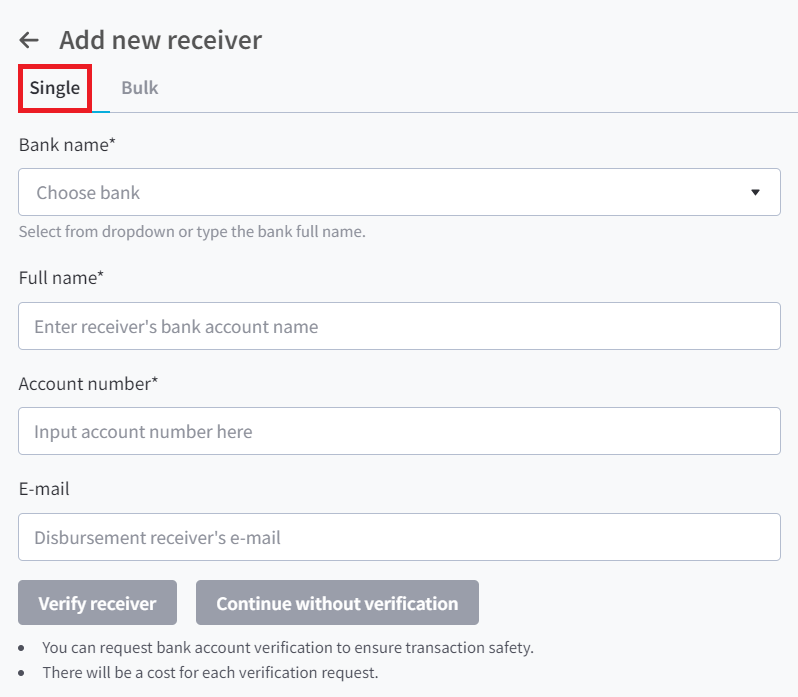
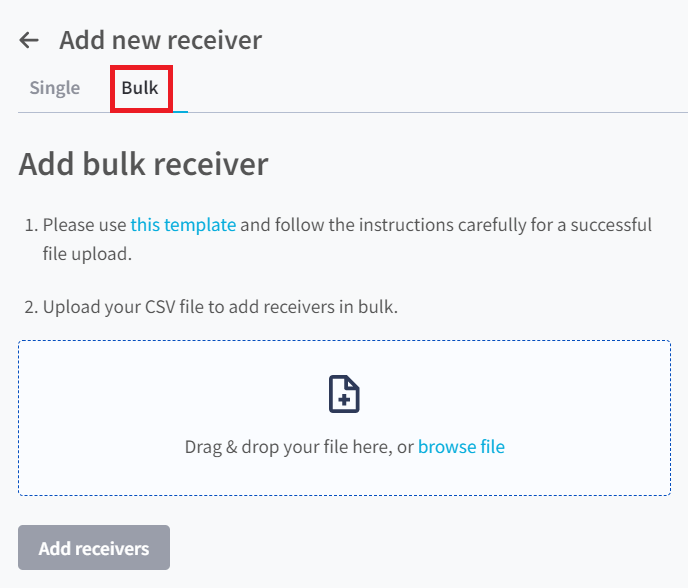
Note 📝If you choose bulk, please download the template provided on the Bulk tab, follow the instructions and upload the CSV file.
How to create a new user into your Merchant Account (user role Admin)?
You can only access and create an account if your user role is Admin.
-
Click on the Account menu on the navigation bar.
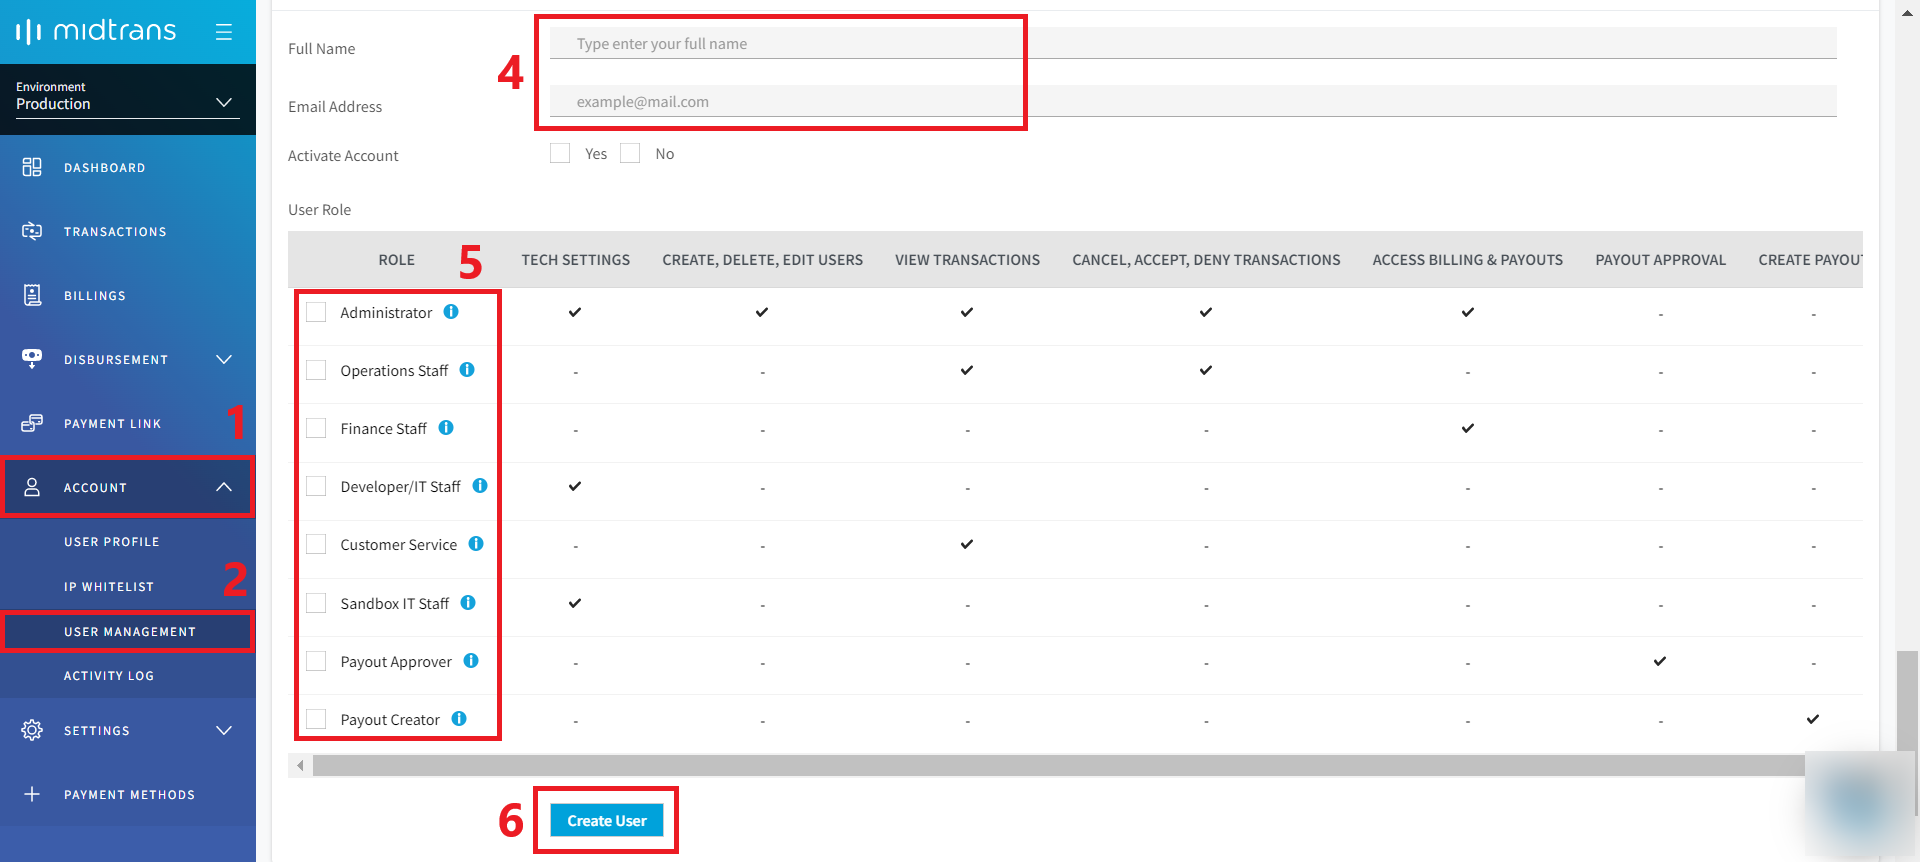
-
Click User Management.
-
Find Create New User just below User List
-
Fill out the name and email.
-
Choose their user role on the checkbox.
-
Click Create User and then they will get an email to activate their account.
Note 📝You can select multiple roles but you can’t select payout approver and payout creator at the same time.
How to verify the receiver's bank account?
-
Click on the Disbursement menu on the navigation bar.

-
Click Receiver List.
-
Click +Add new button on the right side of the dashboard.
-
Fill out the details of the receiver.
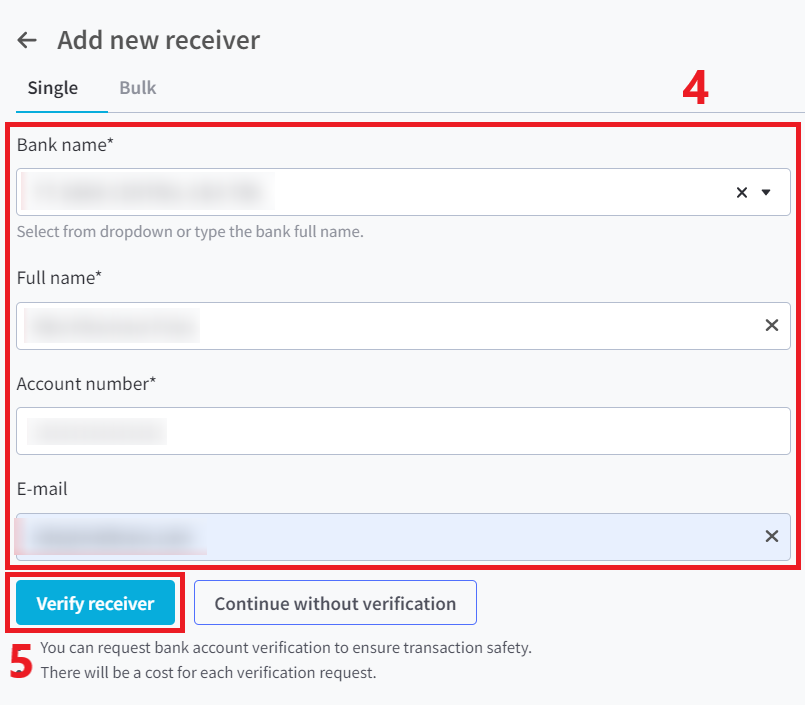
-
Click Verify receiver.
How do I add balance to the Disbursement account, as the source of funds for disbursement?
-
Click on the Disbursement menu on the navigation bar.
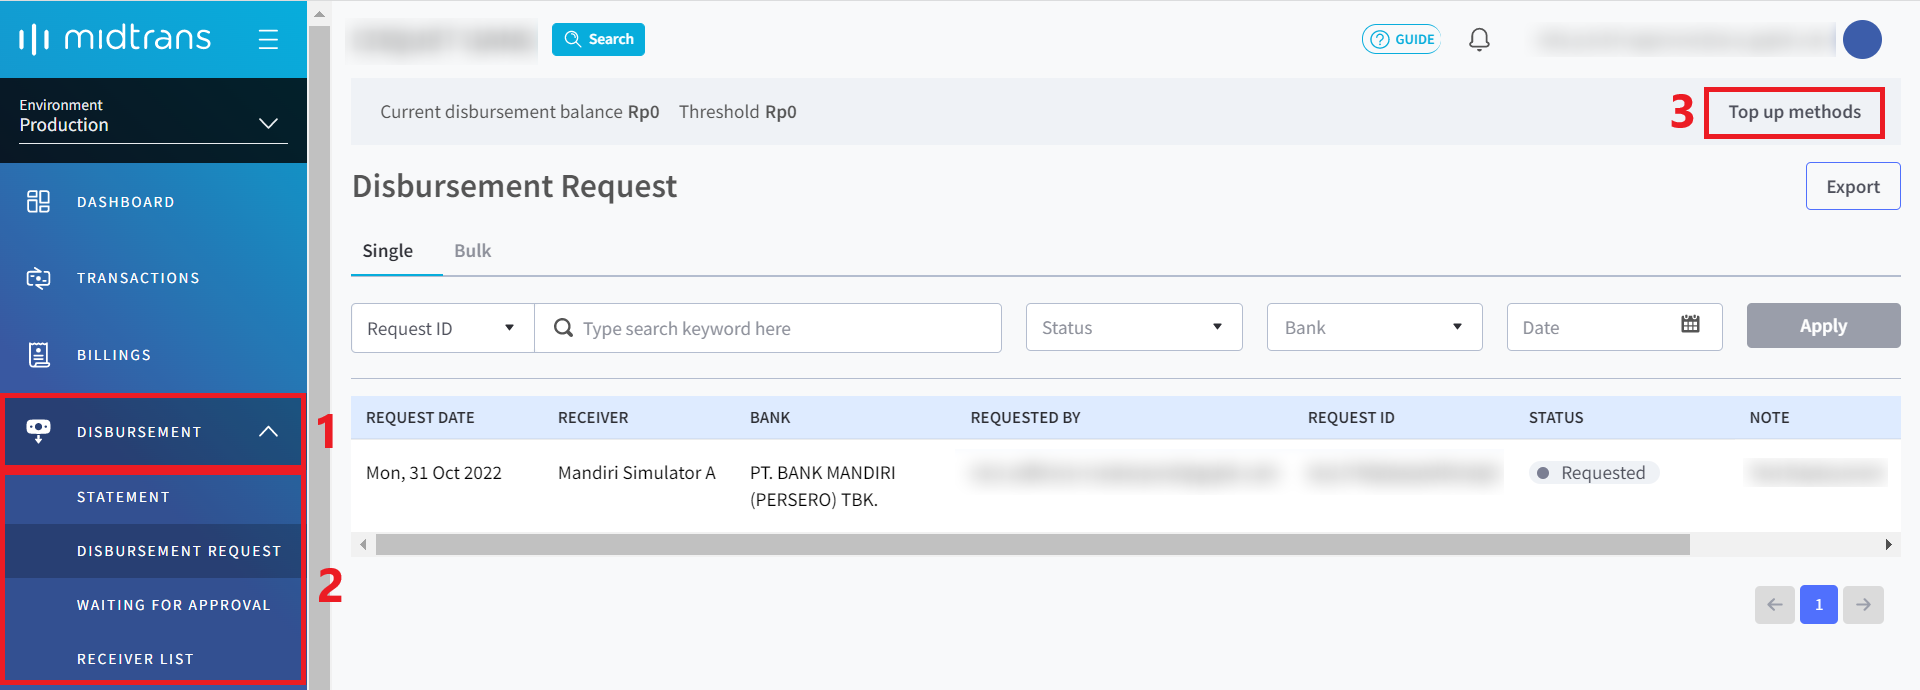
-
You can select any, either Statement, Disbursement Request, or Receiver List.
-
Click Top up methods button on the right side of the dashboard.
How to find your access keys?
-
Click on the Settings menu on the navigation bar.
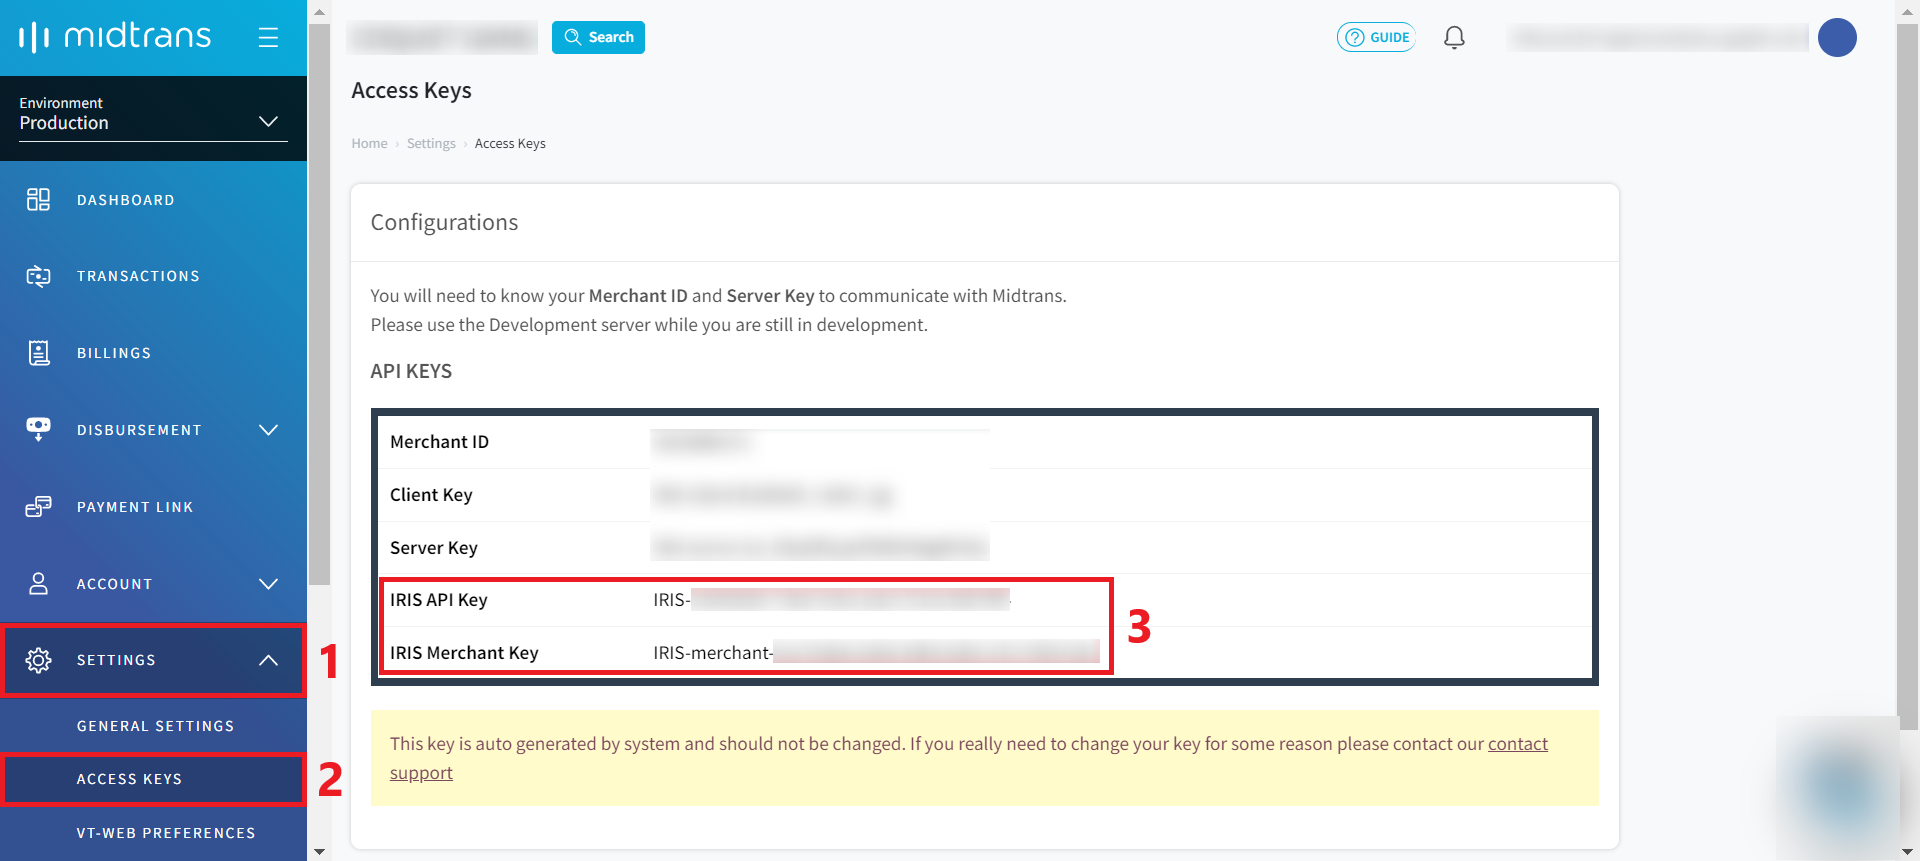
-
Click Access Keys.
-
You can find your IRIS API Key and IRIS Merchant Key inside the box.
Note 📝Access Key is unique and would differ between Production and Sandbox environments, as well as between Approval and Creator roles.
Please make sure to check what environment you need as well as your user role.
Important ❗IRIS API Key and IRIS Merchant Key will be shown only if you are logged in using Approver or Creator roles.
How to configure Two-factor Authentication (2FA)?
-
Click on the Account menu on the navigation bar.
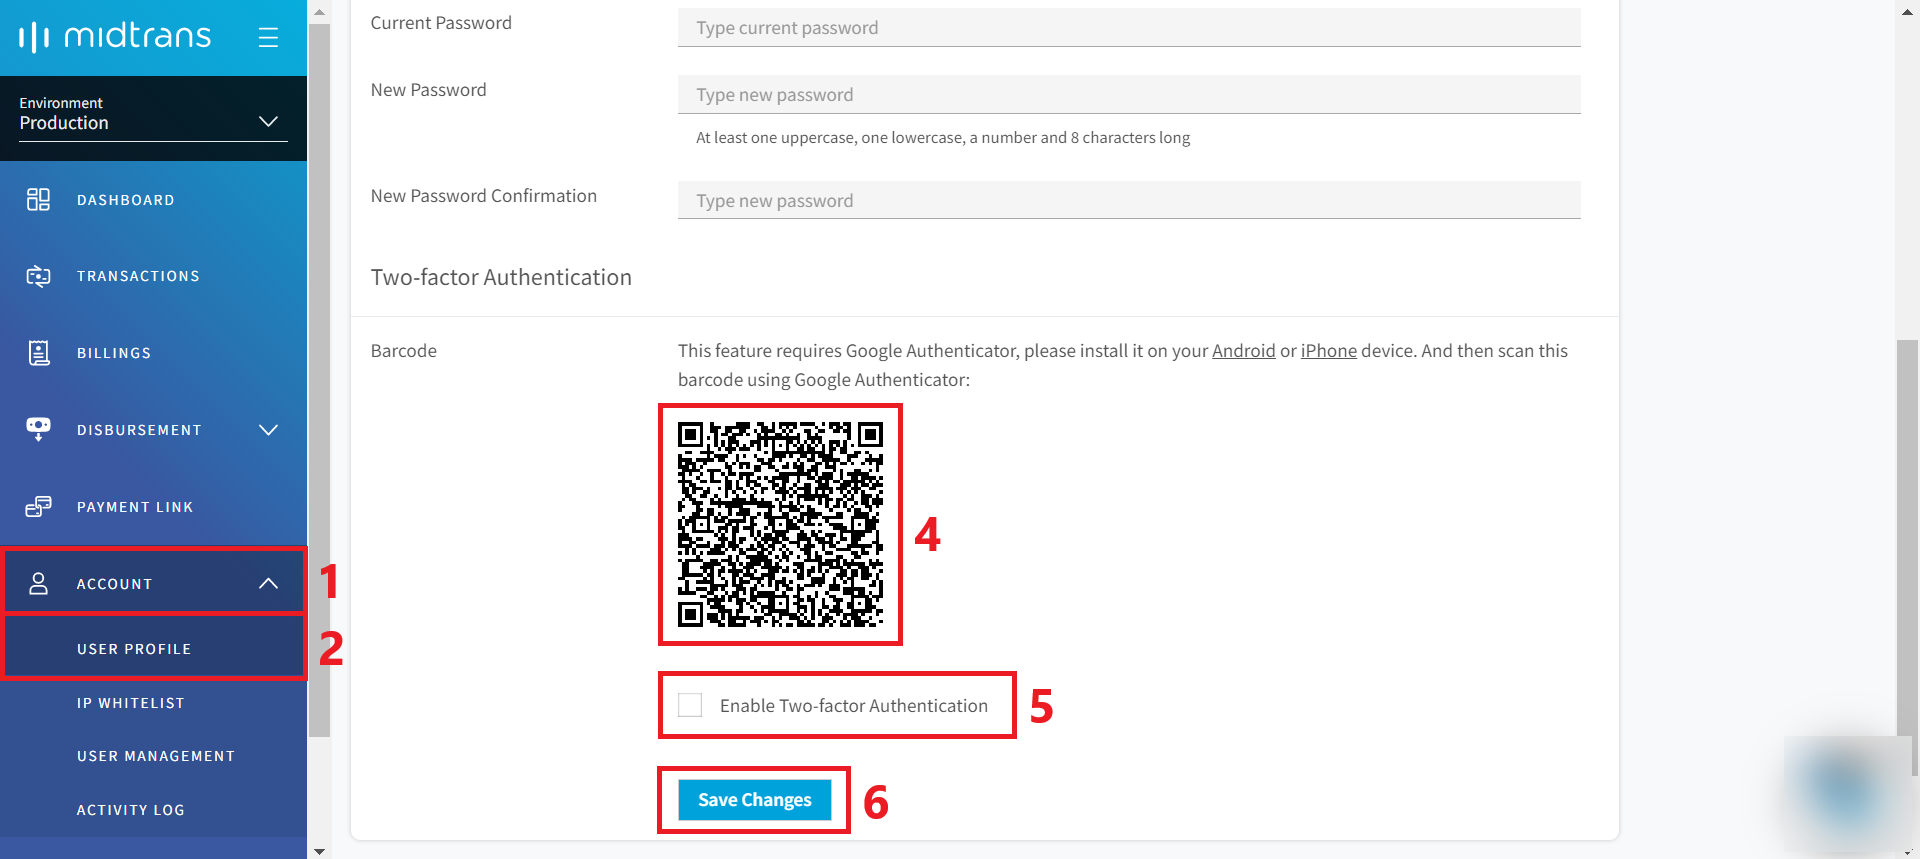
-
Click User Profile.
-
Find Two-factor Authentication just below Set Password.
-
Open your Google Authenticator and follow these steps:
- Click + button on the bottom right of your screen.
- Choose Scan a QR code.
- Scan the QR code from your screen.
- Click Enable Two-factor Authentication on the checkbox.
- Click Save Changes.
Important ❗In order for Authenticator to function properly, the device's date and time settings must be properly synced to the current real-time date and time. Because the Authenticator app relies on the time of the device to generate a proper OTP. It will not work if the device time is incorrectly configured. Try syncing the device time via the settings menu of the device.
Once an OTP is generated, it is only active for a short period of time, usually less than 60 seconds. So make sure the OTP is used in real-time before it expires. Do not wait too long to use it and the OTP only can be used for login Merchant Administration Portal only not for Disbursement activity.
How to change my notification URL?
Environment Production:
In the meantime, you can contact our support team ↗.
Environment Sandbox:
-
Login ↗ to IRIS Portal Sandbox.
-
Click Settings menu.
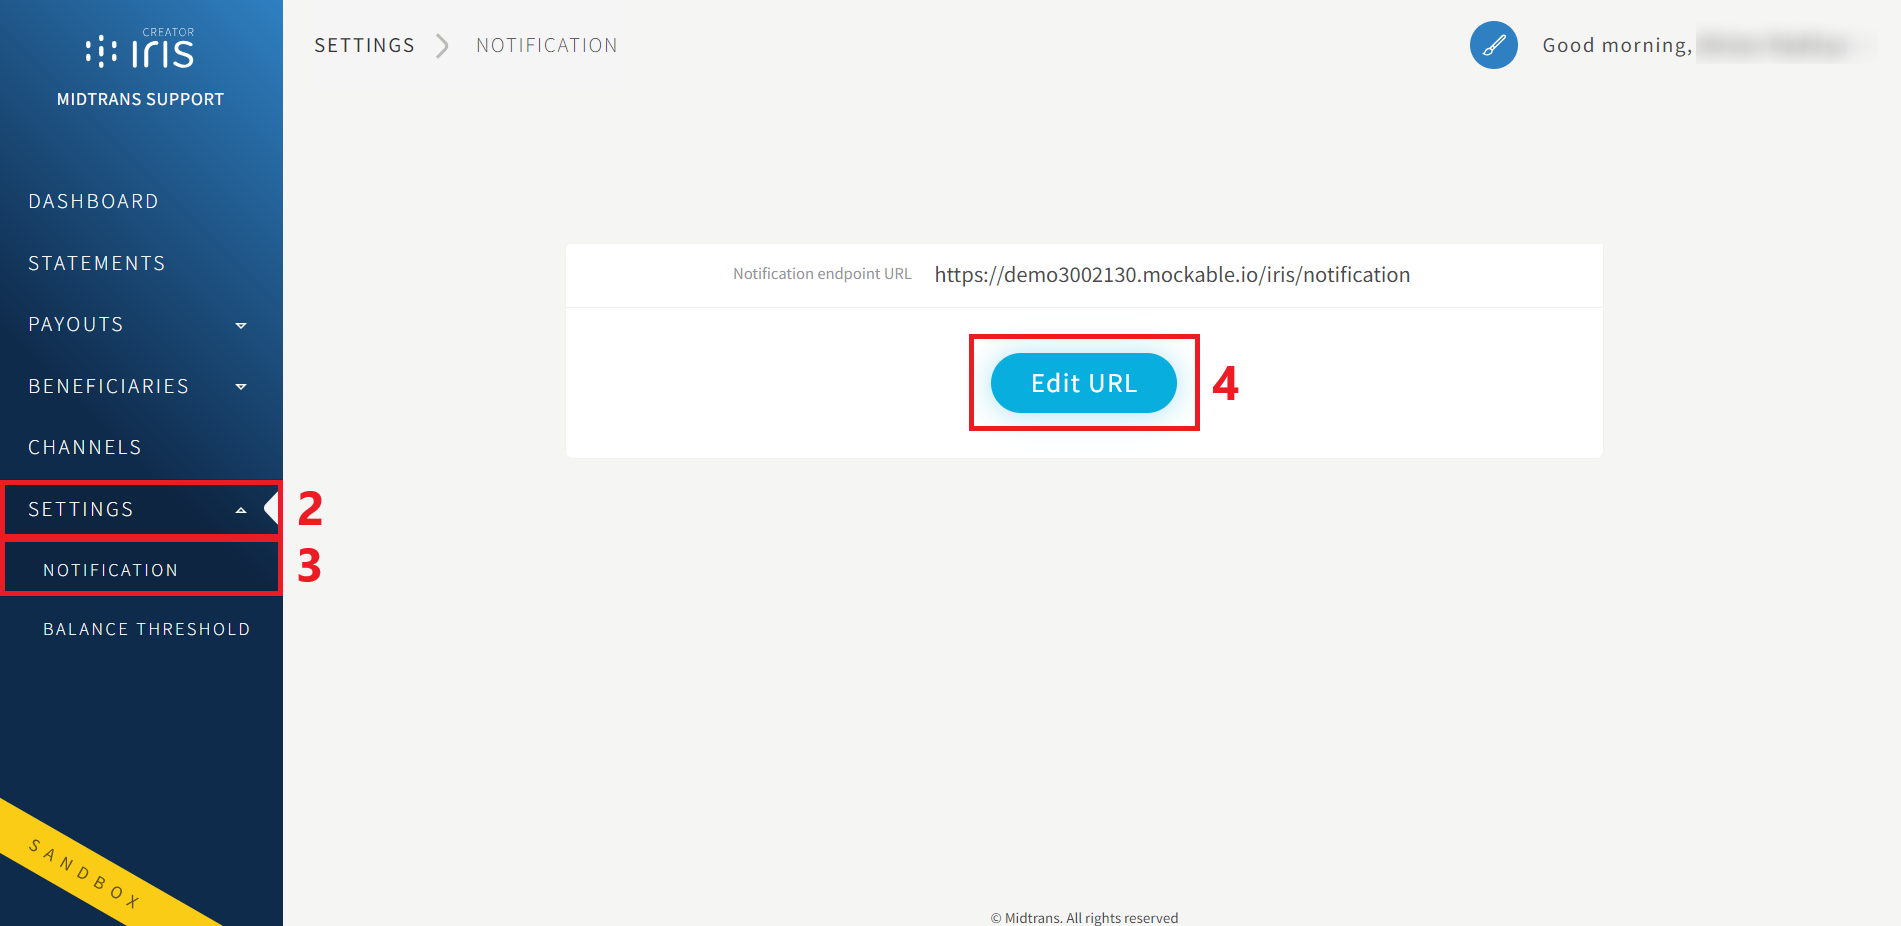
-
Click Notification.
-
Click Edit URL.
-
Edit Notification Endpoint URL.
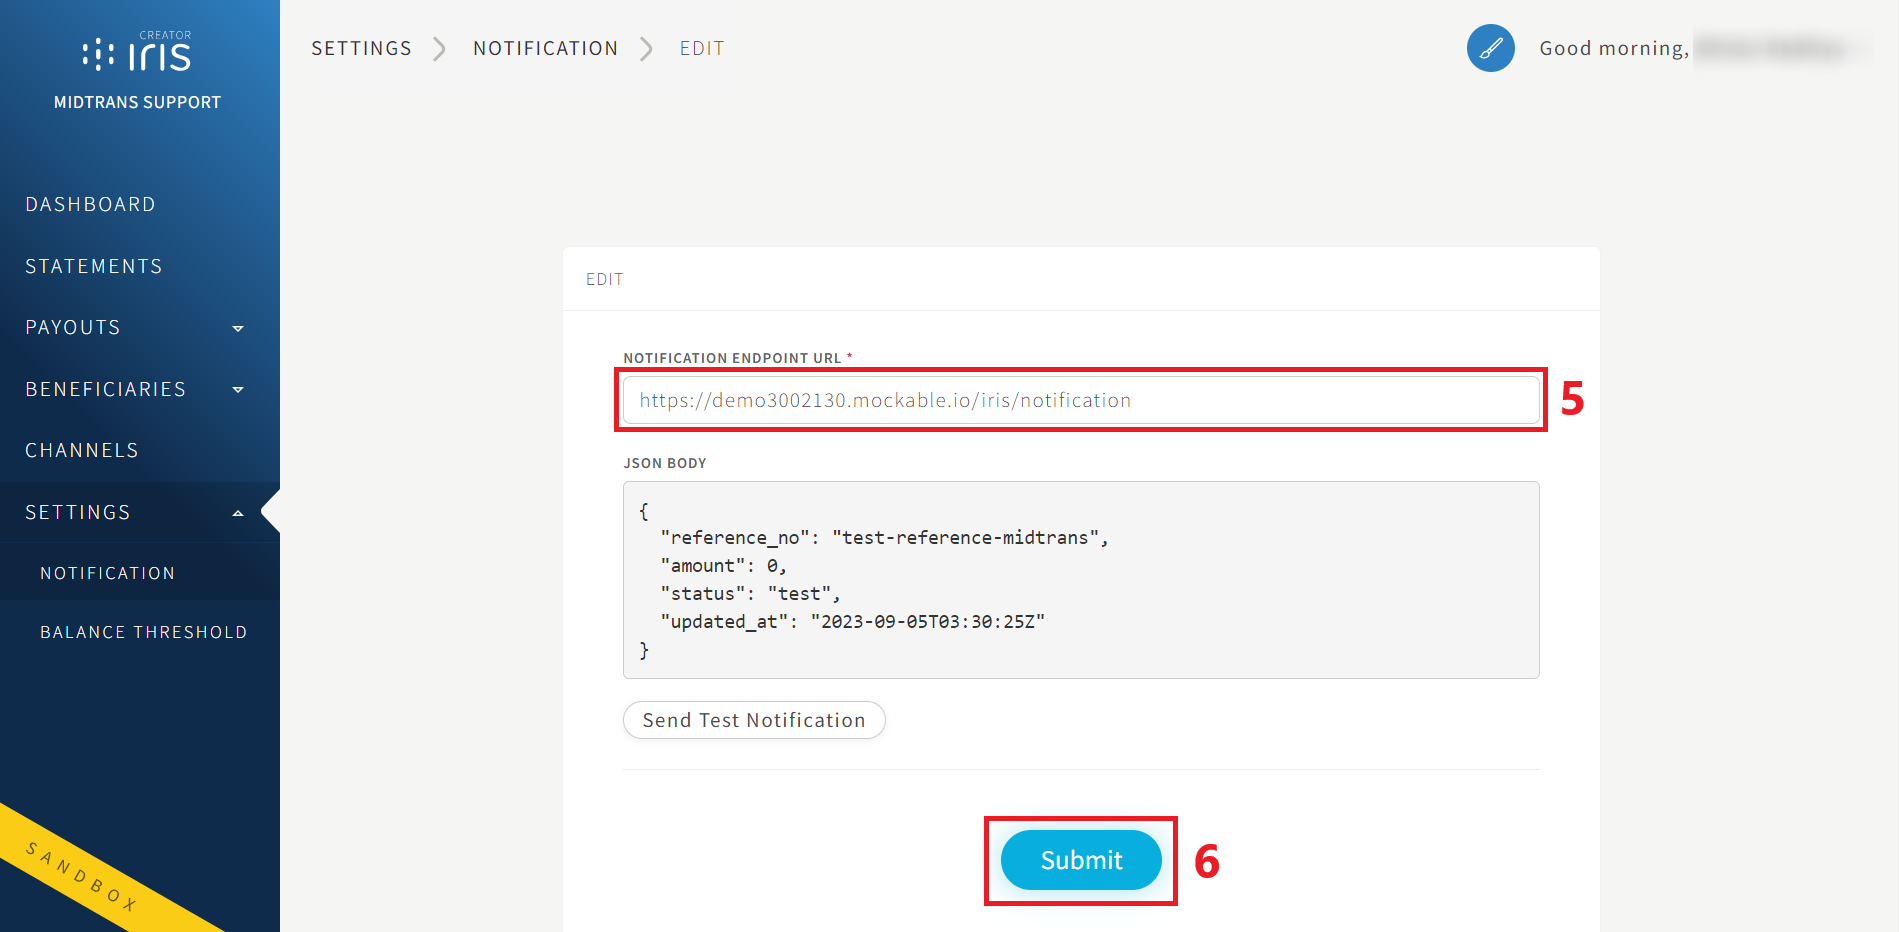
-
Click Submit.
How to change my balance threshold?
In the meantime, you can contact our support team ↗.
How to request a Sandbox account for Disbursement?
Please click on this link ↗.
Updated 9 months ago