Integration: E-Wallet
Core API E-Wallet Integration
NoteThis payment method is compatible with QR Code Indonesian Standard (QRIS), and can be paid with any QRIS compatible e-Wallet or banking app.
GoPay is an E-Wallet . Users can pay using the Gojek app, GoPay app or any QRIS compatible app. The user flow is different for web browser (on a computer or a tablet) and mobile phone:
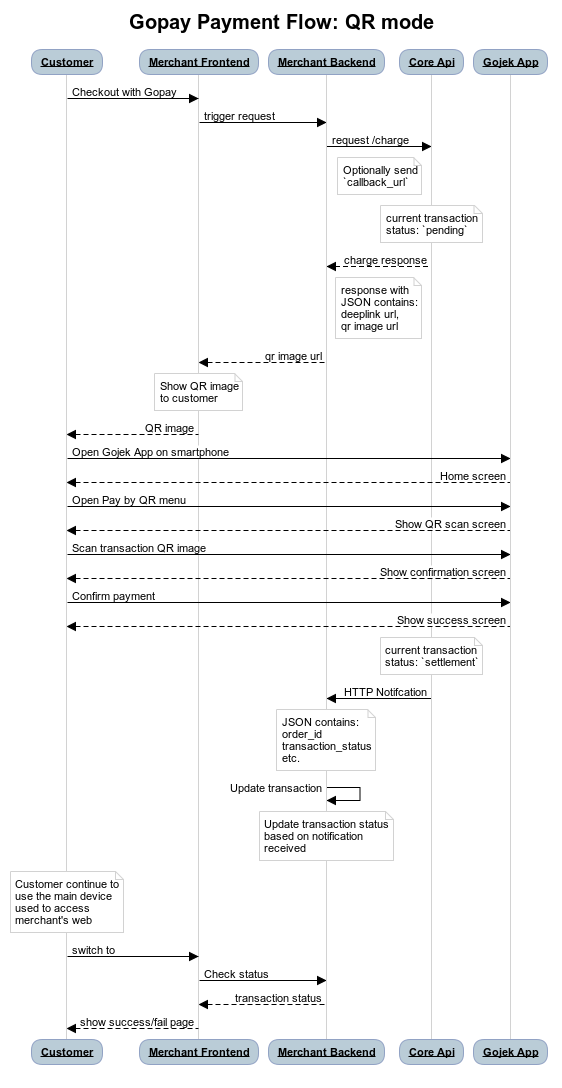
- QR Code - This is the user flow on a web browser (on a computer or a tablet). User is shown a QR code and asked to scan using any QRIS compatible app, such as Gojek app or GoPay app. (Sequence Diagram for QR Code)
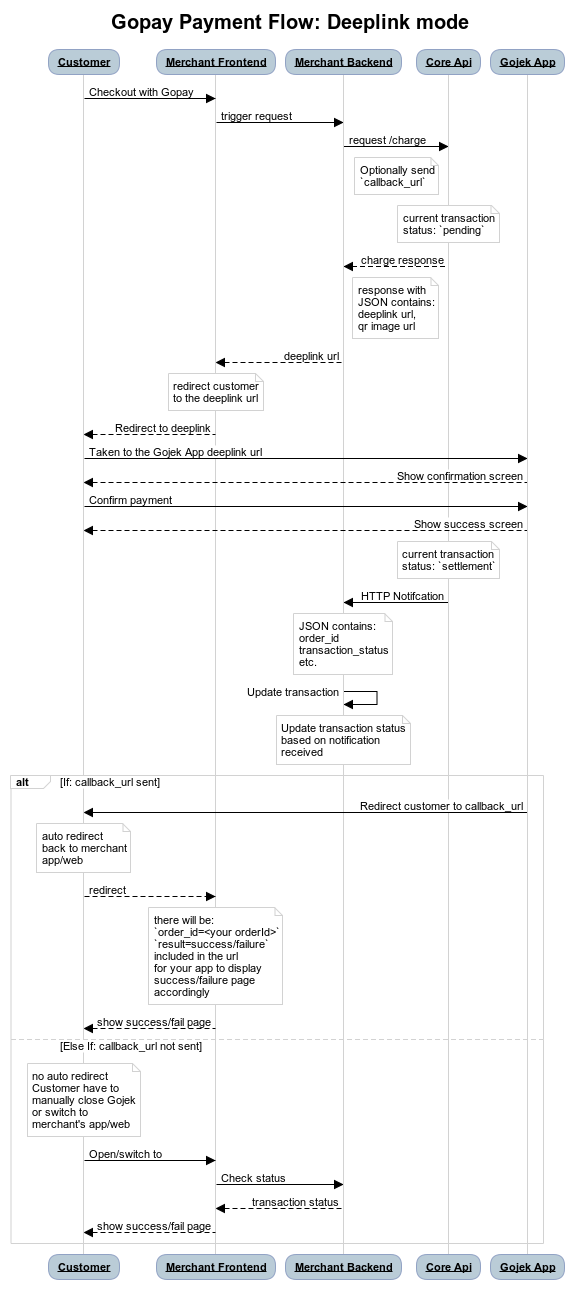
- Deeplink - This is the user flow on a mobile device. User gets redirected to the Gojek app or GoPay app to finish payment. (Sequence Diagram Deeplink). For more details related to redirection to Gojek and GoPay app, please read this article.
NotePlease make sure to create your Midtrans account, before proceeding with this section.
Sequence Diagram
The overall GoPay end-to-end payment process can be illustrated in following sequence diagram.
QR Code Mode (Default)
Deeplink Mode
Sandbox Environment
The steps given below use Midtrans Sandbox environment to test the integration process. Please make sure that you use the Server Key and Client Key for the Sandbox environment. For more details, refer to Retrieving API Access Keys.
Steps for Integration
To integrate with E-Wallet Payment method, follow the steps given below.
1. Sending transaction data to API Charge
| Requirement | Description |
|---|---|
| Server Key | The server key. For more details, refer to Retrieving API Access Keys. |
order_id | The order_id of the transaction. |
gross_amount | The total amount of transaction. |
payment_type | The payment method. Note: Here, set to gopay |
The sample Charge API request implementation is given below. You can choose/implement according to your backend language. For more details, refer to available Language Libraries.\
Request Details
| Environment | Method | URL |
|---|---|---|
| Sandbox | POST | https://api.sandbox.midtrans.com/v2/charge |
| Production | POST | https://api.midtrans.com/v2/charge |
HTTP Headers
Accept: application/json
Content-Type: application/json
Authorization: Basic AUTH_STRINGAUTH_STRING: Base64Encode("YourServerKey"+":")
Midtrans API validates HTTP request by using Basic Authentication method. The username is your Server Key while the password is empty. The authorization header value is represented by AUTH_STRING. AUTH_STRING is base-64 encoded string of your username and password separated by colon symbol (:). For more details, refer to API Authorization and Headers.
Sample Request
curl -X POST \
  https://api.sandbox.midtrans.com/v2/charge \
  -H 'Accept: application/json'\
  -H 'Authorization: Basic <YOUR SERVER KEY ENCODED in Base64>' \
  -H 'Content-Type: application/json' \
  -d '{
    "payment_type": "gopay",
    "transaction_details": {
        "order_id": "order-101",
        "gross_amount": 44000
    }
}'
/*Install midtrans-php (https://github.com/Midtrans/midtrans-php) library.
composer require midtrans/midtrans-php
Alternatively, if you are not using **Composer**, you can download Midtrans PHP library(https://github.com/Midtrans/midtrans-php/archive/master.zip), and then require the file manually.
require_once dirname(__FILE__) . '/pathofproject/Midtrans.php';`*/
//SAMPLE REQUEST START HERE
// Set your Merchant Server Key
\Midtrans\Config::$serverKey = 'YOUR_SERVER_KEY';
$params = array(
'transaction_details' => array(
'order_id' => rand(),
'gross_amount' => 10000,
),
'payment_type' => 'gopay',
'gopay' => array(
'enable_callback' => true, // optional
'callback_url' => 'someapps://callback' // optional
)
);
$response = \Midtrans\CoreApi::charge($params);/*Install midtrans-client (https://github.com/Midtrans/midtrans-nodejs-client) NPM package.
npm install --save midtrans-client*/
//SAMPLE REQUEST START HERE
const midtransClient = require('midtrans-client');
// Create Core API instance
let core = new midtransClient.CoreApi({
isProduction : false,
serverKey : 'YOUR_SERVER_KEY',
clientKey : 'YOUR_CLIENT_KEY'
});
let parameter = {
"payment_type": "gopay",
"transaction_details": {
"gross_amount": 12145,
"order_id": "test-transaction-54321",
},
"gopay": {
"enable_callback": true, // optional
"callback_url": "someapps://callback" // optional
}
};
// charge transaction
core.charge(parameter)
.then((chargeResponse)=>{
console.log('chargeResponse:');
console.log(chargeResponse);
});/*Install midtrans-java (https://github.com/Midtrans/midtrans-java) library.
If you are using Maven as the build tool for your project, please add the following dependency to your project's build definition (pom.xml).
<dependencies>
<dependency>
<groupId>com.midtrans</groupId>
<artifactId>java-library</artifactId>
<version>3.0.0</version>
</dependency>
</dependencies>
(If you are using Gradle as the build tool for your project, please add following dependency to your project's build definition (build.gradle).
dependencies {
implementation 'com.midtrans:java-library:3.0.0'
}
You can also check the [functional tests](https://github.com/Midtrans/midtrans-java/blob/master/library/src/test/java/com/midtrans/java/CoreApiTest.java) for more examples.*/
import com.midtrans.Midtrans;
import com.midtrans.httpclient.SnapApi;
import com.midtrans.httpclient.error.MidtransError;
import java.util.HashMap;
import java.util.Map;
import java.util.UUID;
import org.json.JSONObject;
public class MidtransExample {
public static void main(String[] args) throws MidtransError {
// Set serverKey to Midtrans global config
Midtrans.serverKey = "YOUR_SERVER_KEY";
// Set value to true if you want Production Environment (accept real transaction).
Midtrans.isProduction = false;
UUID idRand = UUID.randomUUID();
Map<String, Object> chargeParams = new HashMap<>();
Map<String, String> transactionDetails = new HashMap<>();
transactionDetails.put("order_id", idRand.toString());
transactionDetails.put("gross_amount", "265000");
chargeParams.put("transaction_details", transactionDetails);
chargeParams.put("payment_type", "gopay");
JSONObject result = CoreApi.chargeTransaction(chargeParams);
System.out.println(result);
}
}#Install [**midtransclient**](https://github.com/Midtrans/midtrans-python-client) PIP package.
#pip install midtransclient
#SAMPLE REQUEST START HERE
import midtransclient
# Create Core API instance
core_api = midtransclient.CoreApi(
is_production=False,
server_key='YOUR_SERVER_KEY',
client_key='YOUR_CLIENT_KEY'
)
# Build API parameter
param = {
"payment_type": "gopay",
"transaction_details": {
"gross_amount": 12145,
"order_id": "test-transaction-54321",
},
"gopay": {
"enable_callback": true, # optional
"callback_url": "someapps://callback" # optional
}
}
# charge transaction
charge_response = core_api.charge(param)Please check Midtrans available language libraries.
Post Body JSON Attribute Description
| Requirement | Description | Type | Required |
|---|---|---|---|
| transaction_details | Details of the transaction such as order_id and gross_amount. | - | Required |
| order_id | Transaction order ID, defined from your side. | String | Required |
| gross_amount | Total amount of transaction, defined from your side. | String | Required |
| payment_type | Set to gopay. | String | Required |
TipsYou can include more information such as
customer_details,item_details, and so on. It is recommended to send more details regarding the transaction, so that these details will be captured on the transaction record. Which can be viewed on the Midtrans Dashboard.
Learn more on why this API request should be securely managed from your backend.\
Sample Response
{
  "status_code": "201",
  "status_message": "GO-PAY transaction is created",
  "transaction_id": "231c79c5-e39e-4993-86da-cadcaee56c1d",
  "order_id": "order-101h-1570513296",
  "gross_amount": "44000.00",
  "currency": "IDR",
  "payment_type": "gopay",
  "transaction_time": "2019-10-08 12:41:36",
  "transaction_status": "pending",
  "fraud_status": "accept",
  "actions": [
      {
        "name": "generate-qr-code",
        "method": "GET",
        "url": "https://api.sandbox.veritrans.co.id/v2/gopay/231c79c5-e39e-4993-86da-cadcaee56c1d/qr-code"
      },
      {
        "name": "deeplink-redirect",
        "method": "GET",
        "url": "https://simulator.sandbox.midtrans.com/gopay/ui/checkout?referenceid=Y0xwjoQ9uy&callback_url=someapps%3A%2F%2Fcallback%3Forder_id%3Dorder-101h-1570513296"
      },
      {
        "name": "get-status",
        "method": "GET",
        "url": "https://api.sandbox.veritrans.co.id/v2/231c79c5-e39e-4993-86da-cadcaee56c1d/status"
      },
      {
        "name": "cancel",
        "method": "POST",
        "url": "https://api.sandbox.veritrans.co.id/v2/231c79c5-e39e-4993-86da-cadcaee56c1d/cancel"
      }
  ]
}
NoteYou will get the
actionsattribute to complete the transaction.
Response Body JSON Attribute Description
| Element | Description | Type | Notes |
|---|---|---|---|
| status_code | The status of the API call. | String | For more details, refer to Status Codes and Error. |
| status_message | The message describing the status of the transaction. | String | - |
| transaction_id | The Transaction ID of the specific transaction. | String | - |
| order_id | The specific Order ID. | String | - |
| gross_amount | The total amount of transaction for the specific order. | String | - |
| currency | The unit of currency used for the transaction. | String | - |
| payment_type | The type of payment method used by the customer for the transaction. | String | - |
| transaction_time | The date and time at which the transaction occurred. | String | It is in the format, YYYY-MM-DD HH:MM:SS. Time zone: Western Indonesian Time (GMT+7). |
| transaction_status | The status of the transaction. | String | For more details, refer to Transaction Status. |
| fraud_status | The fraud_status of the transaction is displayed. | String | - |
| actions | The set of actions. | Array | It is the set of actions that can be retrieved through this attribute. Merchant chooses the action according to his/her need. |
| name | The name of the action. | String | - |
| method | The type of the method. | String | - |
| url | The redirect URL. | String | - |
2. Altering payment flow depending on the device used
Depending on which platform (Desktop or Mobile) you are integrating this payment method for your customer to pay, the payment flow will be different between computer/tablet versus smartphone/mobile. Choose from the flows below accordingly.
Show QR Code Image (on computer or tablet)
To display transaction QR Code image, use the URL from generate-qr-code actions retrieved from API response. Simplest way is to "hotlink" the image URL. If the frontend is HTML, put the URL in image tag <img src="THE_QR_CODE_URL_HERE">, or display it on a similar component downloading.
If the frontend does not support such scenario, you may need to locally download the QR code image from that URL, then display it on your frontend.
Once the QR Code for payment is displayed to customer, it will be available for customer to pay.
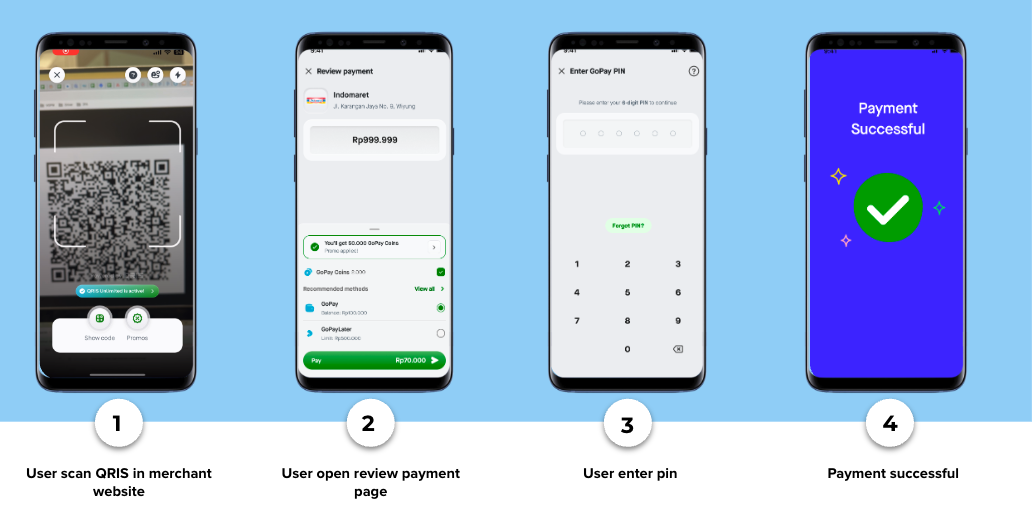
Payment flow example for customer on Production environment:
- On Merchant web/app, choose GoPay/QRIS as payment method.
- Continue checkout until the payment QR code displayed.
- Open any QRIS compatible app, installed in your phone, for example Gojek or GoPay App
- Use "Scan to Pay" feature to scan the QR code.
- Click Pay, after checking and verifying your payment details.
- You may be prompted to input Security PIN to finish your transaction.
Redirecting to Gojek-GoPay app deeplink (on smartphone)
To redirect the customer to Gojek-GoPay app, use URL from deeplink-redirect actions retrieved from API response. Then customer can be redirected via server-side redirect, using JavaScript, such as window.location=[DEEPLINK URL], or using HTML link, <a href="[DEEPLINK URL]">Pay with GoPay</a>.
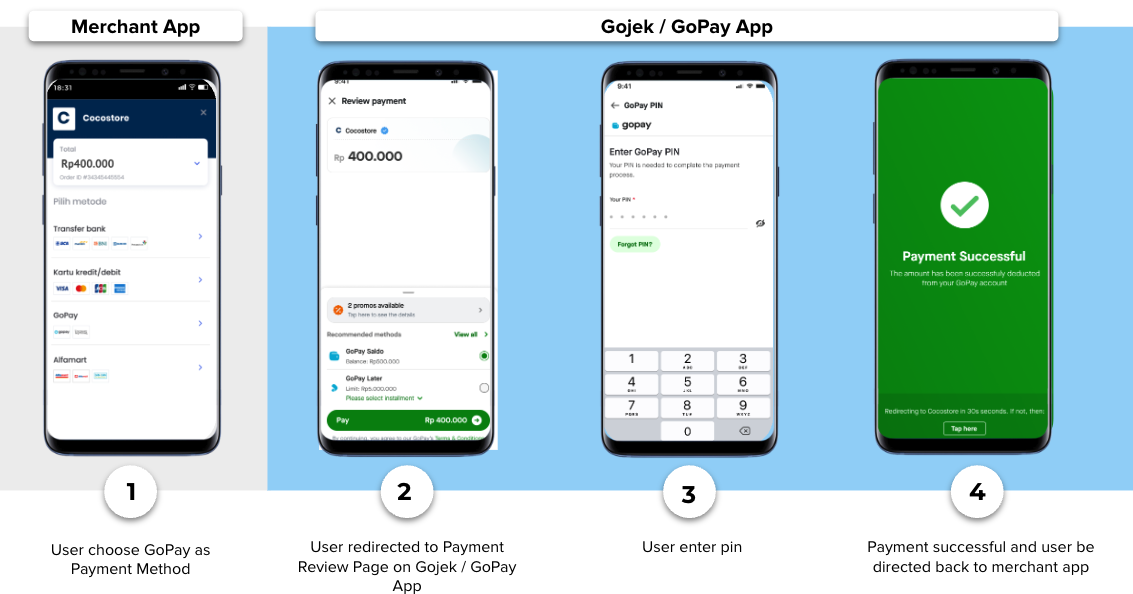
Payment flow example for customer on Production Environment:
- On Merchant web/app, choose GoPay as payment method.
- Continue checkout until you are redirected to Gojek-GoPay app.
- Click Pay, after checking and verifying your payment details.
- You may be prompted to input Security PIN to finish your transaction.
Note
Implementing finish redirect callback handler
In addition to app deeplink flow above, you can optionally implement finish redirect callback. Which after payment, the customer will be redirected back from Gojek-GoPay to your app.
Add the following parameters within the gopay object in the Charge API request.
"gopay": {
      "enable_callback": true,
      "callback_url": "tokokuapp://gopay-finish"
  }
//you can also use web url like "https://myshop.com/gopay-finish"| JSON Attribute | Description |
|---|---|
| enable_callback | To determine whether customer will be redirected to the callback URL after payment. Default value: false. |
| callback_url | To determine where Gojek-GoPay app will redirect customer after payment. Can be HTTP or app deeplink URL. Default value: callback_url in dashboard settings. |
You will need to implement callback url handler on your web/app. Customer will be redirected to this URL once payment is completed. The redirect will also automatically appended with query parameters below.
| Parameter | Description |
|---|---|
| order_id | Order ID sent on the Charge Request |
| result | Result of the transaction to decide what kind of page to show to customer. Possible values: success or failure |
The final url will become for example tokokuapp://gopay-finish?order_id=123&result=success. So make sure your app can handle the finish redirect url properly.
NoteTo update the Transaction Status on merchant backend/database, do not solely rely on frontend callbacks. For security reasons, to make sure that the Transaction Status is authentically coming from Midtrans, you can update Transaction Status by waiting for HTTP Notification or timely call API Get Status on your backend.
If you don't implement finish redirect callback, after payment completed, customer can manually dismiss GoPay success/failure screen, then navigate back to your app manually.\
3. Handling post transaction
HTTP POST request with JSON body will be sent to your server's Notification URL configured on dashboard.
Configuring Payment Notification URL
To configure the Payment Notification URL, follow the steps given below.
- Login to your MAP account.
- On the Home page, go to SETTINGS > CONFIGURATION. Configuration page is displayed.
- Enter Payment Notification URL.
- Click Update. A confirmation message is displayed.
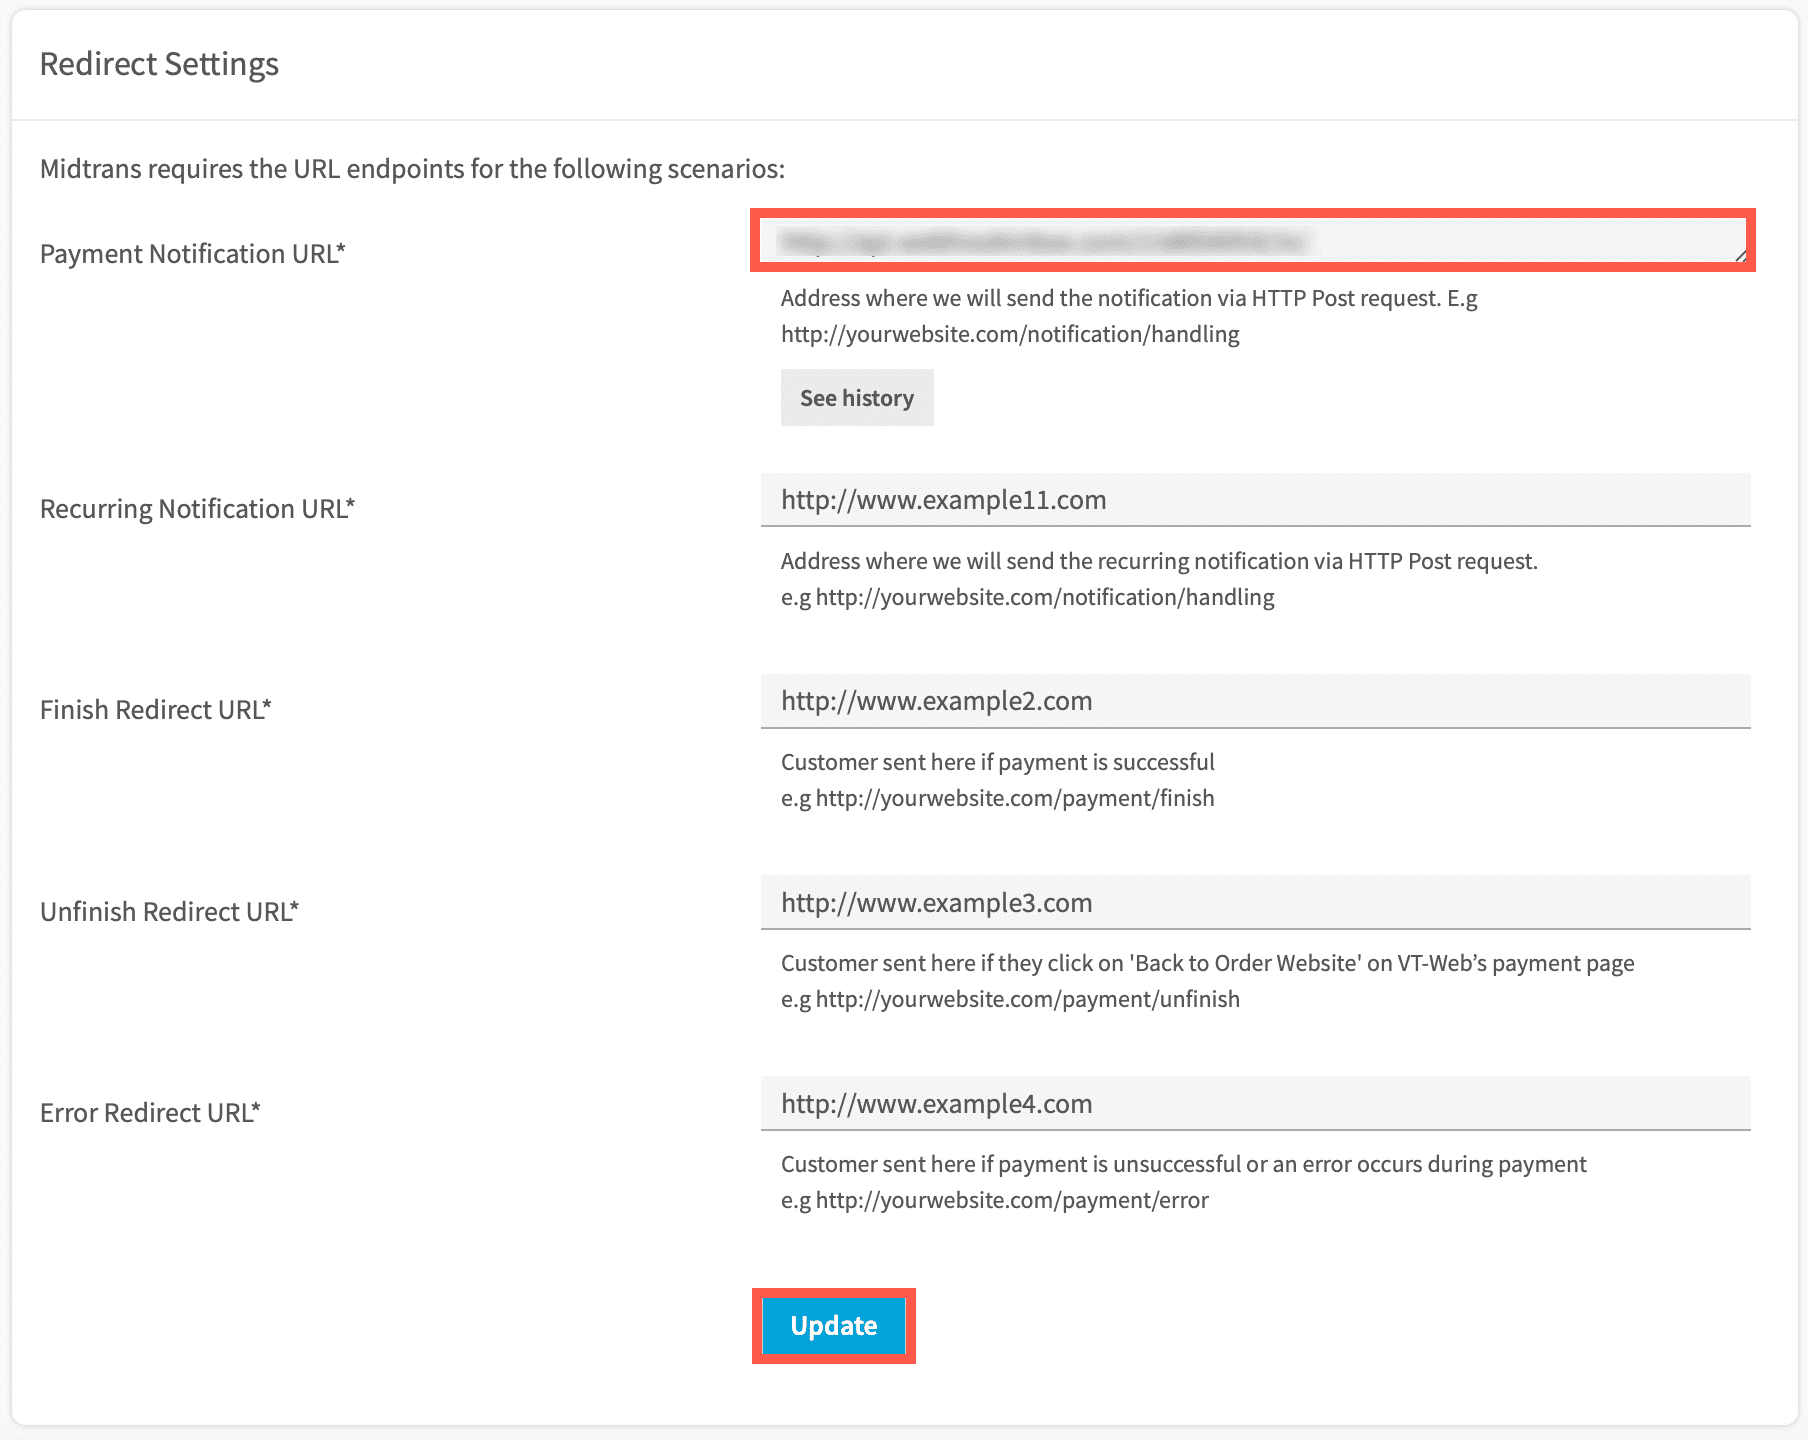
The Payment Notification URL is configured.
See also : HTTP(S) Notification/Webhooks\
Transaction status description
The table given below explains transaction_status values for E-Wallet transaction.
| Transaction Status | Description |
|---|---|
| settlement | Transaction is successfully paid, customer has completed the transaction. |
| pending | Transaction is successfully created to payment provider but it's not yet completed by the customer. |
| expire | Transaction is failed as the payment is not done by customer within the given time period. |
| cancel | Transaction is canceled by you. |
| deny | Transaction is rejected by the payment provider. |
| refund | Transaction is refunded by you. |
Additional Notes
Allowing App Redirect for Mobile Platform App
If app deeplink redirect method is being used within WebView, you may need to include additional configurations to ensure that your app will be able to redirect customer to Gojek-GoPay app. Please make sure that the WebView allows opening app redirect link urls.\
Android Native
If using WebView on Android, please make sure that the WebView allows opening other app redirect link urls.
As a reference/example please follow this FAQ on how to allow Gojek-GoPay app redirect link.\
iOS Native
If using WebView on iOS, please make sure that the WebView allows opening other app redirect link urls.
As a reference/example please follow this FAQ on how to allow Gojek-GoPay app redirect link.\
WebView & others
If you are using other framework such as React Native, Flutter, etc. Please follow this FAQ on how to allow Gojek-GoPay app redirect link.
For more details on transaction_status & fraud_status, see here.\
Making sure app redirect works on web based mobile platform app
If you are implementing redirect using web based code (Browser, PWA, React Native, within WebView, etc.) on a Mobile App, sometimes the platform may block you from redirecting customer to another app.
Please follow this FAQ on how to allow deep/universal link redirect.\
Payment via QRIS
Please note that if the payment transaction is paid by customer via QRIS scanning method, then Midtrans will send webhook/HTTP notification with"payment_type": "qris" instead ofgopay . This is to indicate that the payment is via QRIS.
Updated 3 months ago