
Merchant Administration Portal - Unified Reporting: Menu Saldo / Pembayaran
You can only see the Balance menu on the navigation bar (left side of the dashboard) when your user role is Finance or Admin.
| Old Version | New Version |
|---|---|
 |  |
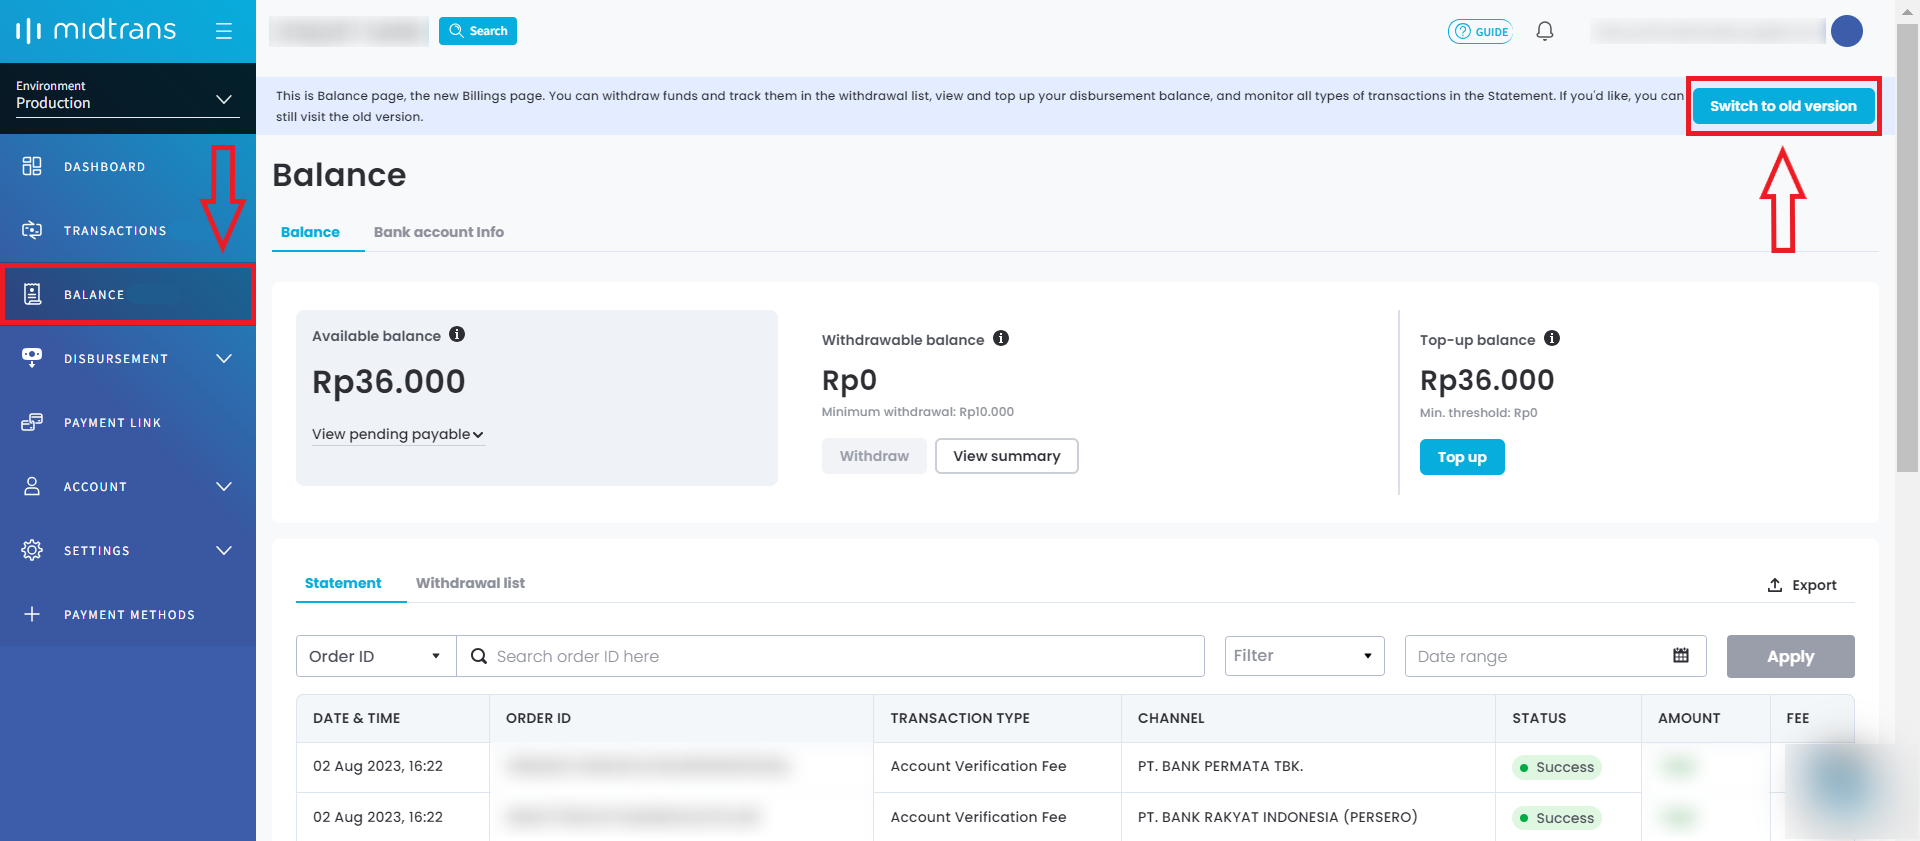
Perform various balance activities in one place. View disbursement, withdrawal balance, and bank accounts without switching pages. Track settlement and withdrawal list too!
List of Feature Upgrades
- Consolidated list of transactions between Online Payments and Disbursement products.
- Preview of the transaction list without the need to download the report.
- Download multiple withdrawal id / payout id on the withdrawal list tab.
- See both Online Payments and Disbursement balance.
- View summary based on time or payment method.
New Terms
| Keywords | Definition | Where do you find it |
|---|---|---|
| Wallet transaction | Balance transfer between money coming from customer to balance to disbursement | On the reporting you downloaded in billing page/balance page as well as transaction details |
| Balance Transfer | Balance transfer between money coming from customer to balance to disbursement | Under channel in the statement |
| Payable balance | Money already settled from the payment method | View summary |
| Pending payable | Money not yet settled from the payment method |
Content List
- How to do a fund withdrawal?
- How to see withdrawable balance summary?
- How to top up the Disbursement balance?
- How to check the transactions and their status?
- How to export the transactions data?
- How to check the withdrawal and its status?
- How to export the withdrawal data?
- New Reporting Format
- How to change billing information?
- Can I use the old version?
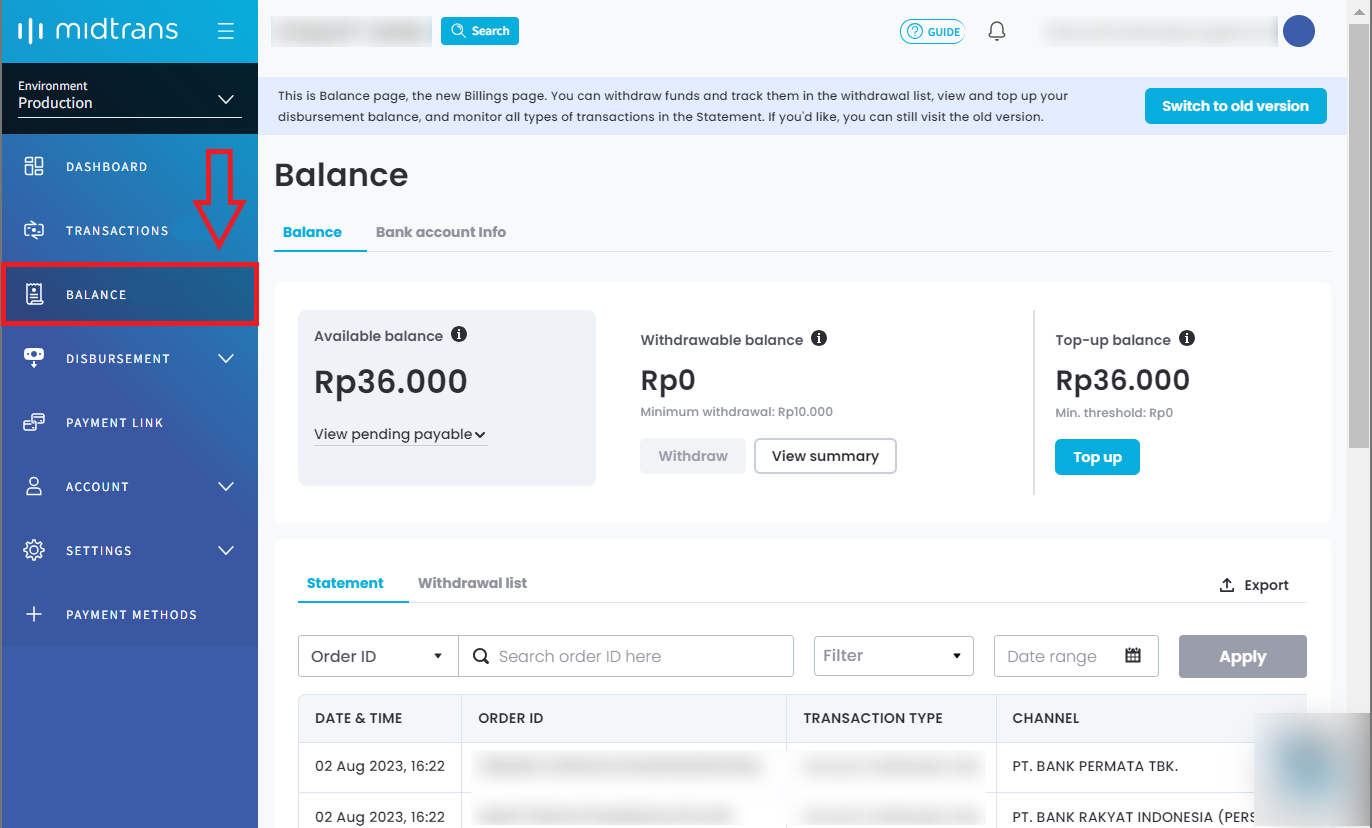
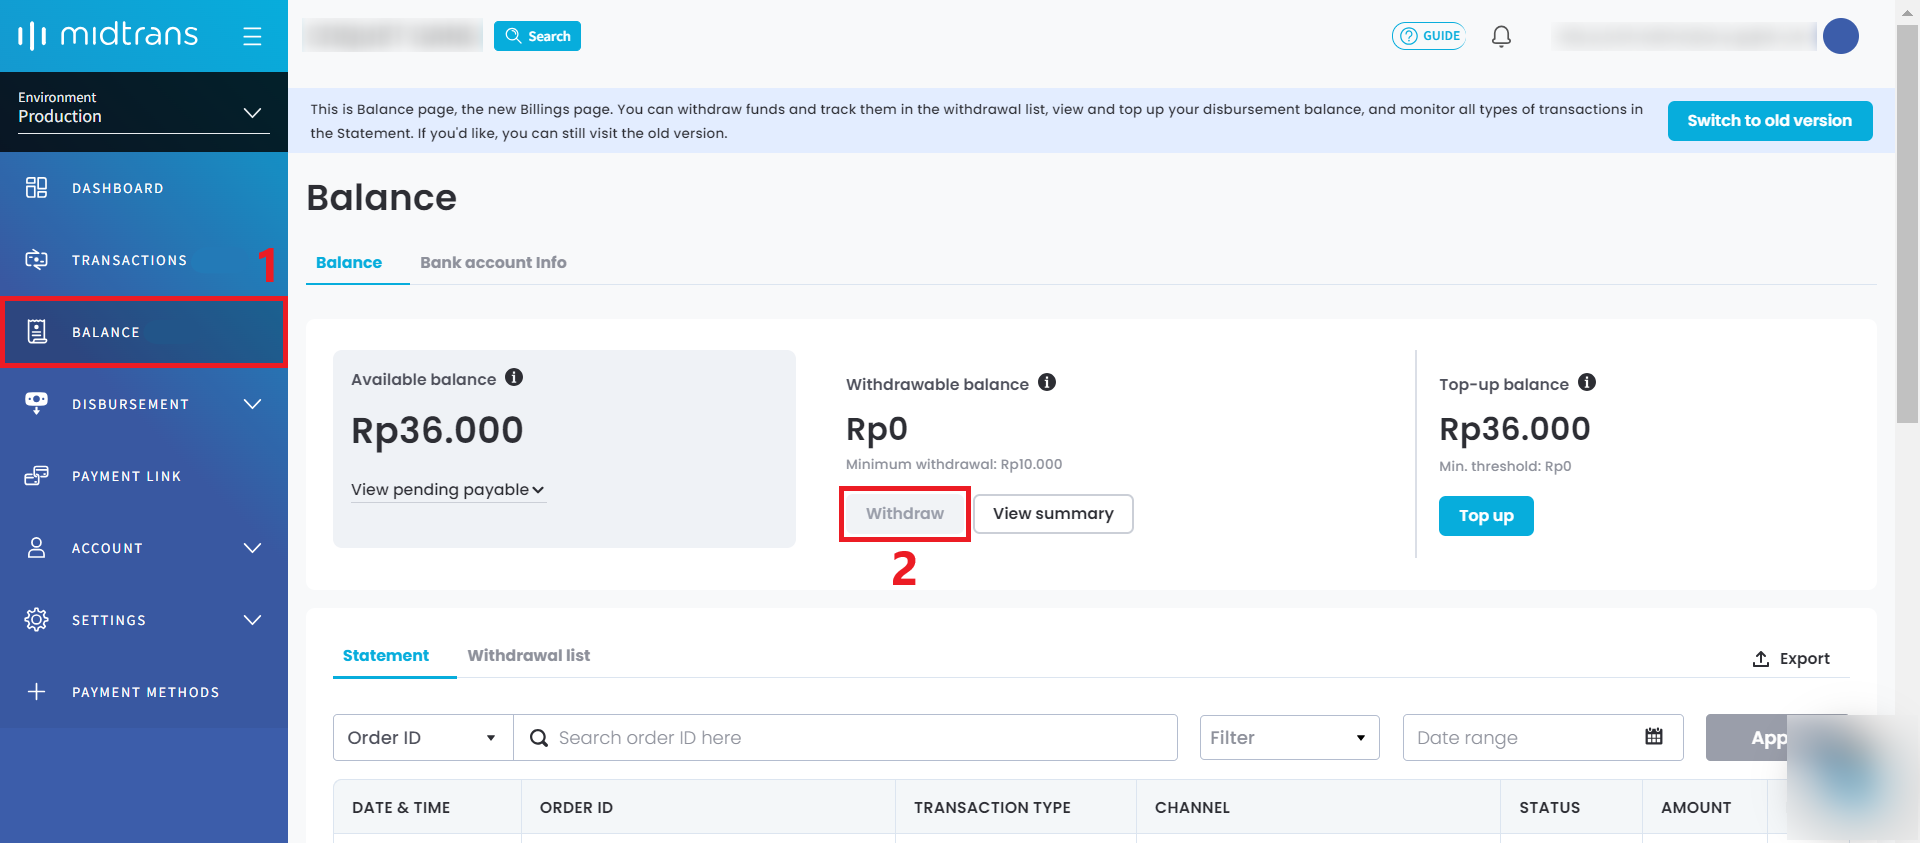
How to do a fund withdrawal?
-
Click on the Balance menu on the navigation bar.
-
Click Withdraw.
-
Click Confirm.

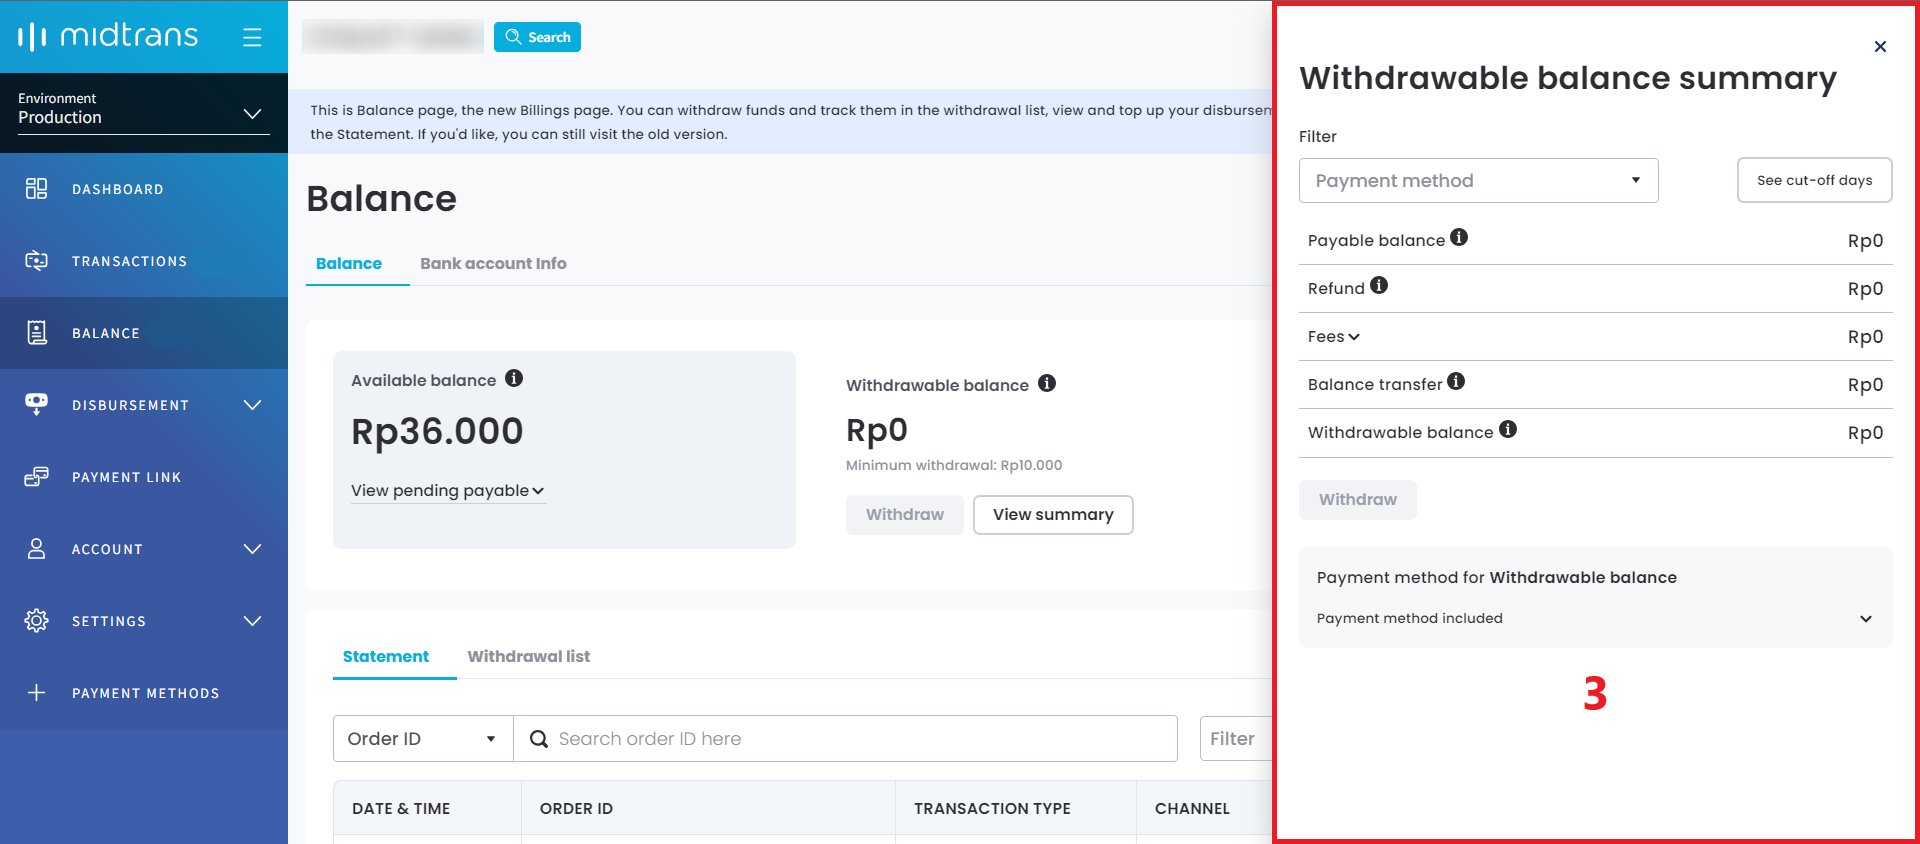
How to see withdrawable balance summary?
-
Click on the Balance menu on the navigation bar.

-
Click View summary.
-
You can see the breakdown of the fees, cut-off days, filter by payment method, and withdraw the fund from this page too.
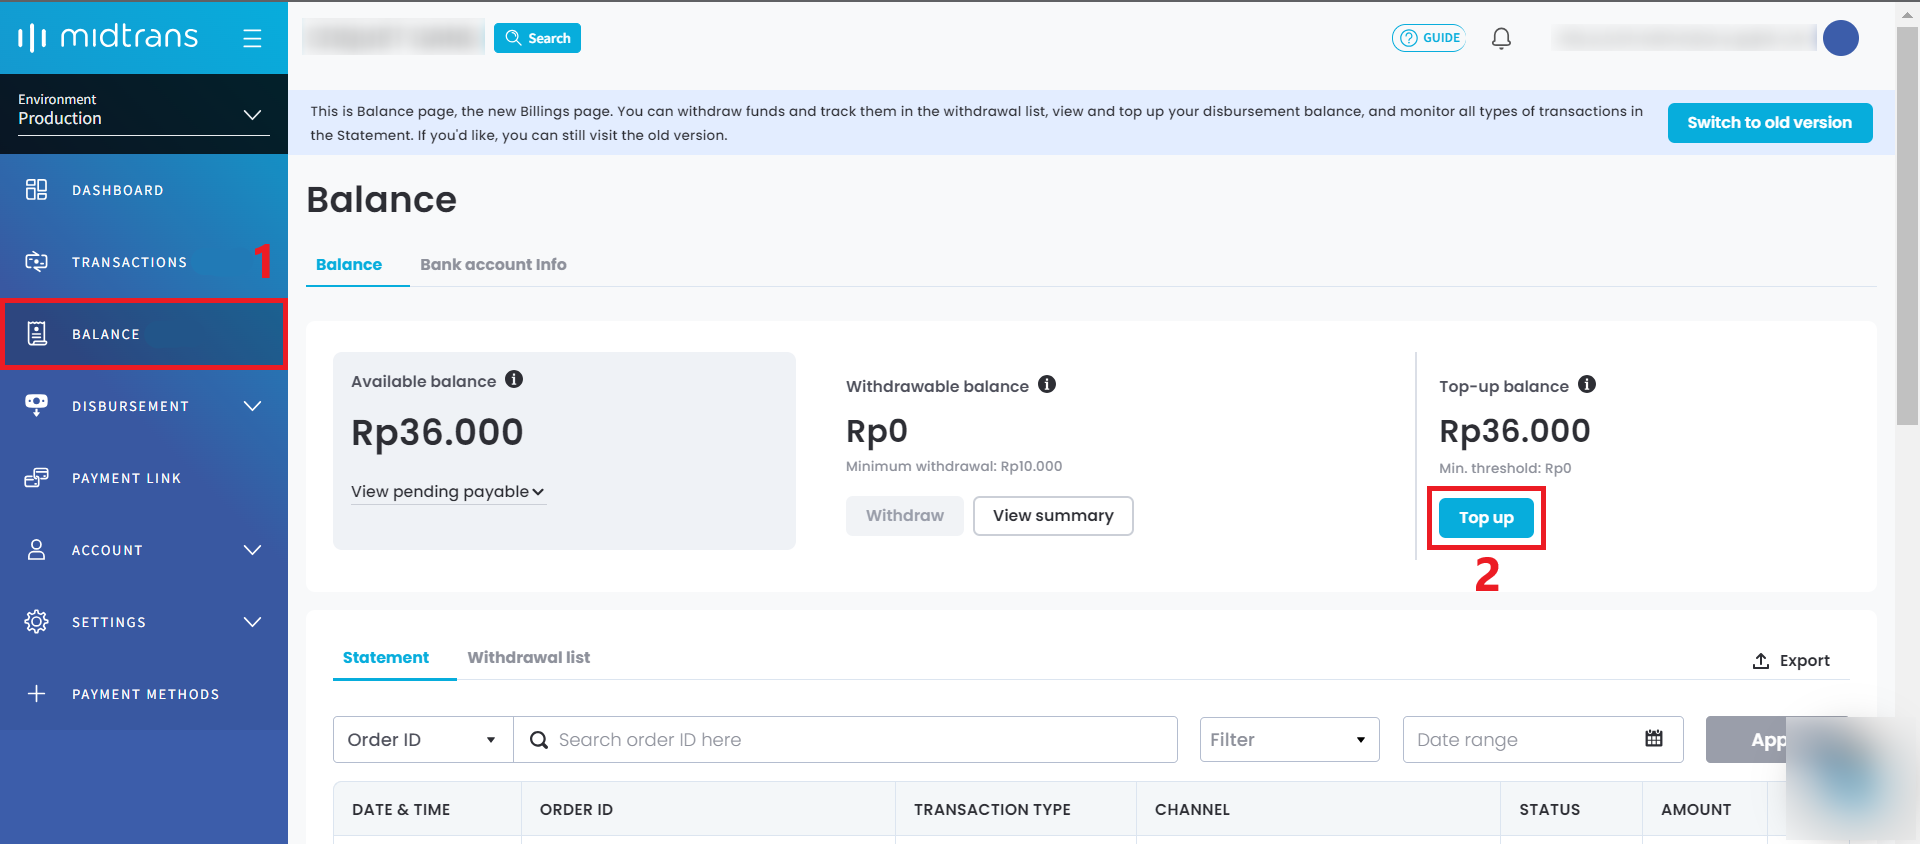
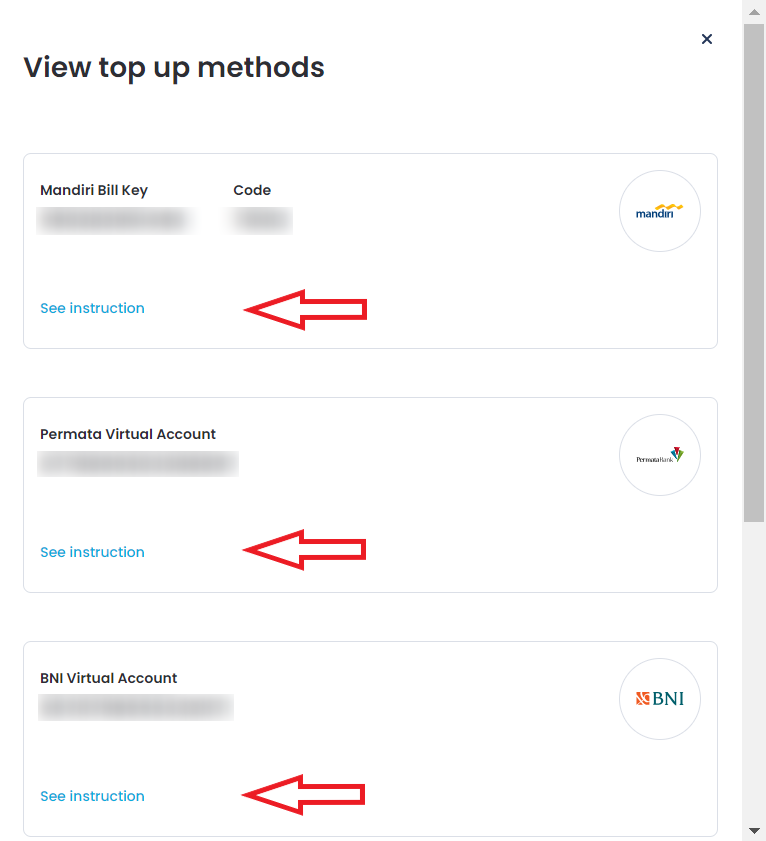
How to top up the Disbursement balance?
-
Click on the Balance menu on the navigation bar.
-
Click Top up.
-
You may see the top up methods and click See instruction.
How to check the transactions and their status?
You can see the transactions and the details below the Statement section, with the maximum period up to the last 6 months.
There are 3 (three) ways to use the filter.
A. Check the transaction by Order ID or Transaction ID.
-
Click on the Balance menu on the navigation bar.
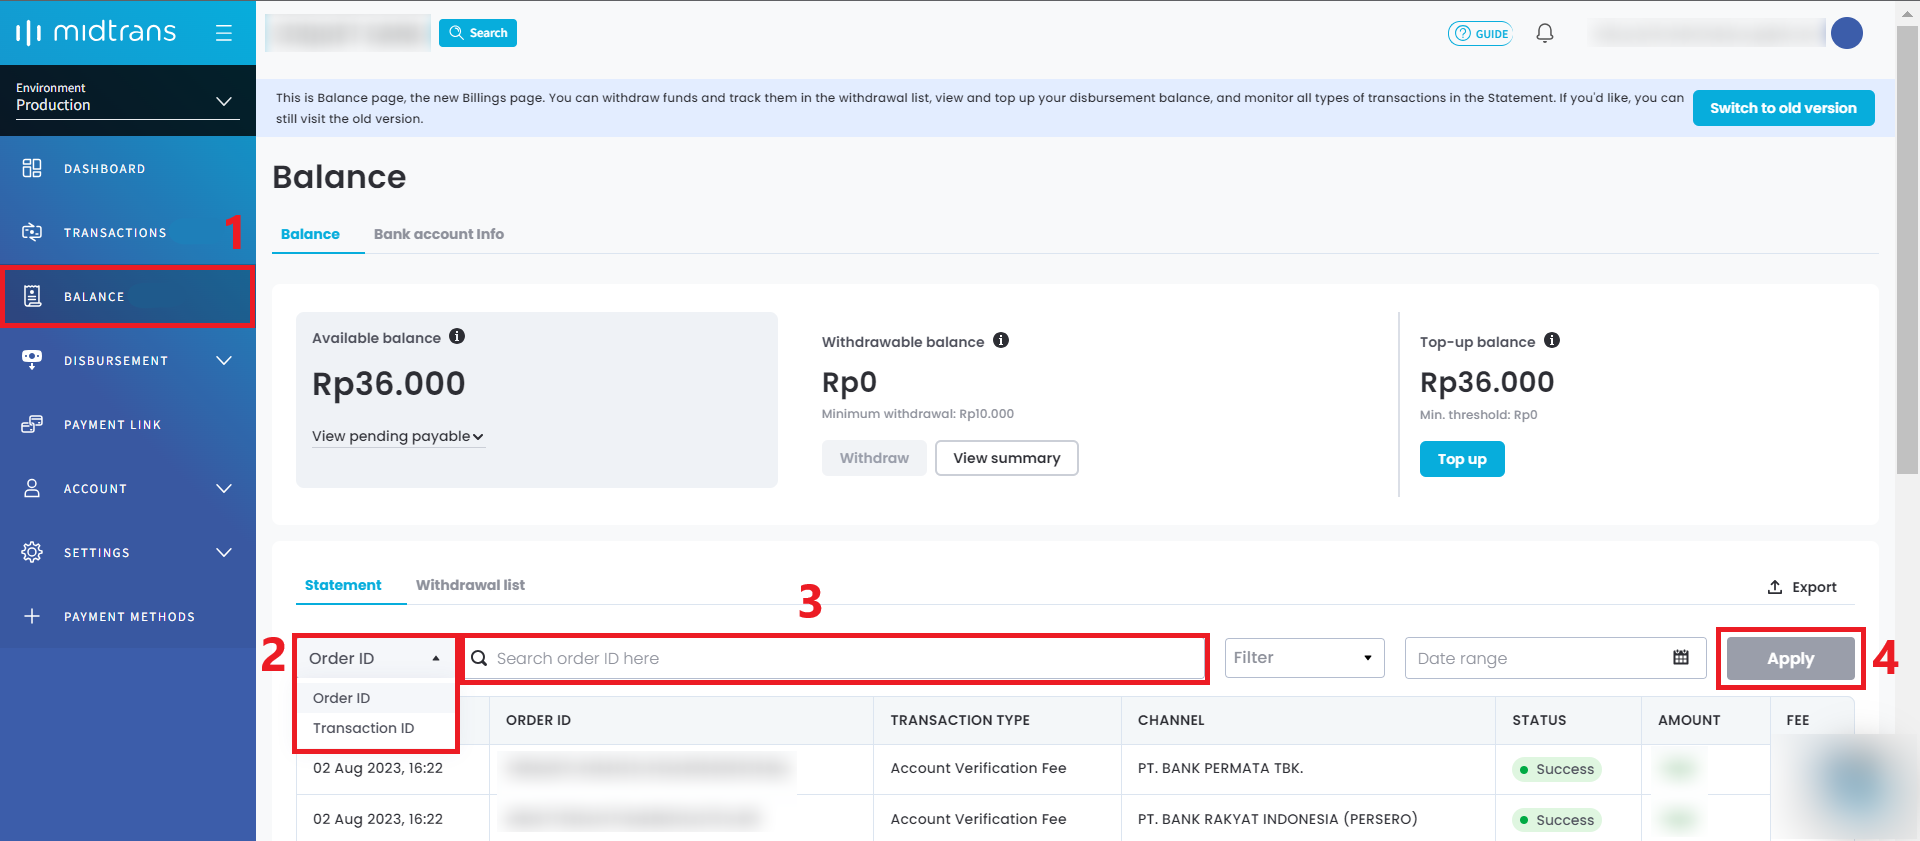
-
Click on the drop down and select between Order ID or Transaction ID.
-
Type the Order ID or Transaction ID.
-
Click Apply.
B. Check the transaction by transaction type, status, and its channel.
-
Click on the Balance menu on the navigation bar.
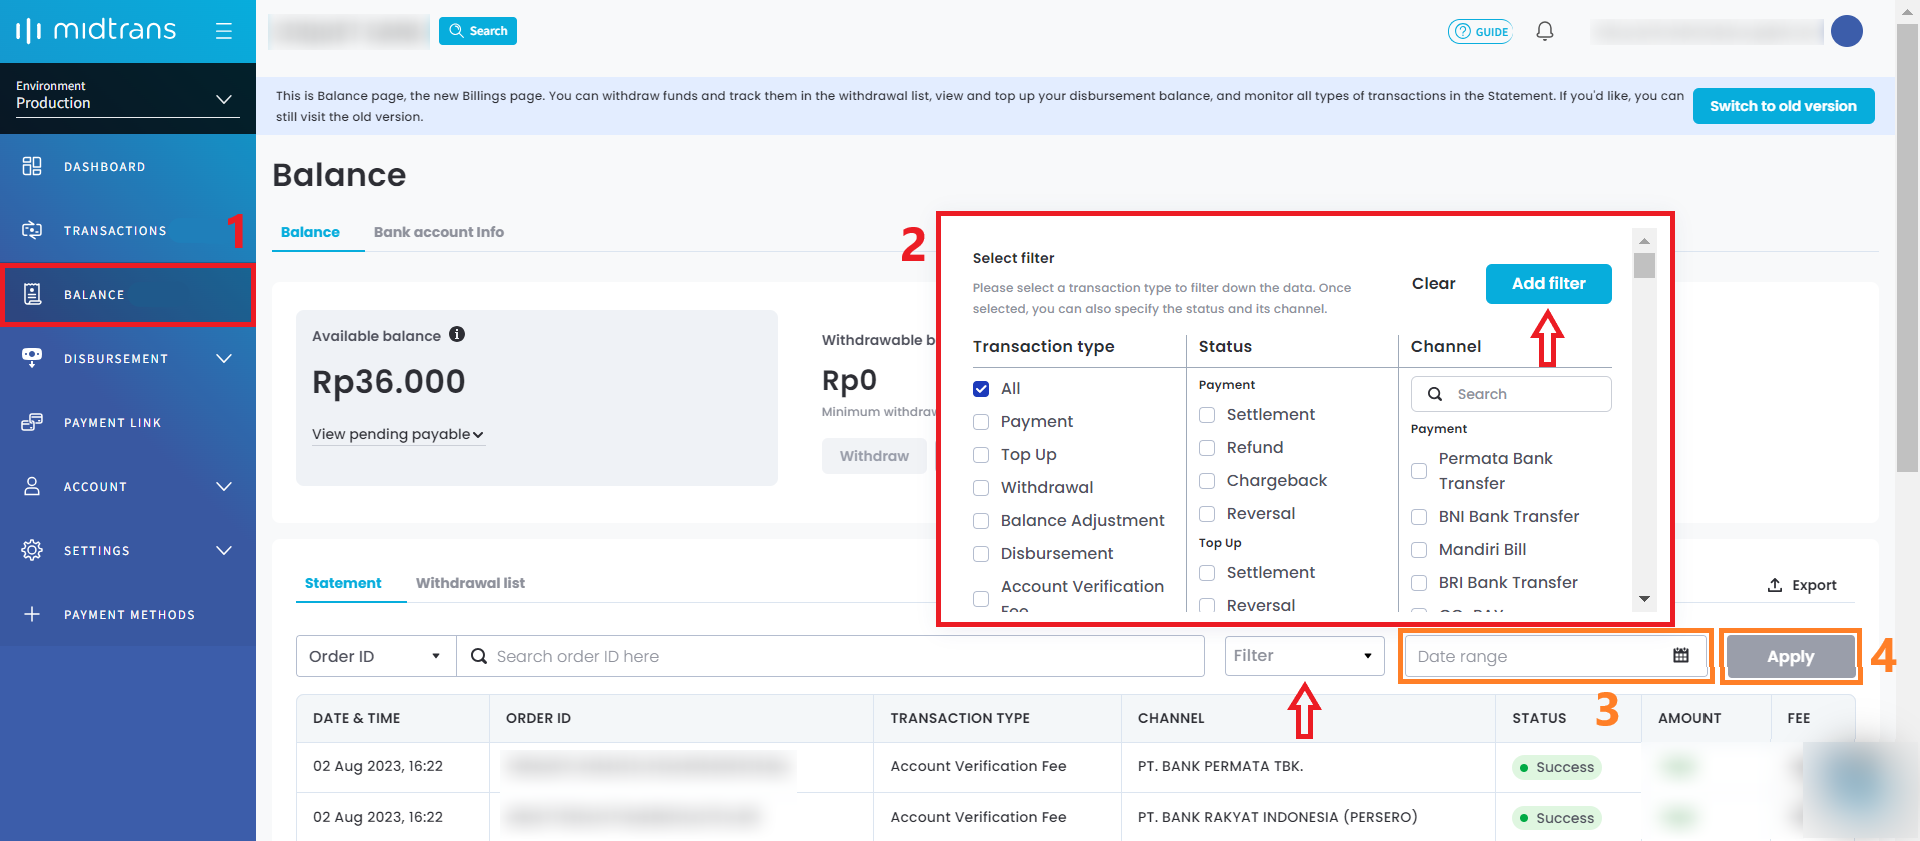
-
Click on the drop down (Filter), select the Transaction type. Once selected, you can also specify the status and its channel, then click Add filter.
IMPORTANT❗
- If you don’t specify the status and its channel it means you don’t have any filter and it will show all the status and its channel.
- The filter shows based on the active product; if you are not using Disbursement product, then it won’t show up in the filter. The same goes for the status and channel.
-
Choose the Date range (optional). You can only view the data with the maximum period up to the last 6 months.
-
Click Apply (only if you choose the Date range).
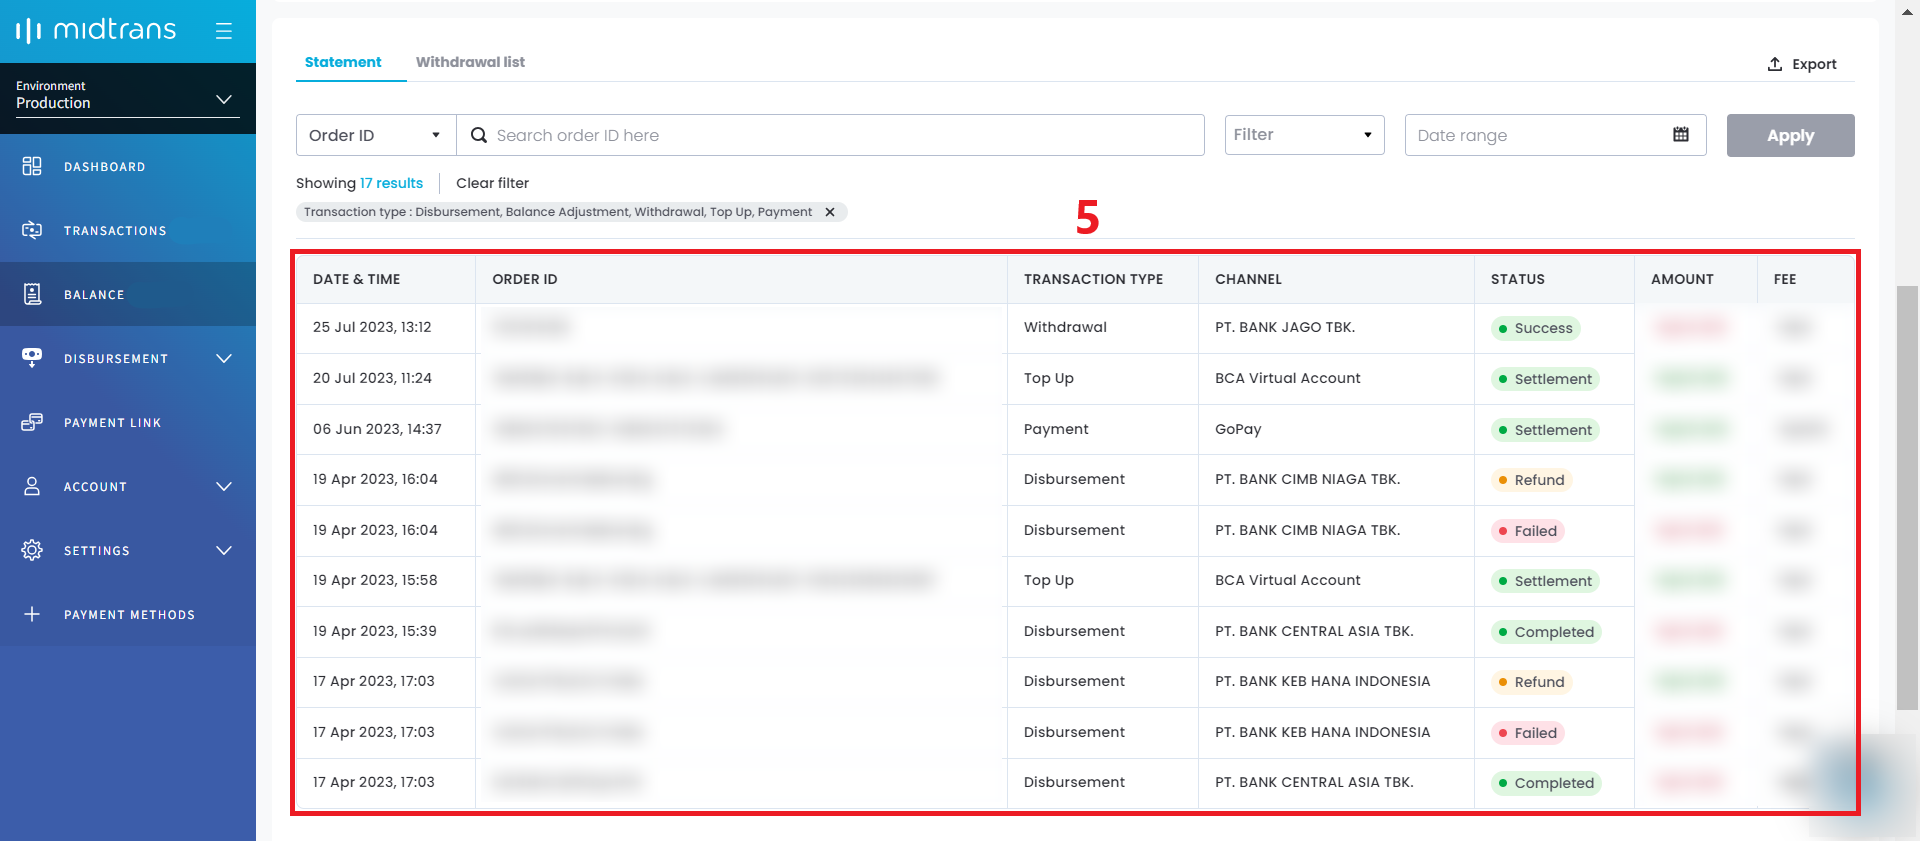
-
You can view all the specific transaction details that you need.
C. Check the transaction by the date range.
-
Click on the Balance menu on the navigation bar.
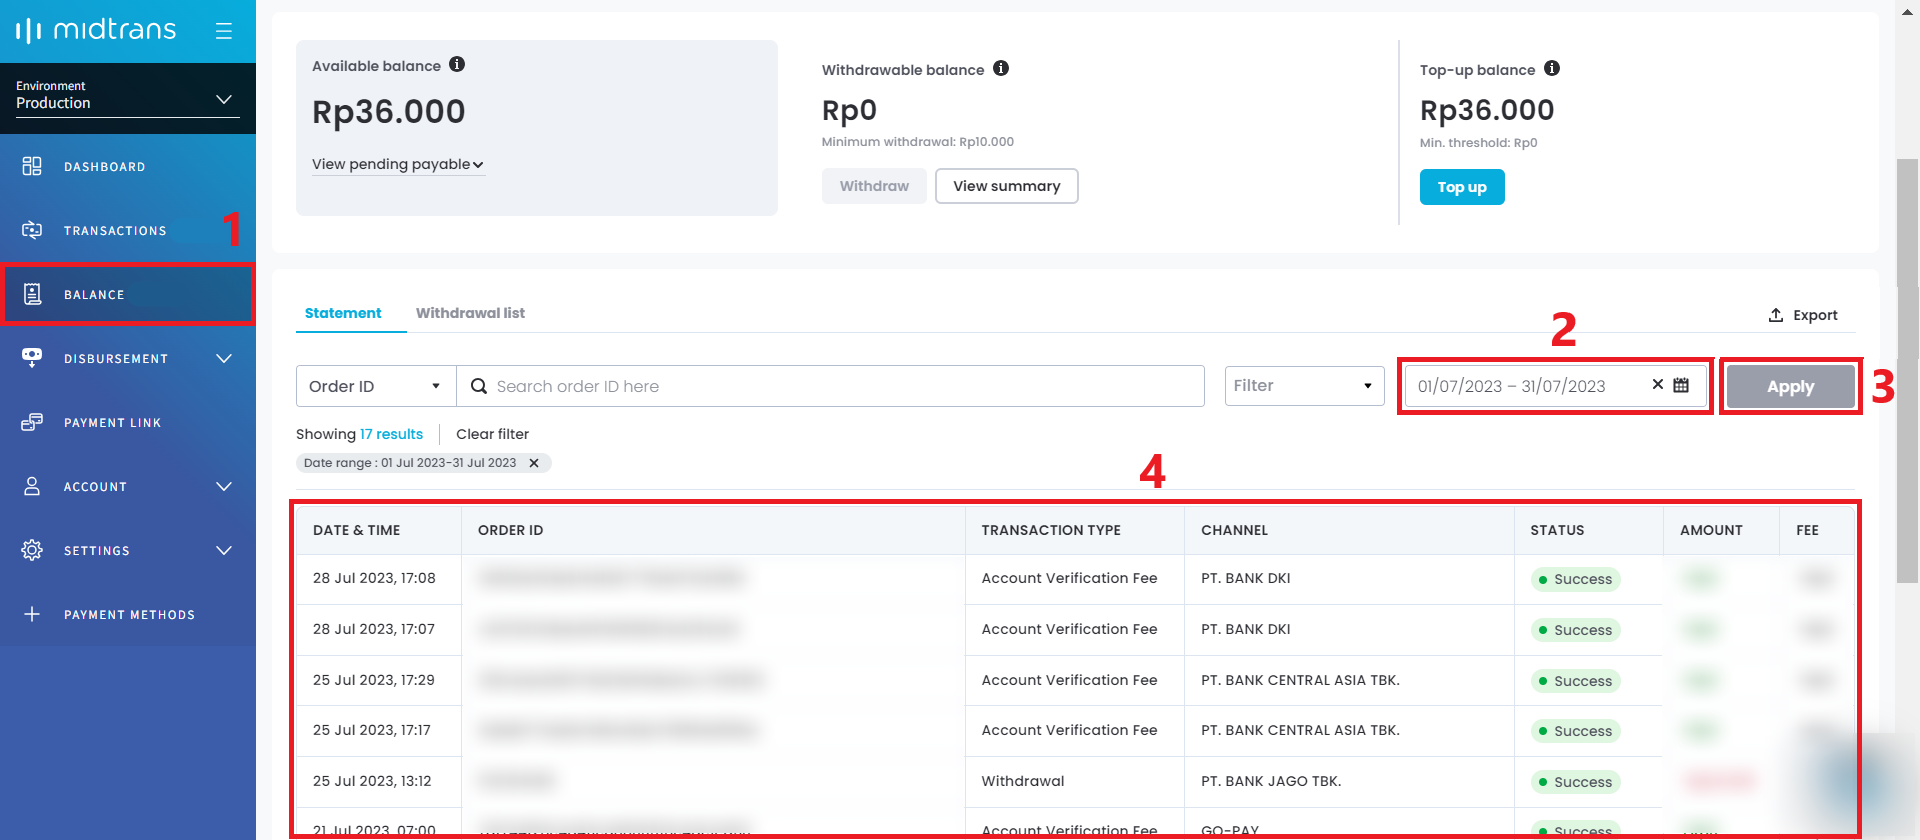
-
Choose the Date range. You can only view the data with the maximum period up to the last 6 months.
-
Click Apply.
-
You can view all the transaction details within the date range that you need.
How to export the transactions data?
-
Click on the Balance menu on the navigation bar. You can see the transactions and the details below the Statement section.
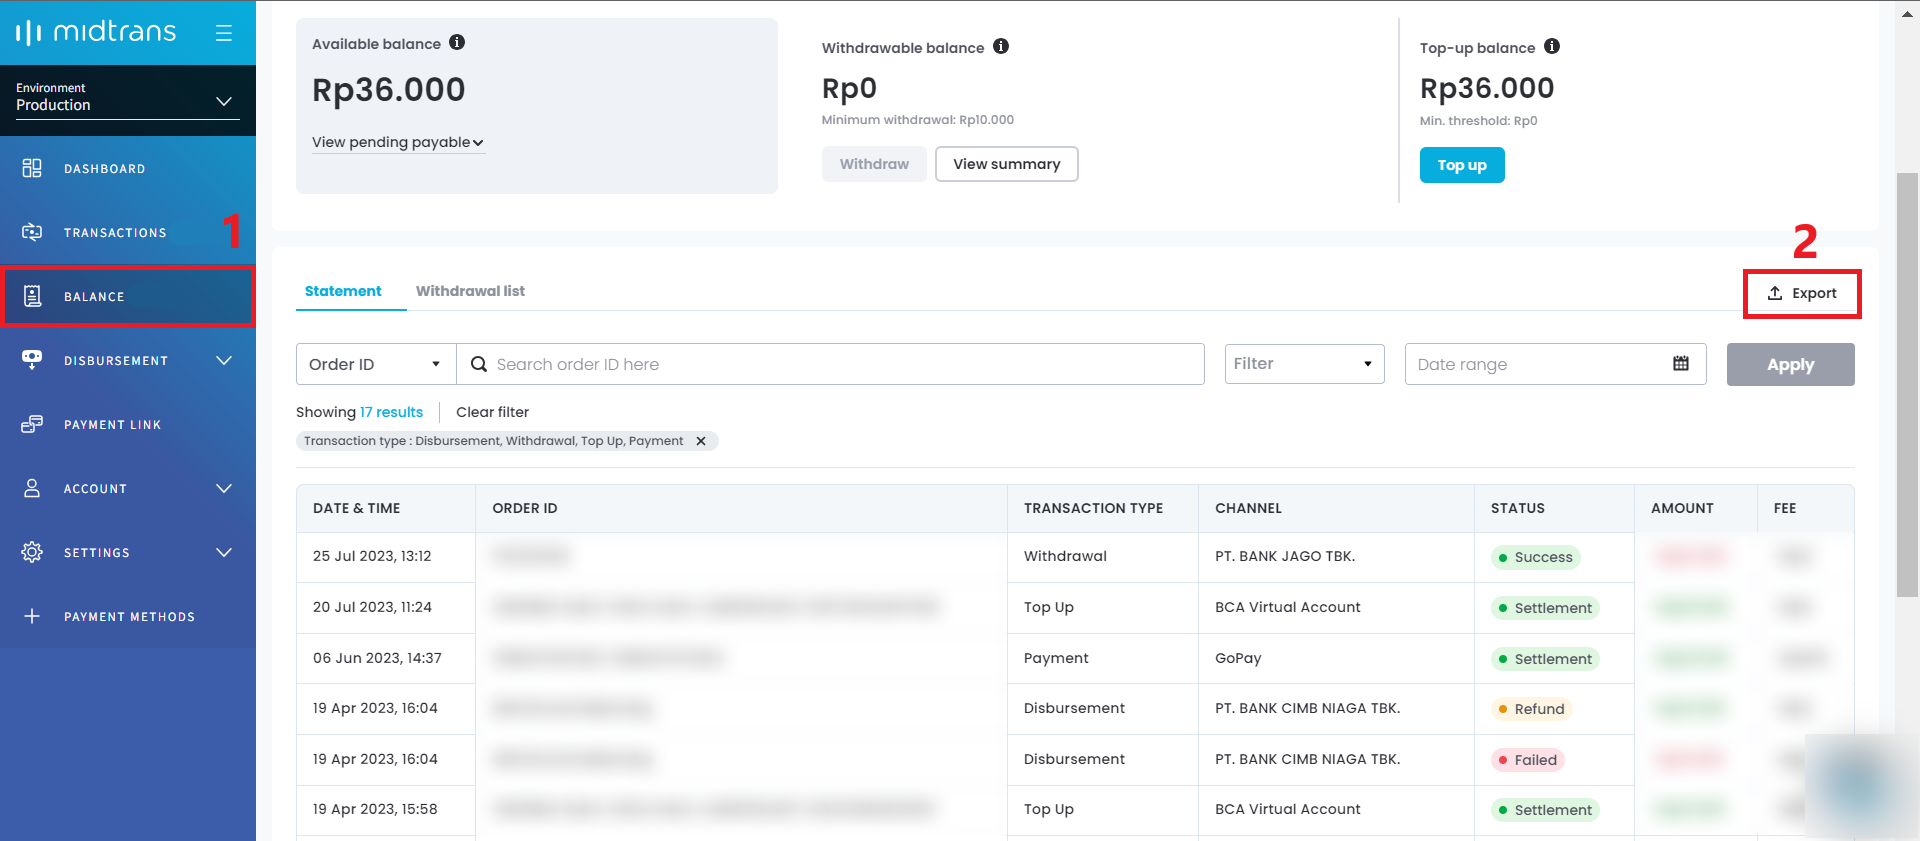
Tips 💡If you need to export a specific transaction details, you have to apply the filter. Please follow FAQ point number 4 (How to check the transactions and their status?).
-
Click Export.
-
Choose the dates. You can only export within 31 days range, with the maximum period up to the last 6 months.
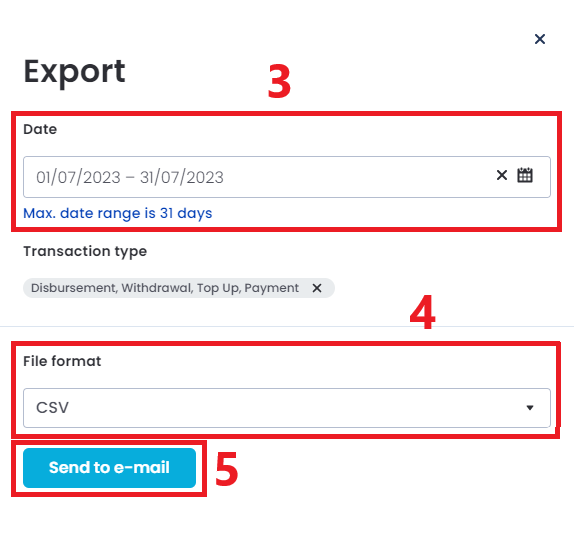
-
Choose the format you want to export between CSV or XLS file.
-
Click Send to e-mail. The exported data will be sent to your registered e-mail.
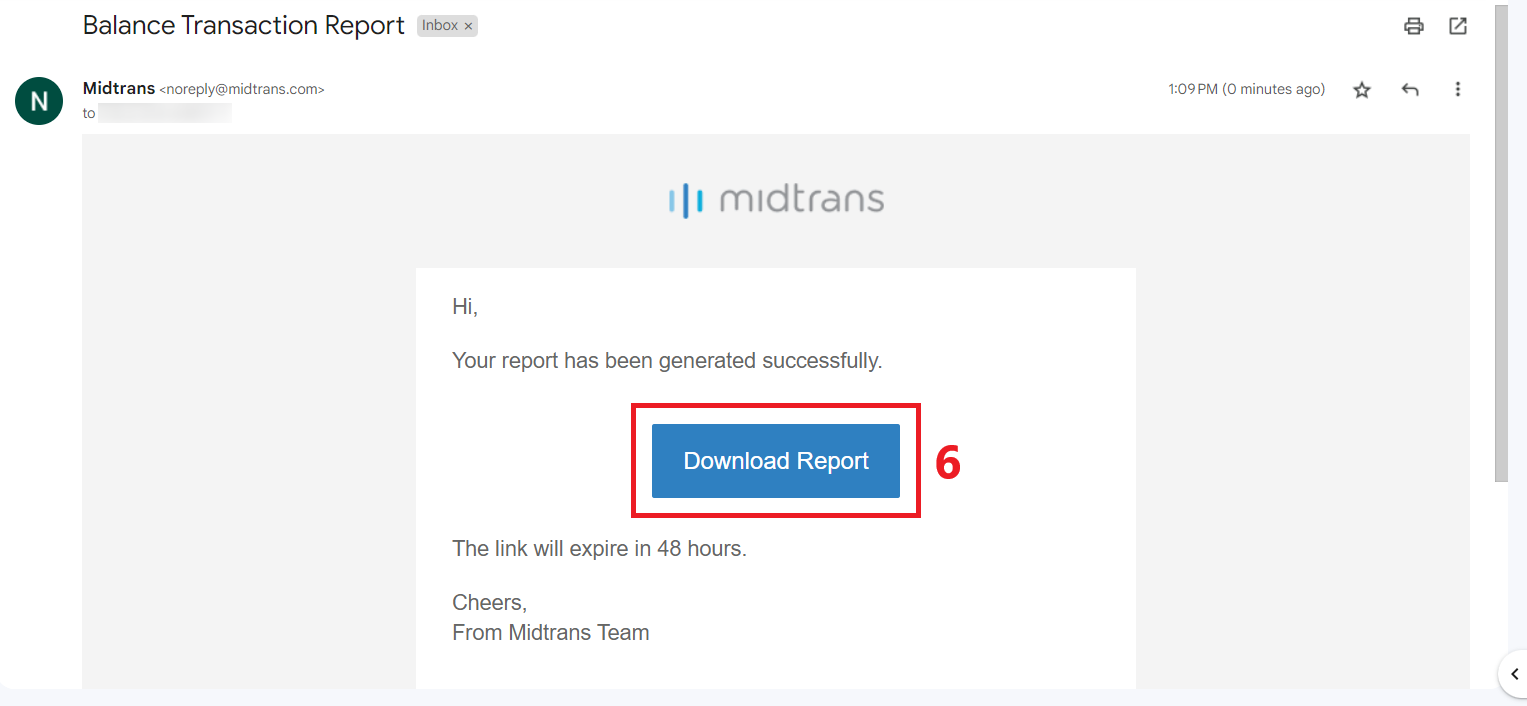
-
Click Download Report (The link will expire within 48 hours).
How to check the withdrawal and its status?
You can see the withdrawal and the details below the Withdrawal list section, with the maximum period up to the last 6 months.
There are 3 (three) ways to use the filter.
A. Check the withdrawal by Order ID.
-
Click on the Balance menu on the navigation bar.
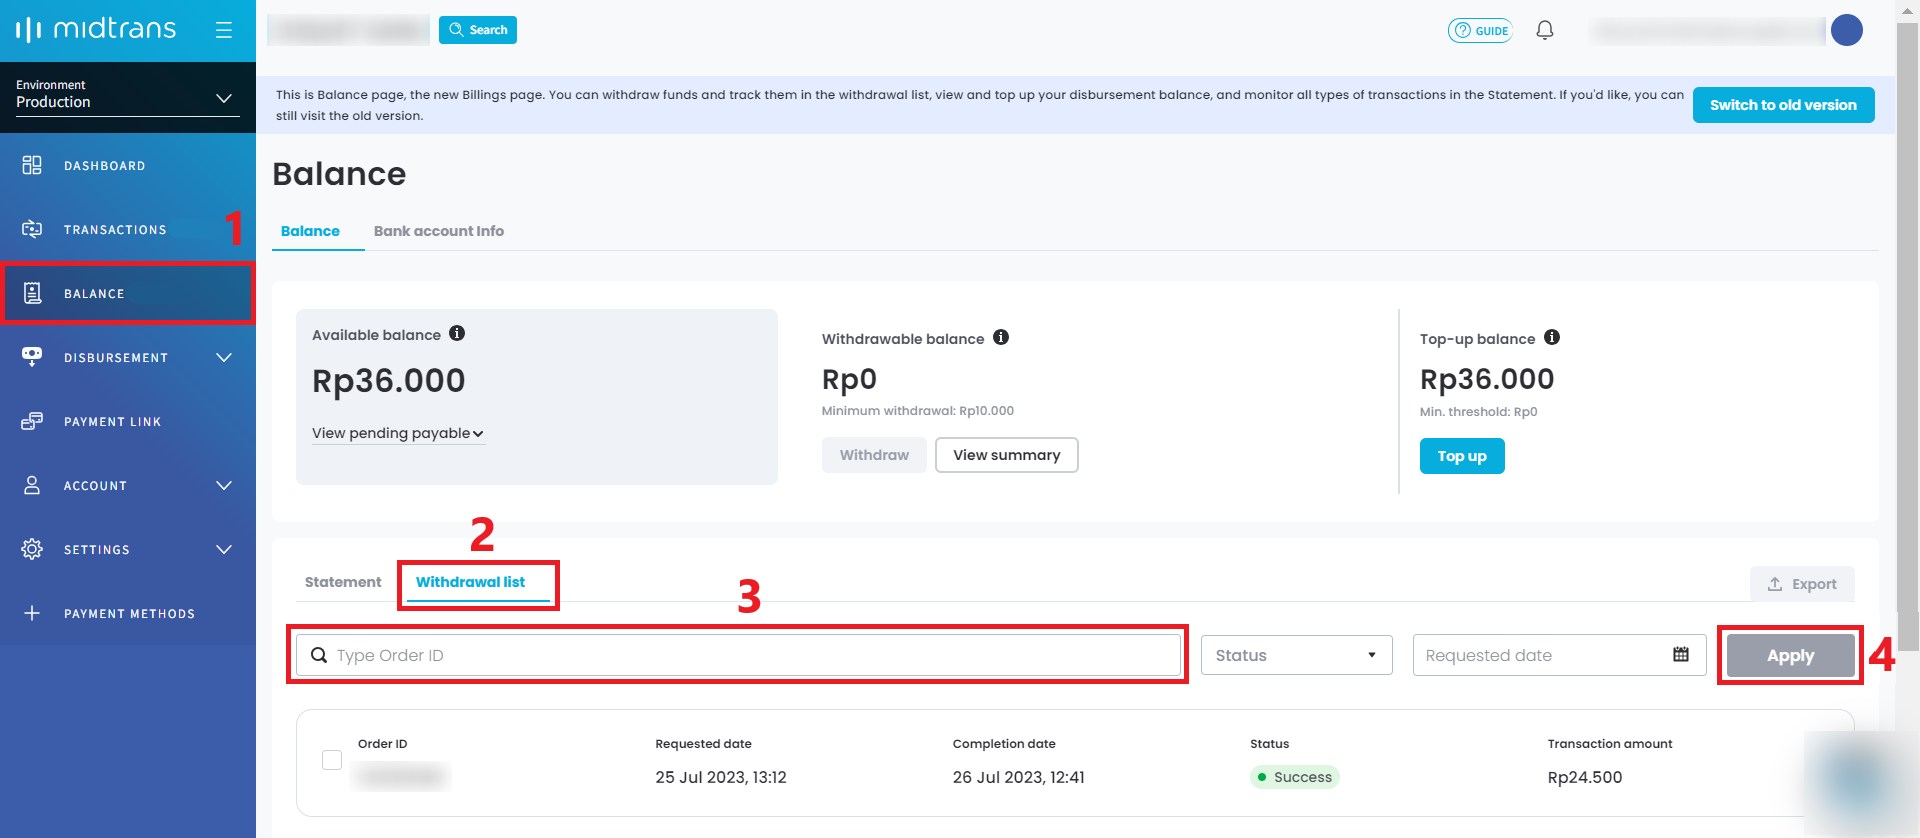
-
Click on the Withdrawal list.
-
Type the Order ID.
-
Click Apply.
B. Check the withdrawal by its status.
-
Click on the Balance menu on the navigation bar.
-
Click on the Withdrawal list.
-
Click on the drop down (Filter), select the Status that you need.
-
Choose the Date range (optional). You can only view the data with the maximum period up to the last 6 months.
-
Click Apply.
-
You can view all the specific transaction details that you need.
C. Check the transaction by the date range.
-
Click on the Balance menu on the navigation bar.

-
Click on the Withdrawal list.
-
Choose the Date range. You can only view the data with the maximum period up to the last 6 months.
-
Click Apply.
-
You can view all the transaction details within the date range that you need.
How to export the withdrawal data?
-
Click on the Balance menu on the navigation bar.
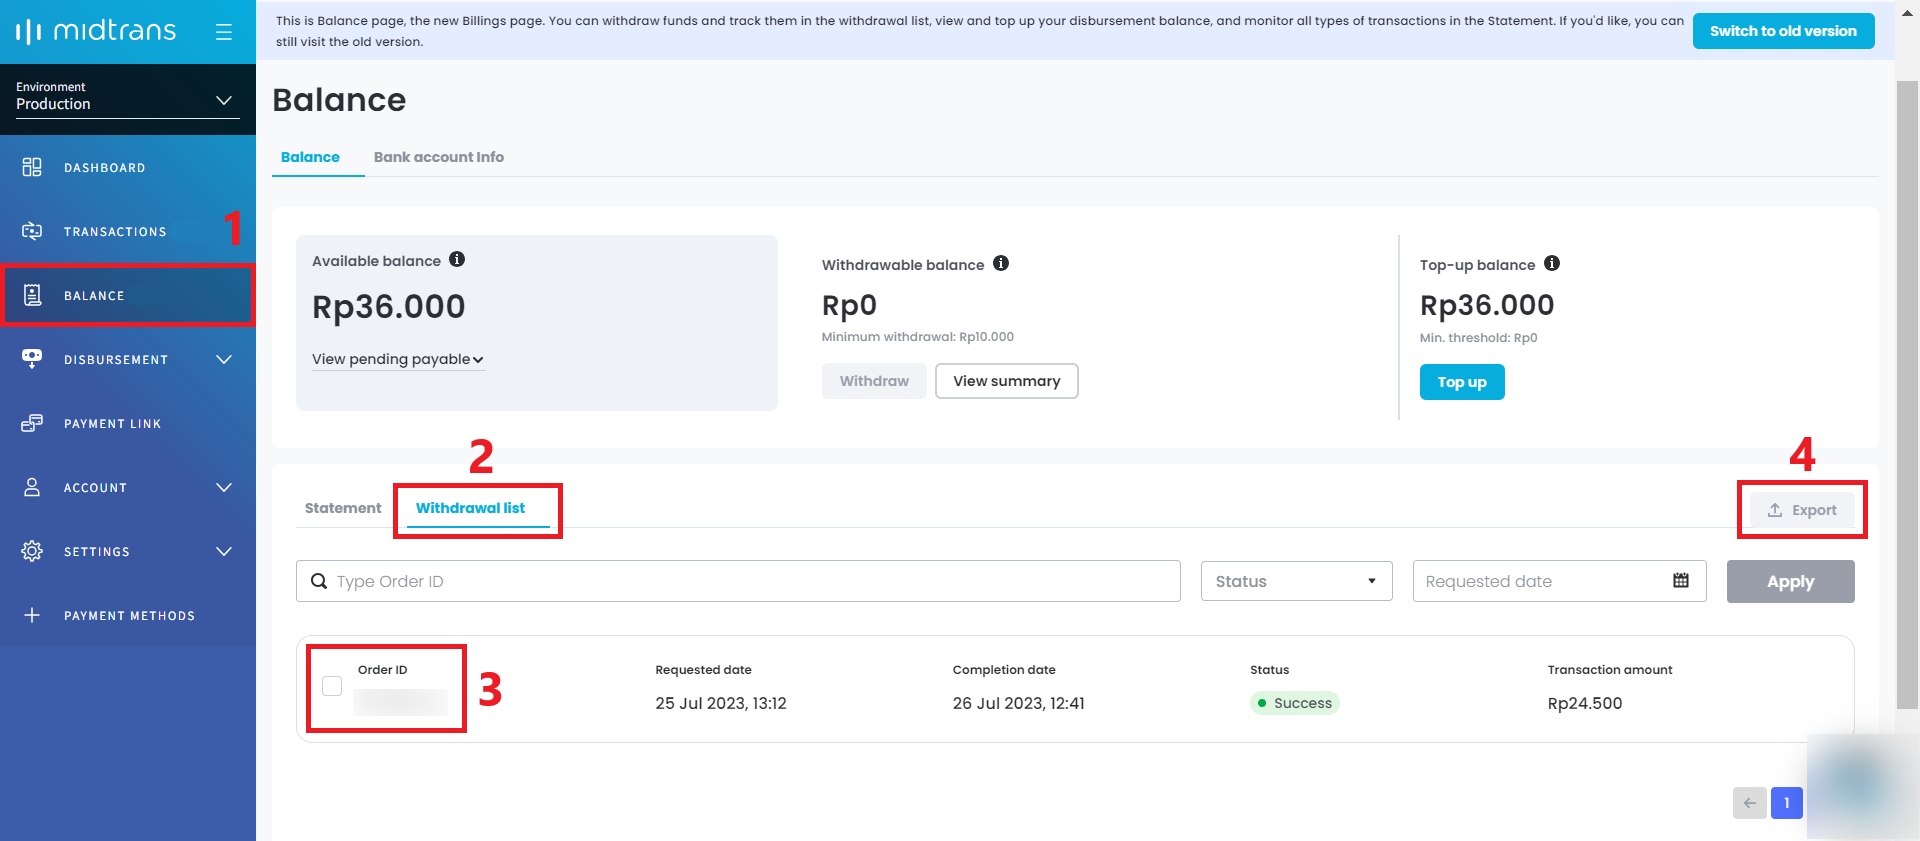
-
Click on the Withdrawal list. You can see the transactions and the details here.
Tips 💡If you need to export a specific transaction, you have to apply the filter. Please follow FAQ point number 6 (How to check the withdrawal and its status?).
-
Click on the checklist box on the Order ID that you want to export.
-
Click Export.
-
Choose the format you want to export between CSV or XLS file.
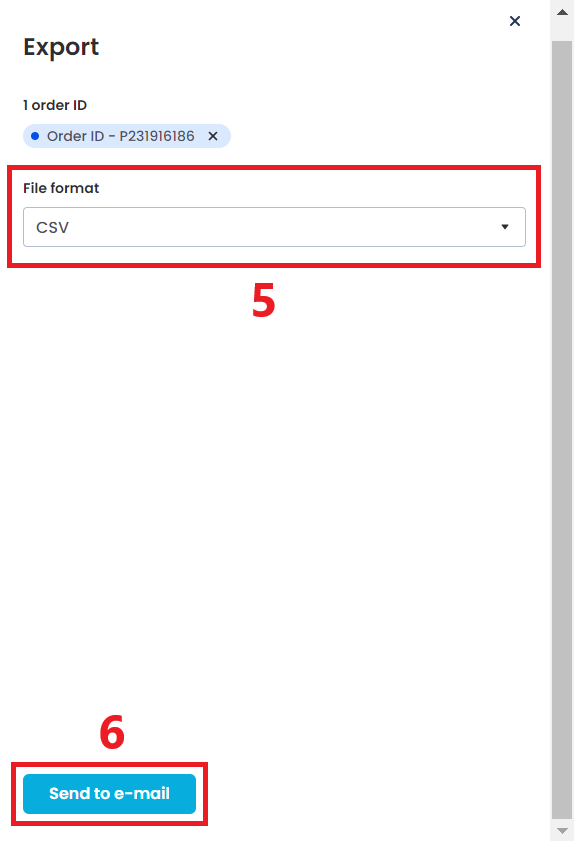
-
Click Send to e-mail. The exported data and the password will be sent separately to your registered e-mail.
-
Click Download Report (The link will expire within 3 hours).

-
Copy the password generated by the system.
-
Open ↗ the downloaded file and enter the password.
New Reporting Format (Payout Report)
With the new consolidated reporting in the dashboard between our Online Payments and Disbursement products, there will be three additional fields when merchants download reports via dashboard:
- Withdrawal ID
- Paid Date
- Requested/Created Date
| OLD FORMAT | NEW FORMAT |
|---|---|
| Payment Type | Withdrawal ID (new field) |
| Transaction Time | Payment Type |
| Settlement Time | Paid Date (new field) |
| Order ID | Requested/Created Date (new field) |
| Customer Email | Transaction Time |
| Credit Card Number Mask | Settlement Time |
| Refund Amount | Order ID |
| Amount | Customer Email |
| 3D Secure | Credit Card Number Mask |
| Card Association | Refund Amount |
| Acquiring Bank | Amount |
| Bank On Us/ Off Us | 3D Secure |
| Transaction Fee | Card Association |
| Merchant Has | Acquiring Bank |
| Refund | Bank On Us/ Off Us |
| Payment Options | Transaction Fee |
| Coins Share | Merchant Has |
| Transaction ID | Refund |
| QRIS Reference ID | Payment Options |
| Coins Share | |
| Transaction ID | |
| QRIS Reference ID |
How to change billing information?
There is a new shortcut from the Balance menu to change your Billing Information and Auto Payout configuration.
-
Click on the Balance menu on the navigation bar.
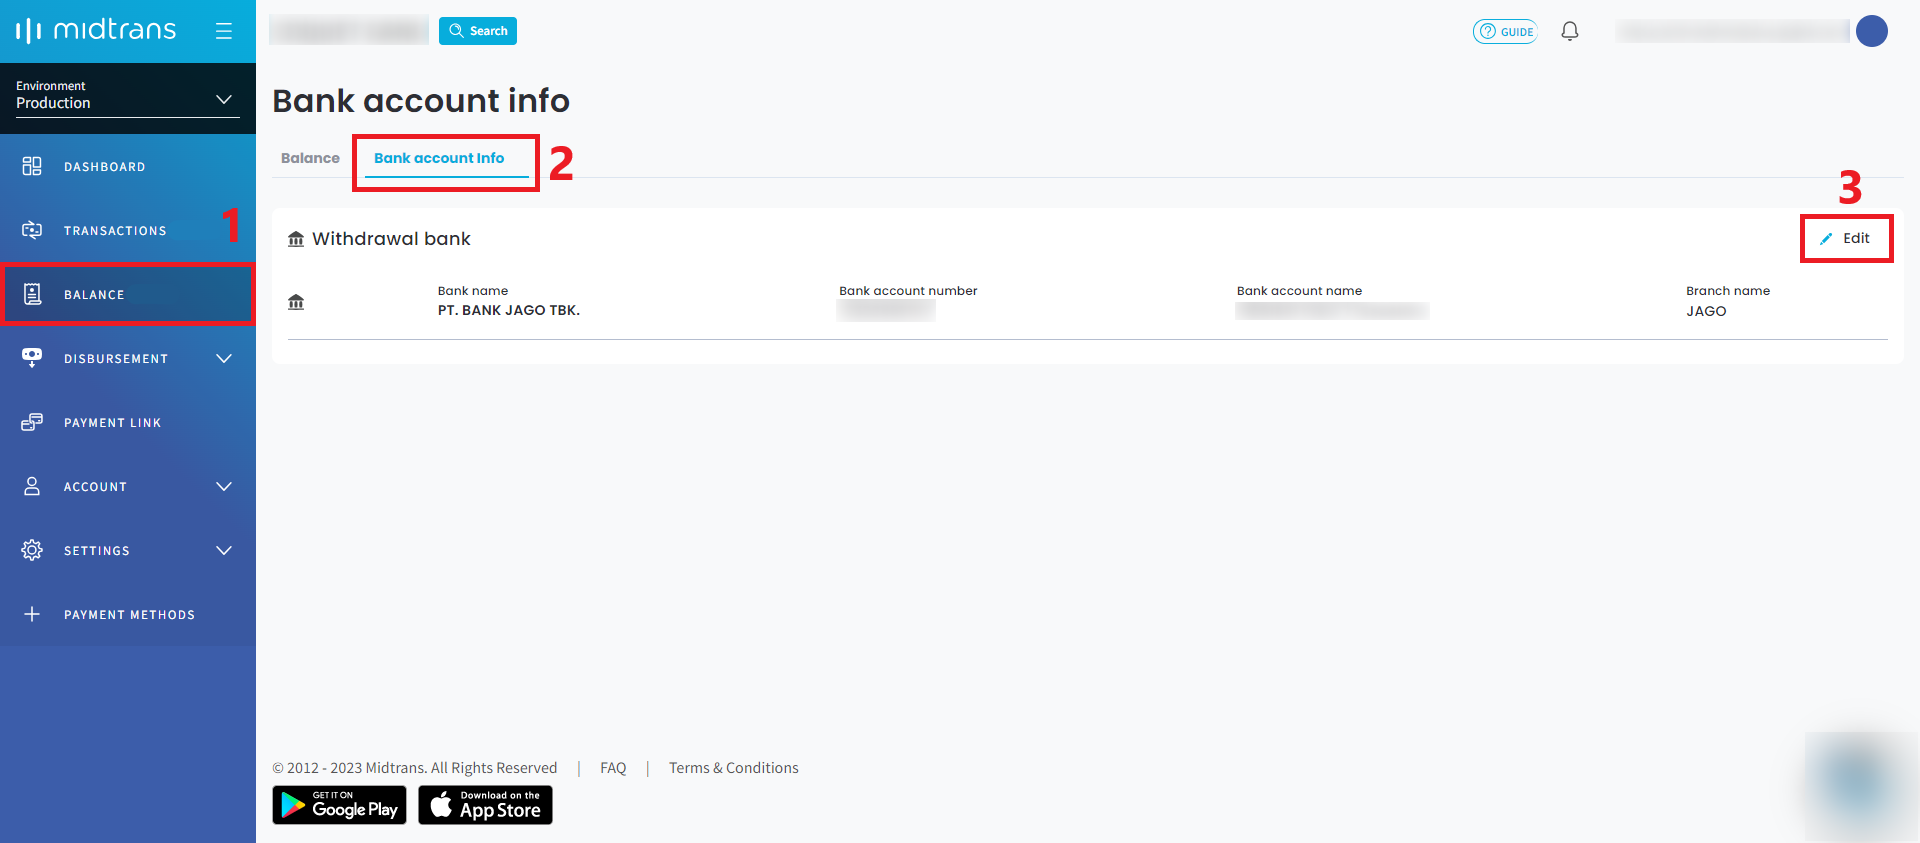
-
Click Bank account info.
-
Click Edit.
Can I use the old version?
Some changes have been made to Midtrans Dashboard, as we keep innovating to make your experience better. We hope you enjoy them! If you'd like, you can still visit the old version by clicking the Switch to old versionbutton.
Updated 3 months ago