
Payment Link
What's new - June 2026We're rolling out new look for the Payment Link page loaded with various enhancements to streamline the creation experience, such as :
- Auto-Generated QR Codes: Every Payment Link now automatically generates its own unique QR code. Download and share it to offer your customers a seamless new way to access Payment Link, whether online or printed offline.
- Ready-to-Use Text Templates: Skip drafting messages from scratch. Instantly copy a pre-formatted billing text prefilled with your payment link, ready to send to your customers via chat or email.
Payment Link provides an easy way to accept payments from your customers. Midtrans generates a link which redirects the customer to Midtrans's hosted checkout page. No technical integration is required. It is suitable for small business owners or sellers on social media platforms such as Instagram, Facebook, WhatsApp and so on.
Creating a Payment Link
To create a Payment Link, login to your MAP account, (optionally switch to your desired environment mode) and follow the steps given below.
- Click Payment Link on the left sidebar.
- Click Create button as shown below.
After clicking the Create button, you are redirected to Payment Link page.
Quick create Payment Link
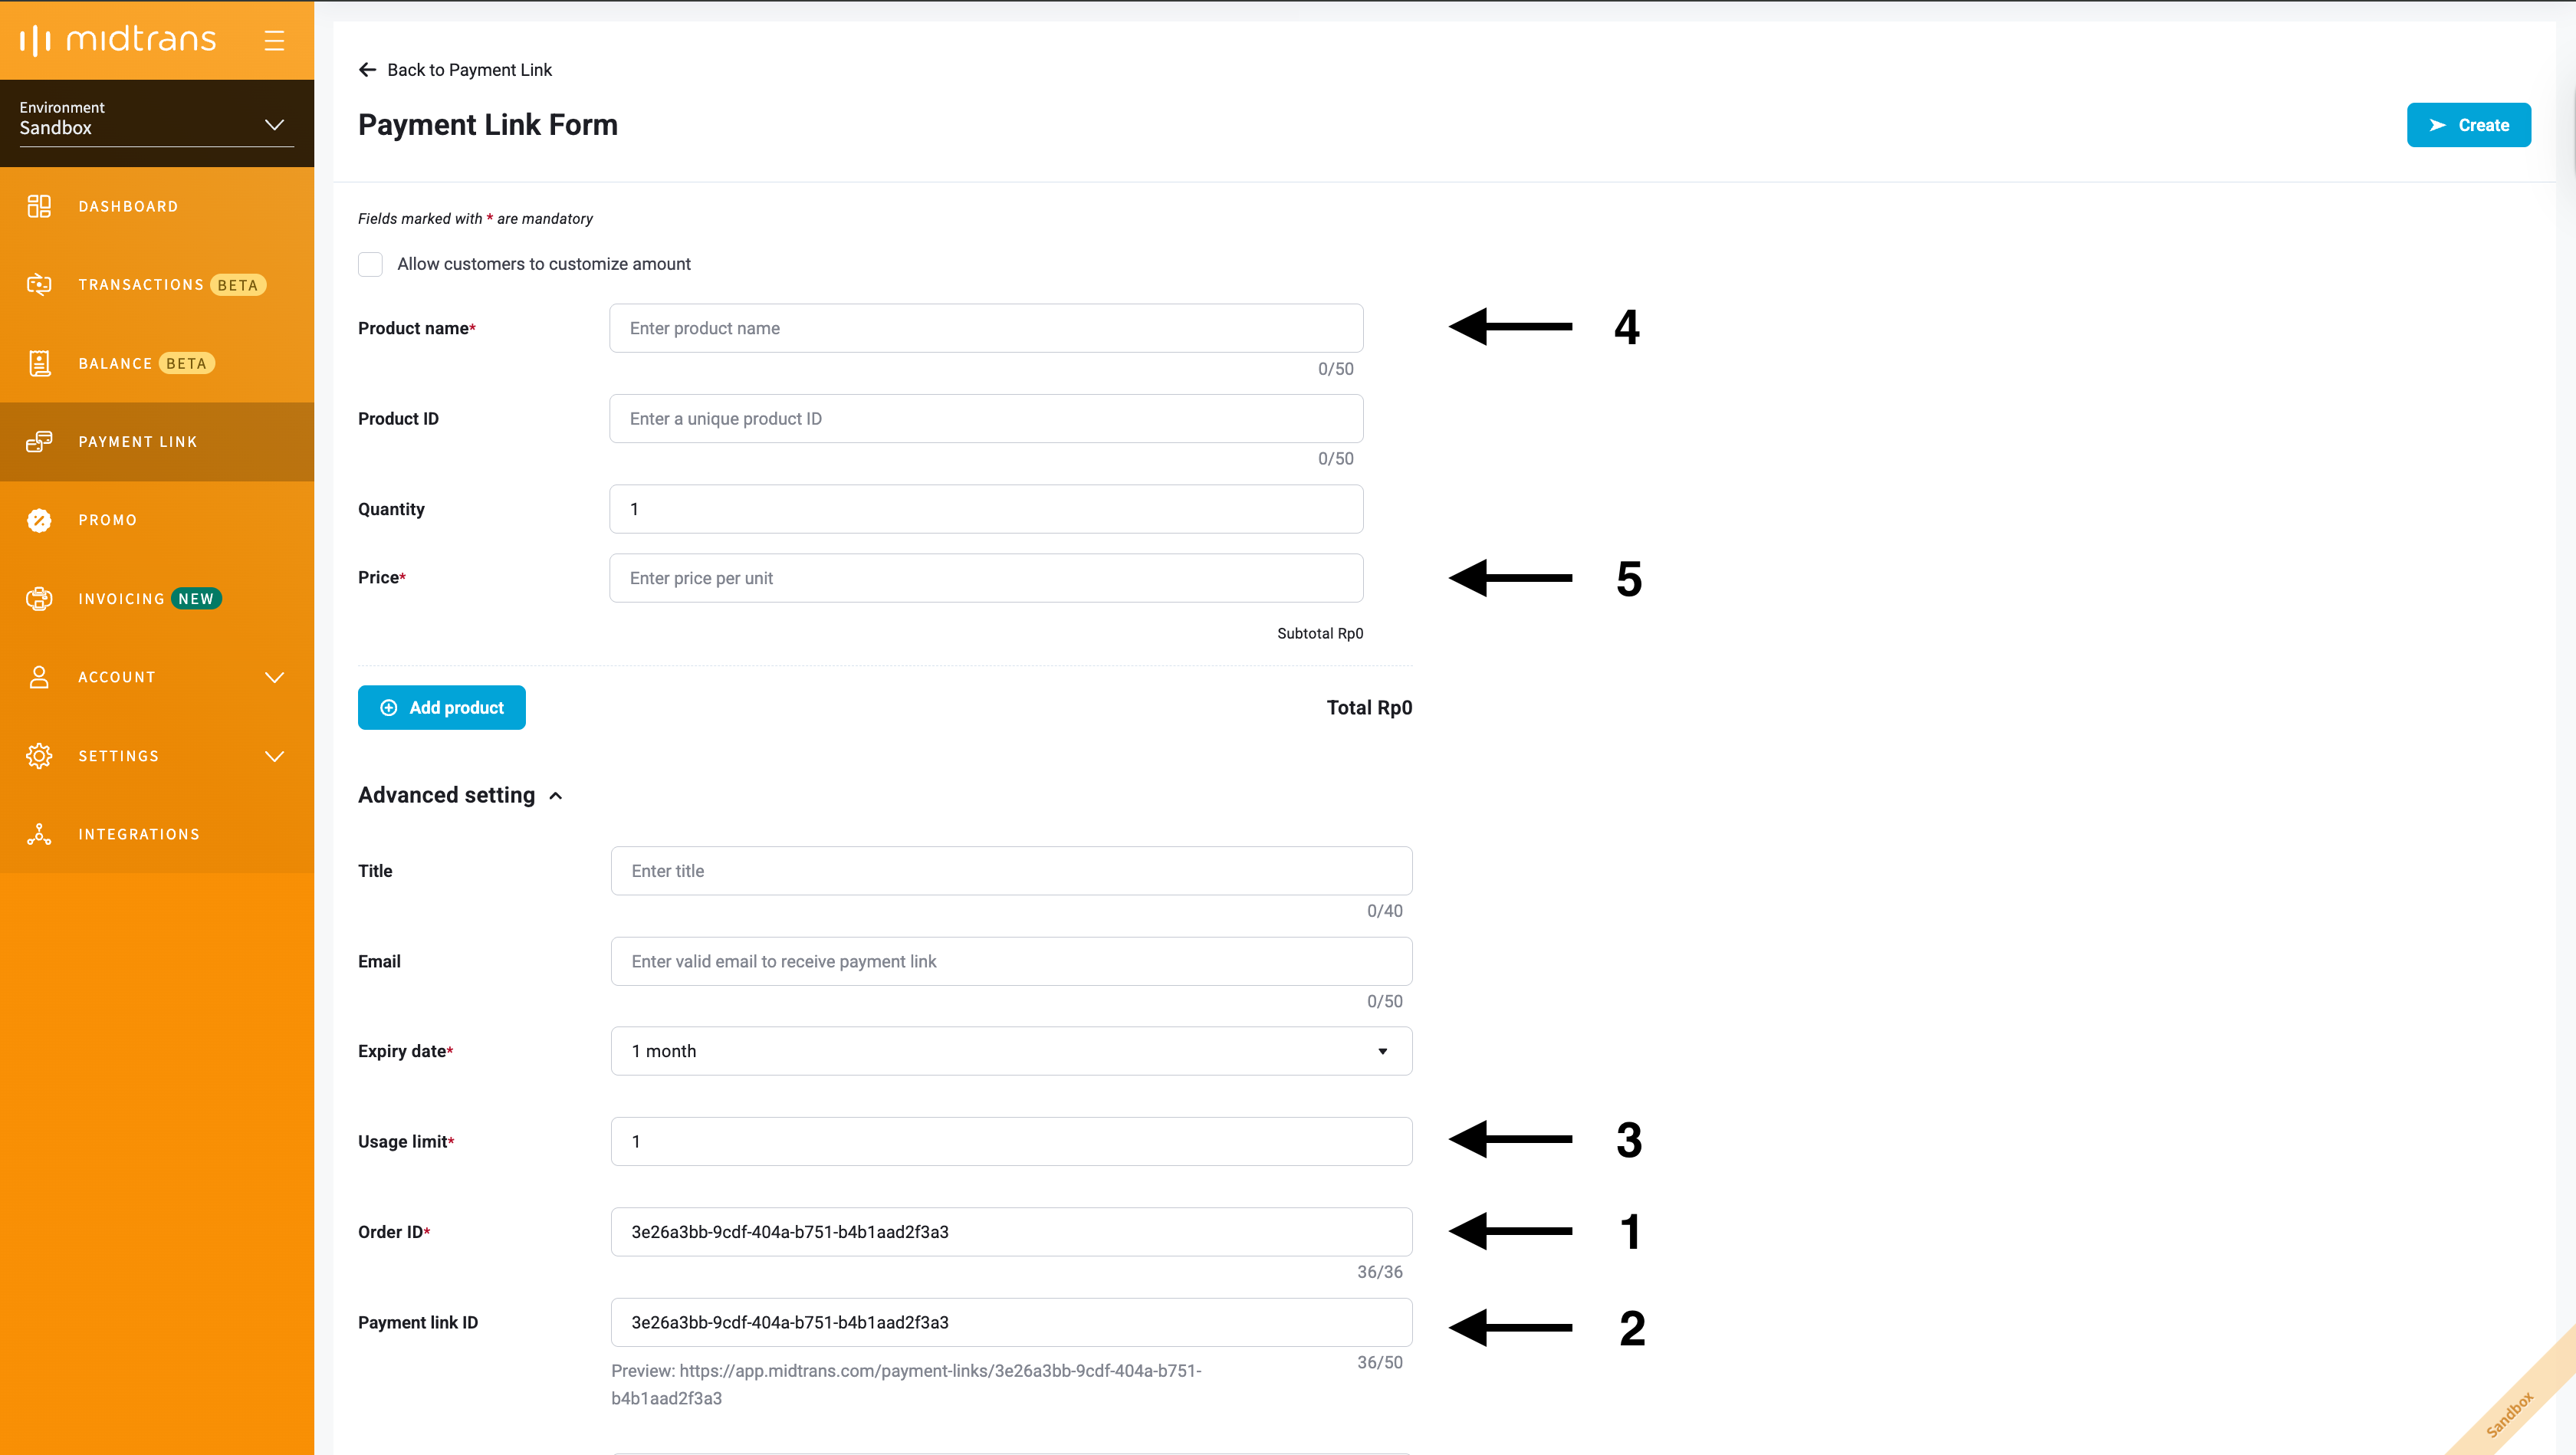
To create a link, you only need to fill in the top fields which are Product Name, and Product Price, then click Create.
If you need to modify additional details, you can modify it in the Advance Settings, but it is optional.
After filling the required fields, you can click on the Create button and the payment link is ready to use.
| Label | Field | Type | Description | Remarks |
|---|---|---|---|---|
| 1 | Order ID | Auto generated | It is unique ID for each Payment link. | Each time, when you create a Payment Link, Order Id gets generated. |
| 2 | Payment Link ID | Auto generated | It is the URL address of the Payment link. | You can share the URL of Payment Link with your customers or on any social media platform. |
| 3 | Usage Limit | Auto generated | It is a maximum number of times the Payment link can be used. | If this field is set, then you can use the Payment Link for specified number of times. |
| 4 | Product Name | Needs to be filled | It is the name of the product or service you are selling. | - |
| 5 | Product Price | Needs to be filled | It is the price of the product or service you are charging. | Product price of every SKU. Negative amount is also accepted (e.g. -10000) for usecases such as showing Discounts. |
Pro Tip :
If you have a discount component as part as your SKU breakdown, you can incorporate it as part of Product Details as follows :

Additional Information
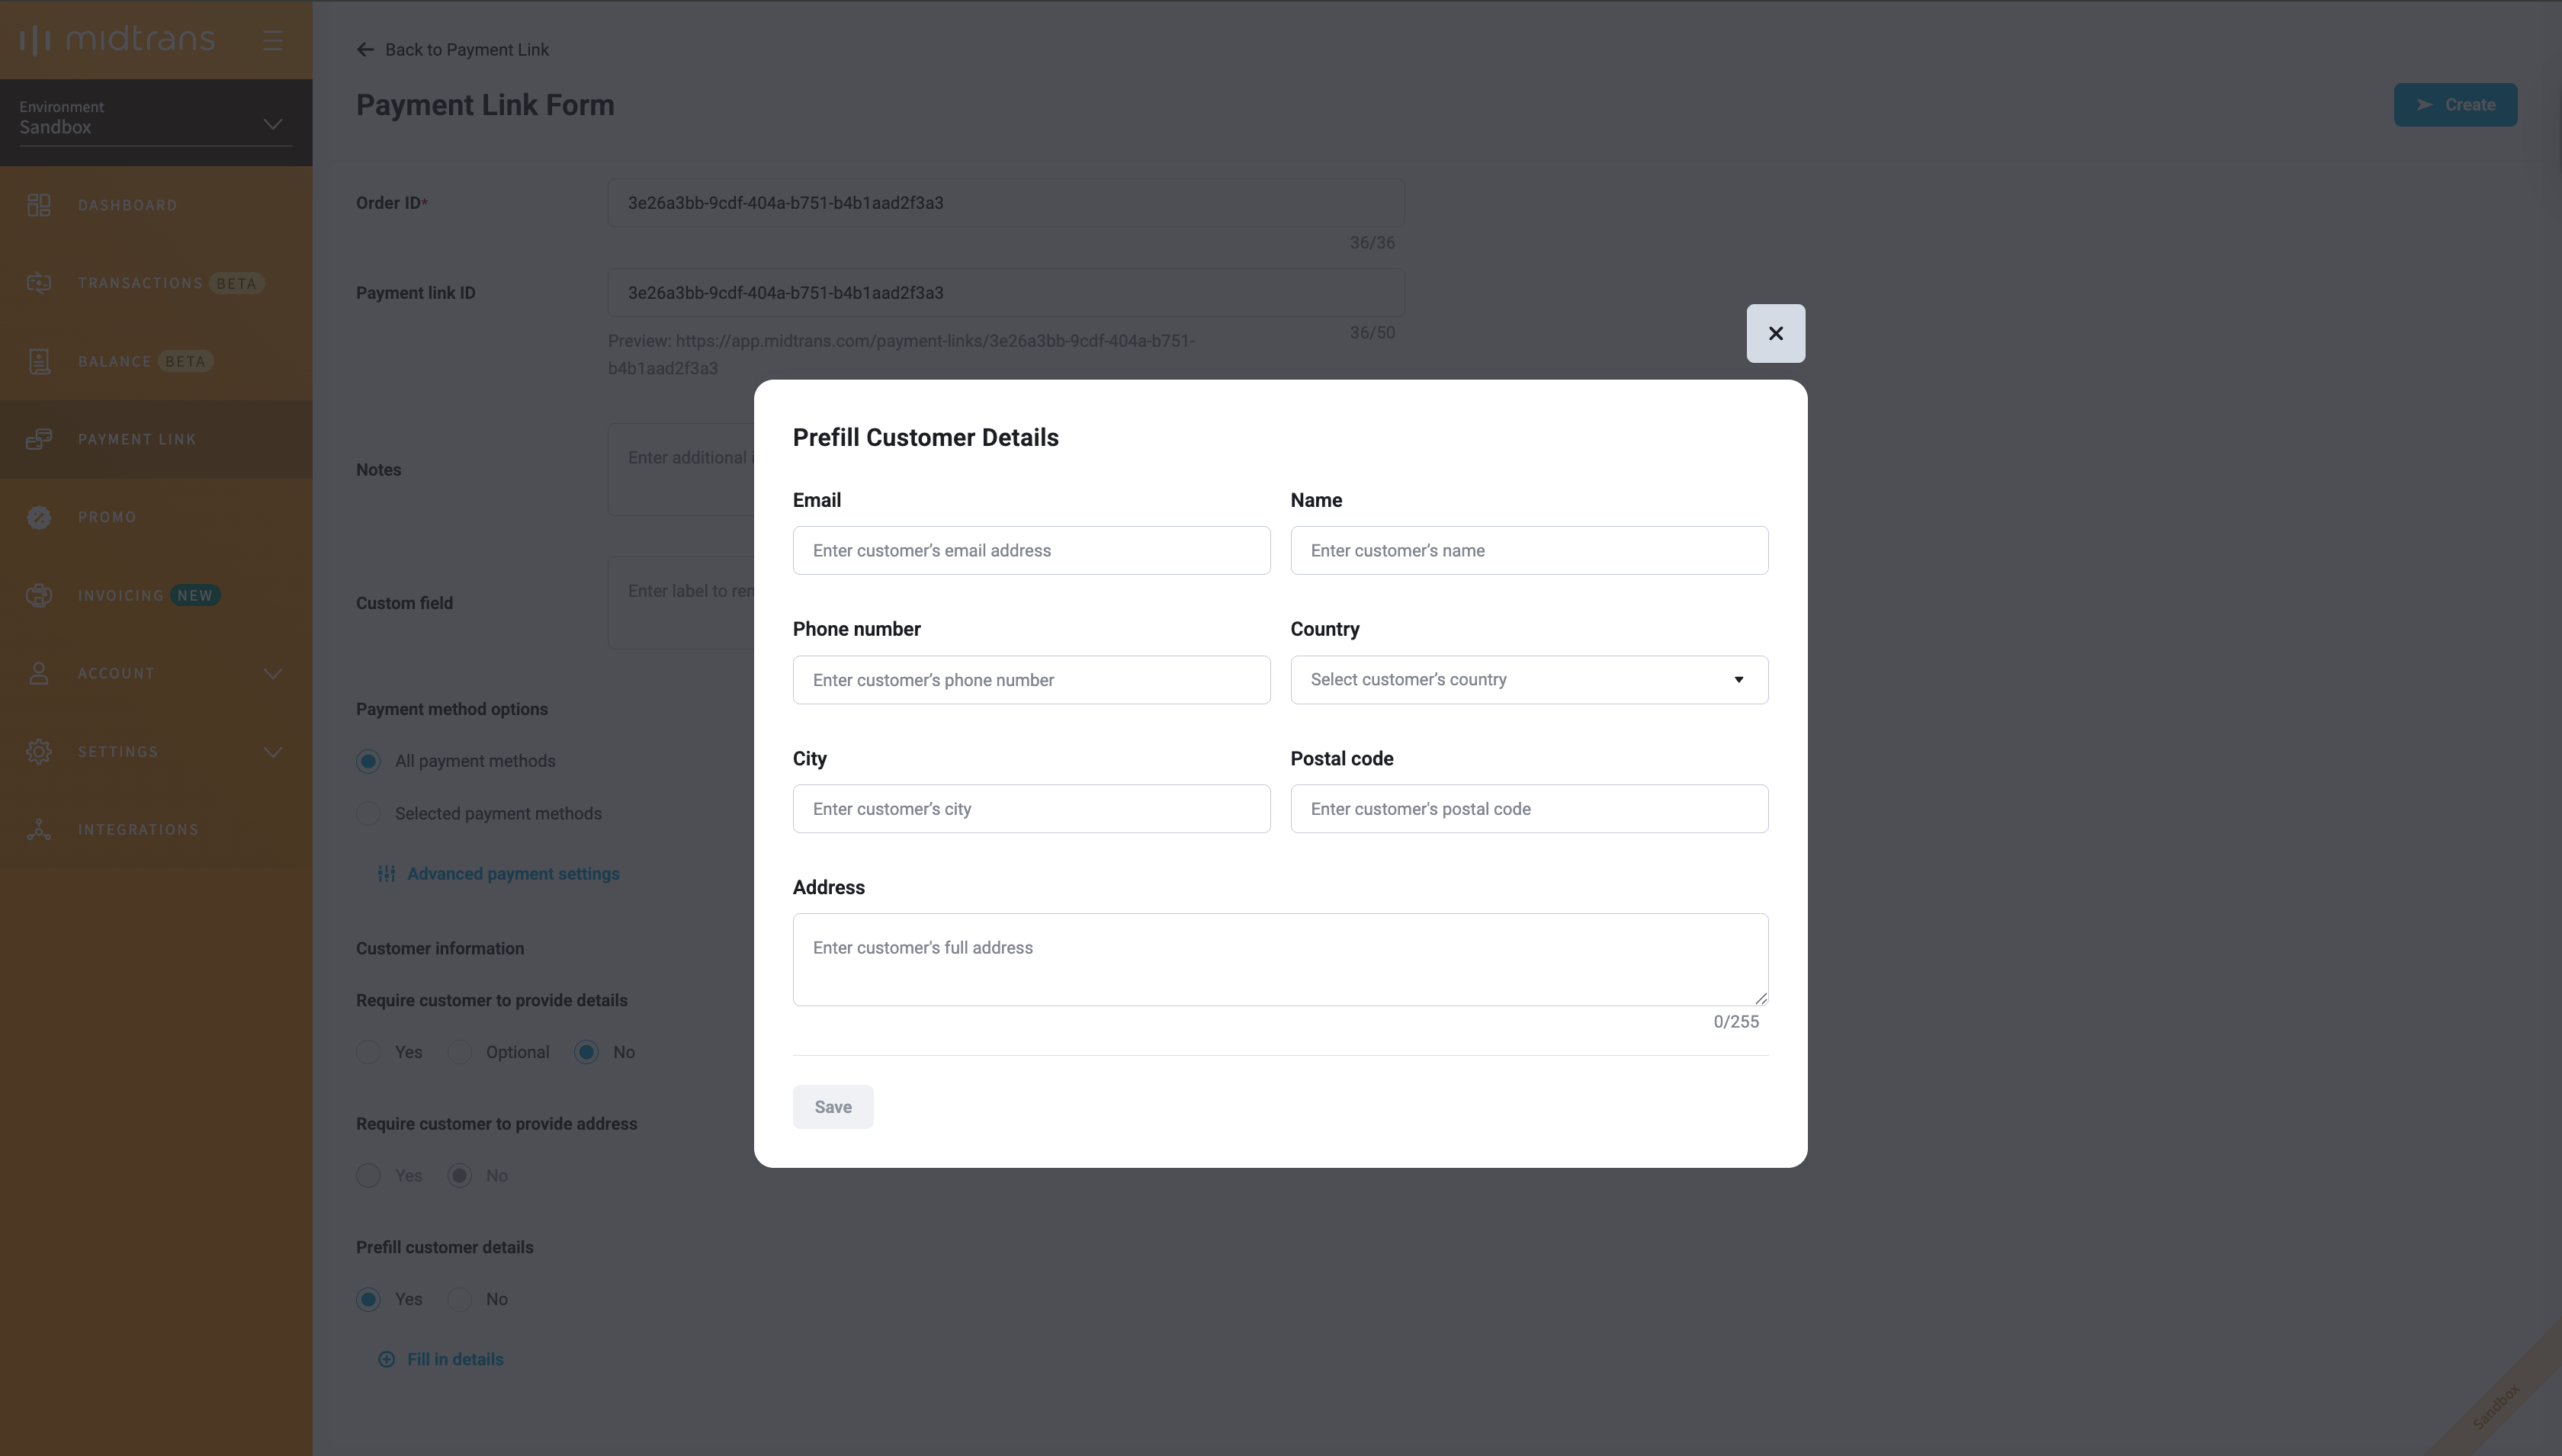
If you need to include or modify additional information, then go to the Advance Settings. All information here is optional to be modified.
Additional options are available:
- if you want to send the Payment Link to a specific customer
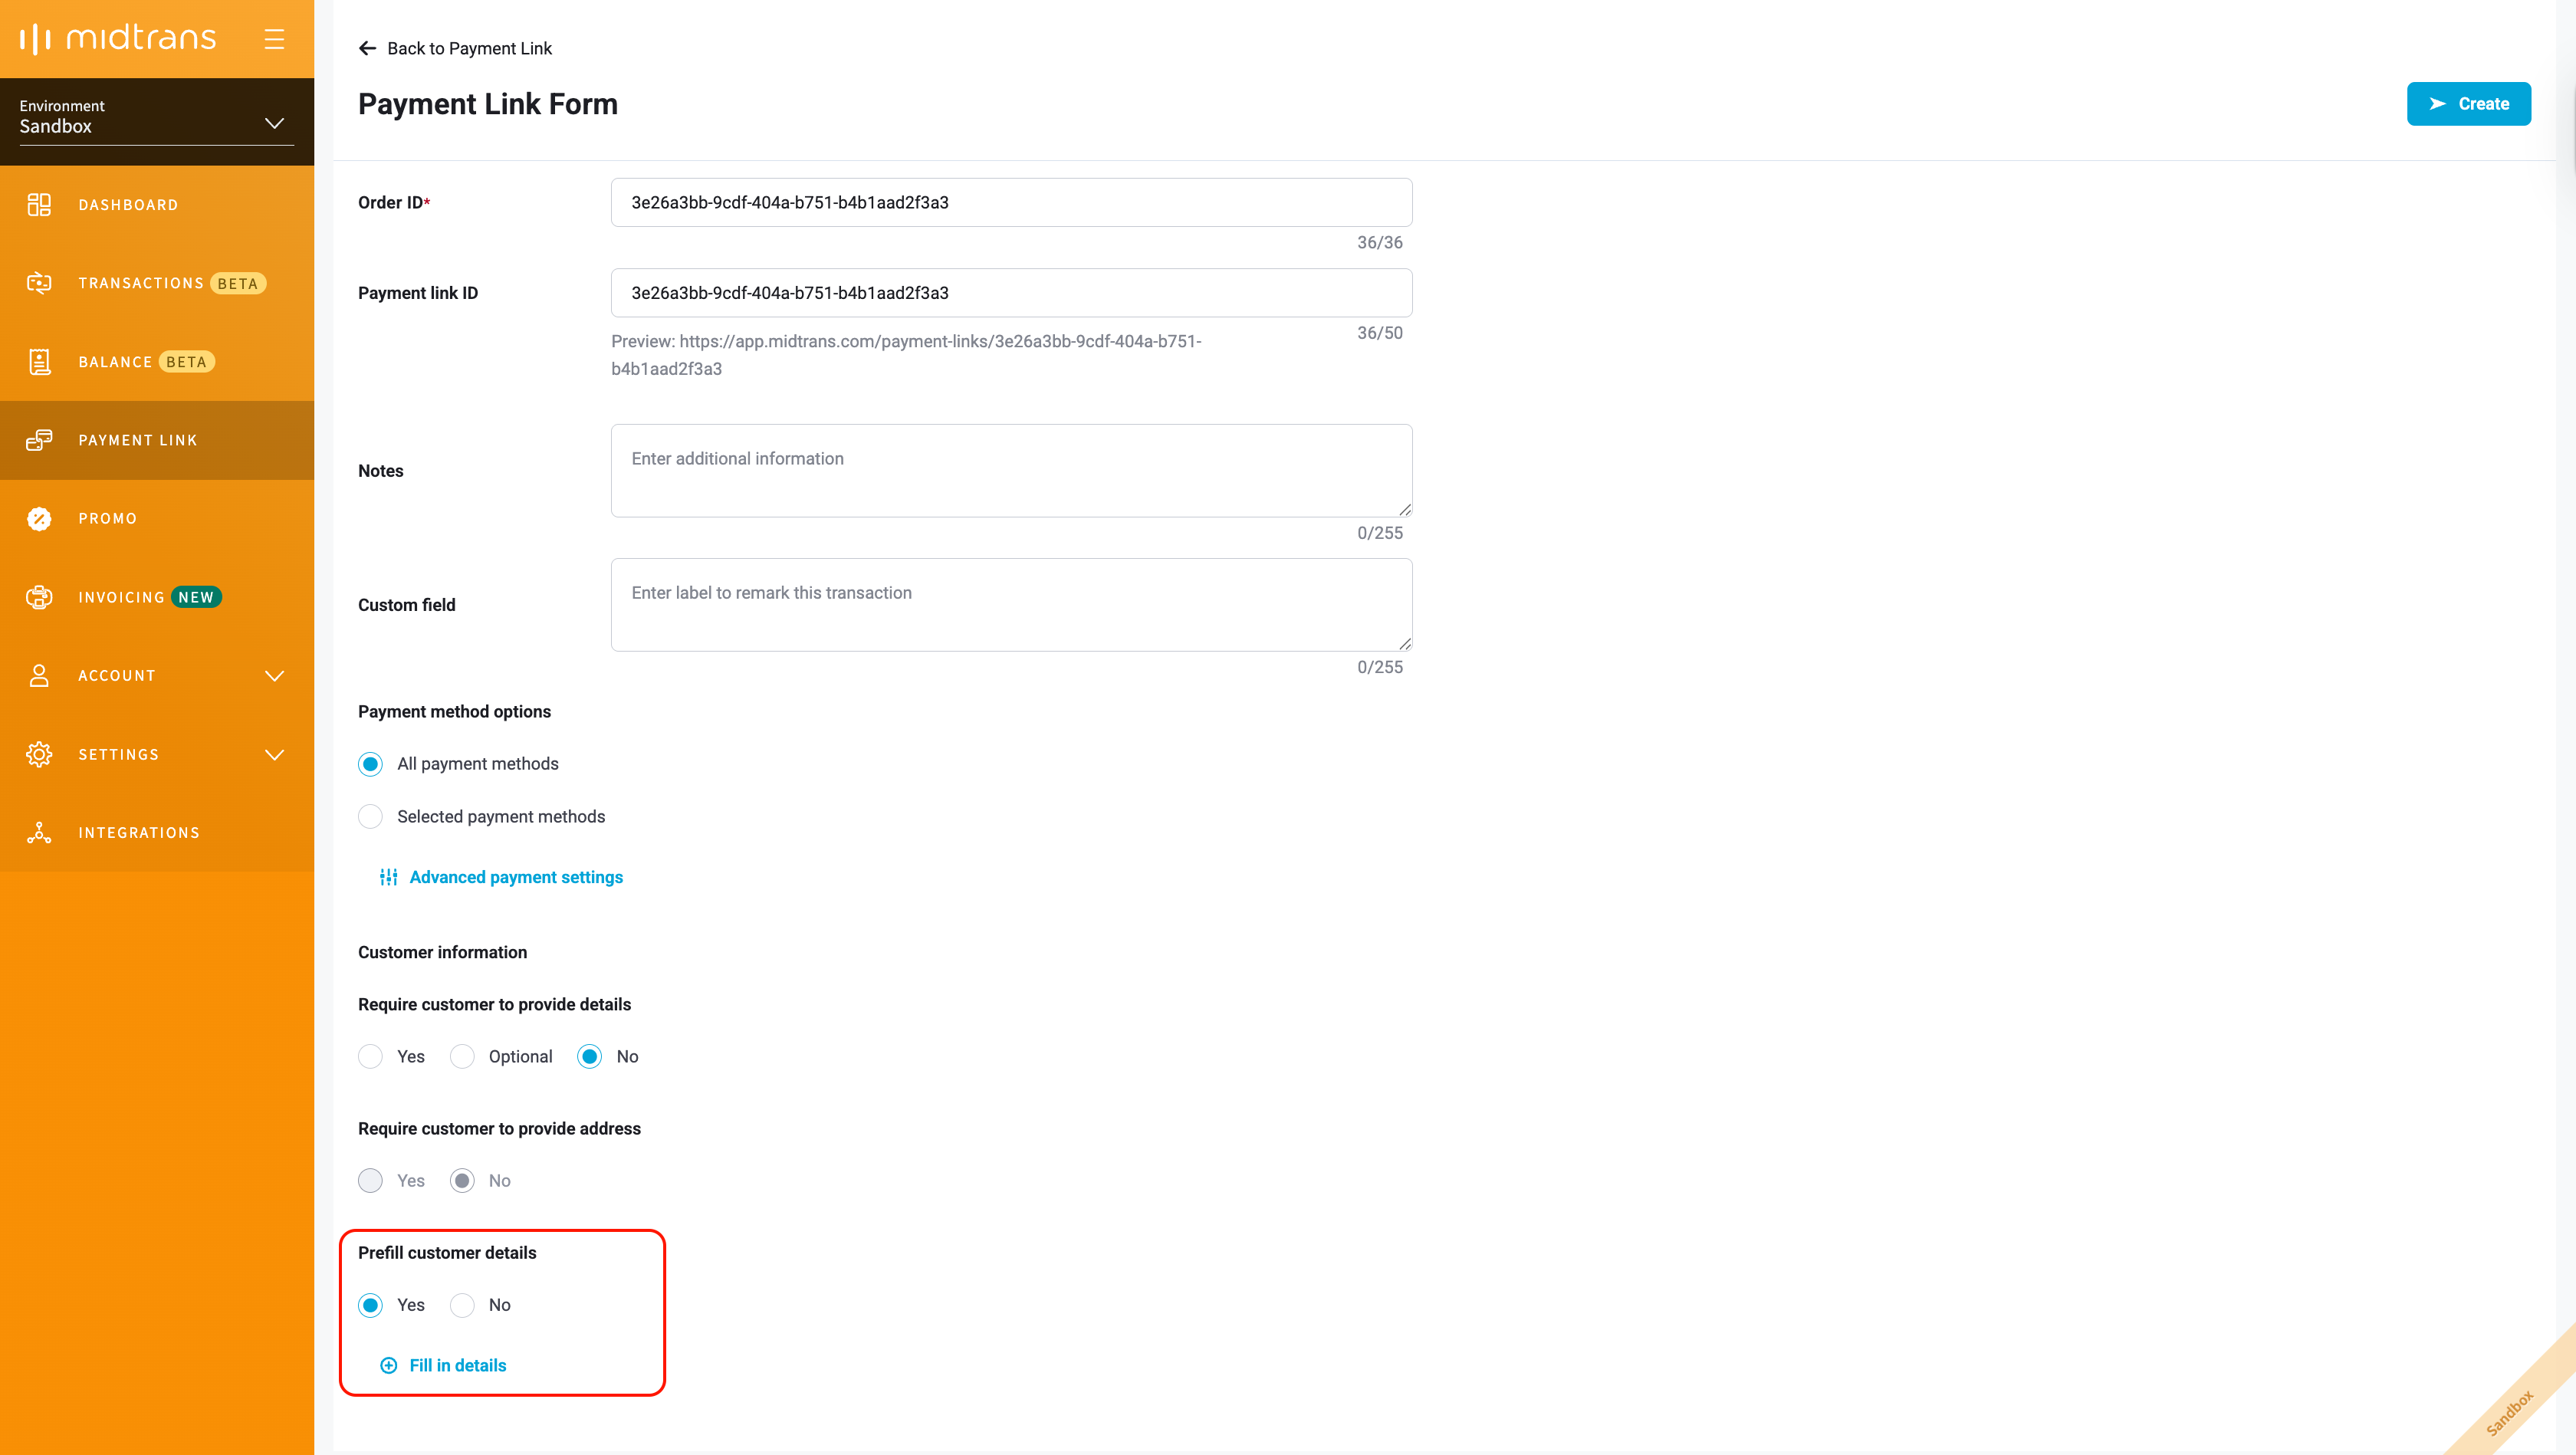
- if you want to include an expiration time and date.
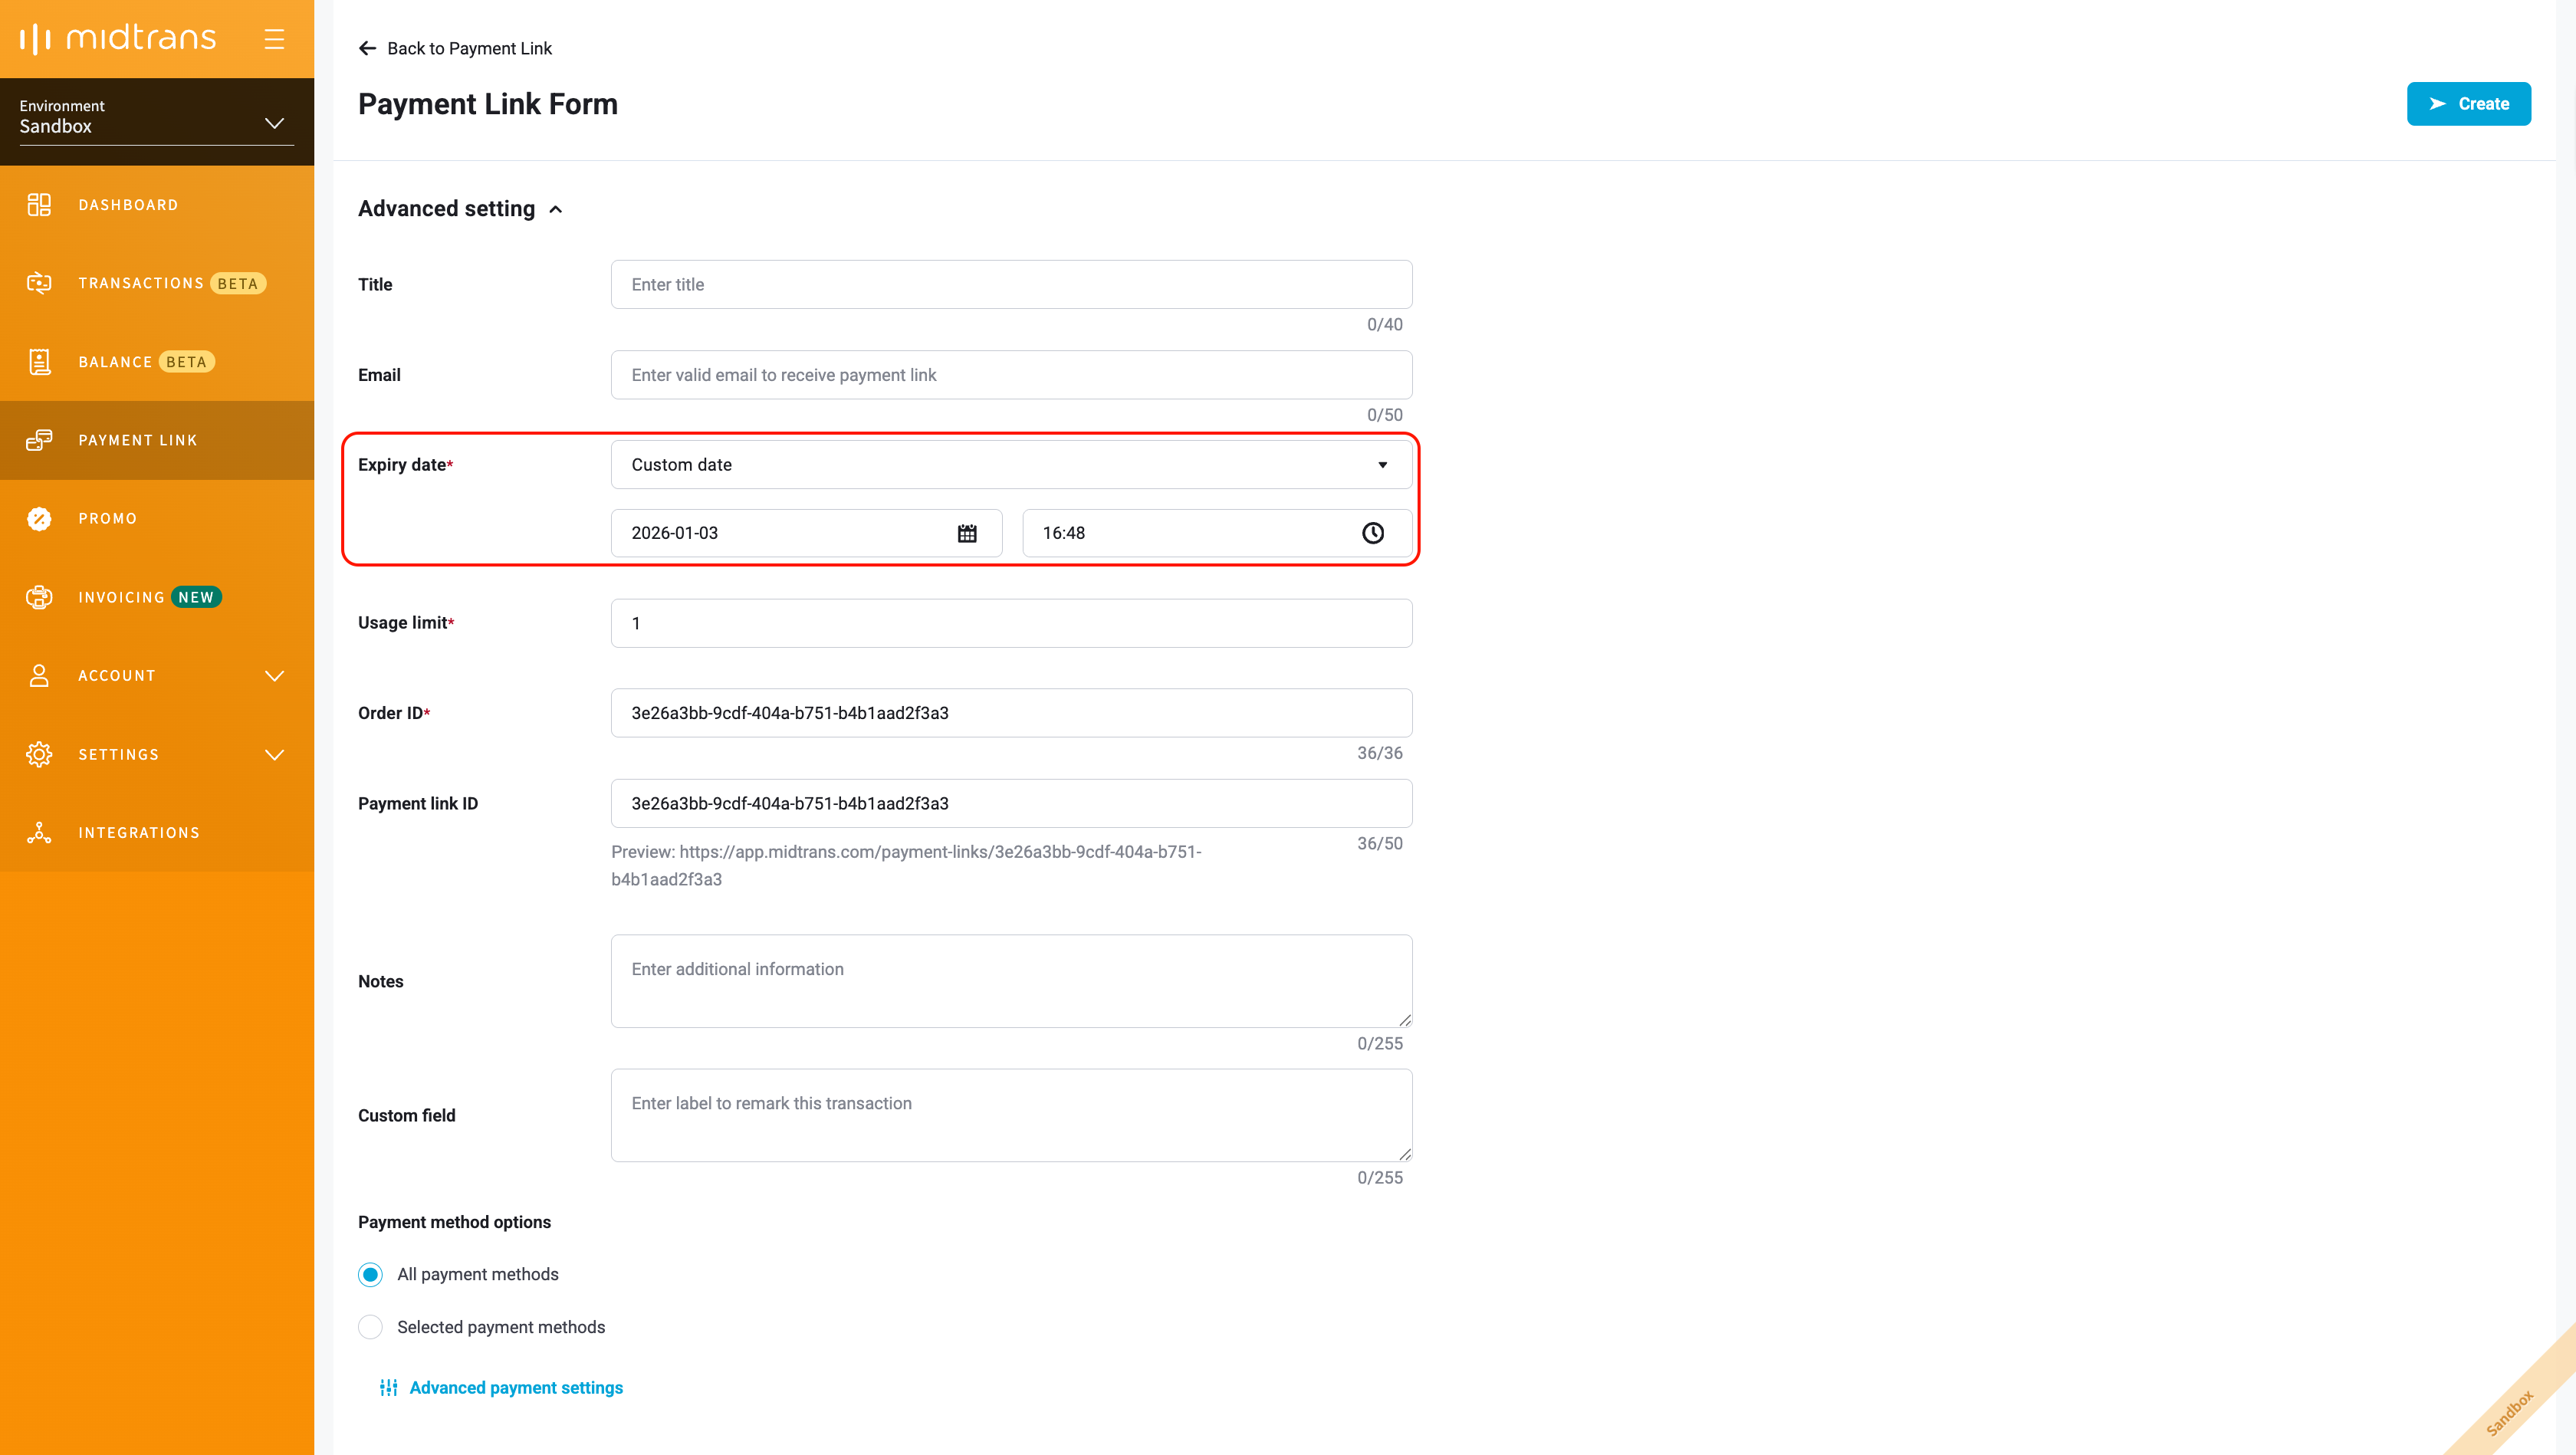
If the transaction is intended for a specific customer, the Payment Link is sent straight to the specified customer’s email address.
- Expiration Date field contains the date and time until when the Payment Link is valid.
- Maximum Usage field indicates the number of times the link can be accessed.
The Payment Link is valid until either the Maximum Usage number is reached, or the expiration date/time is reached, whichever occurs first.
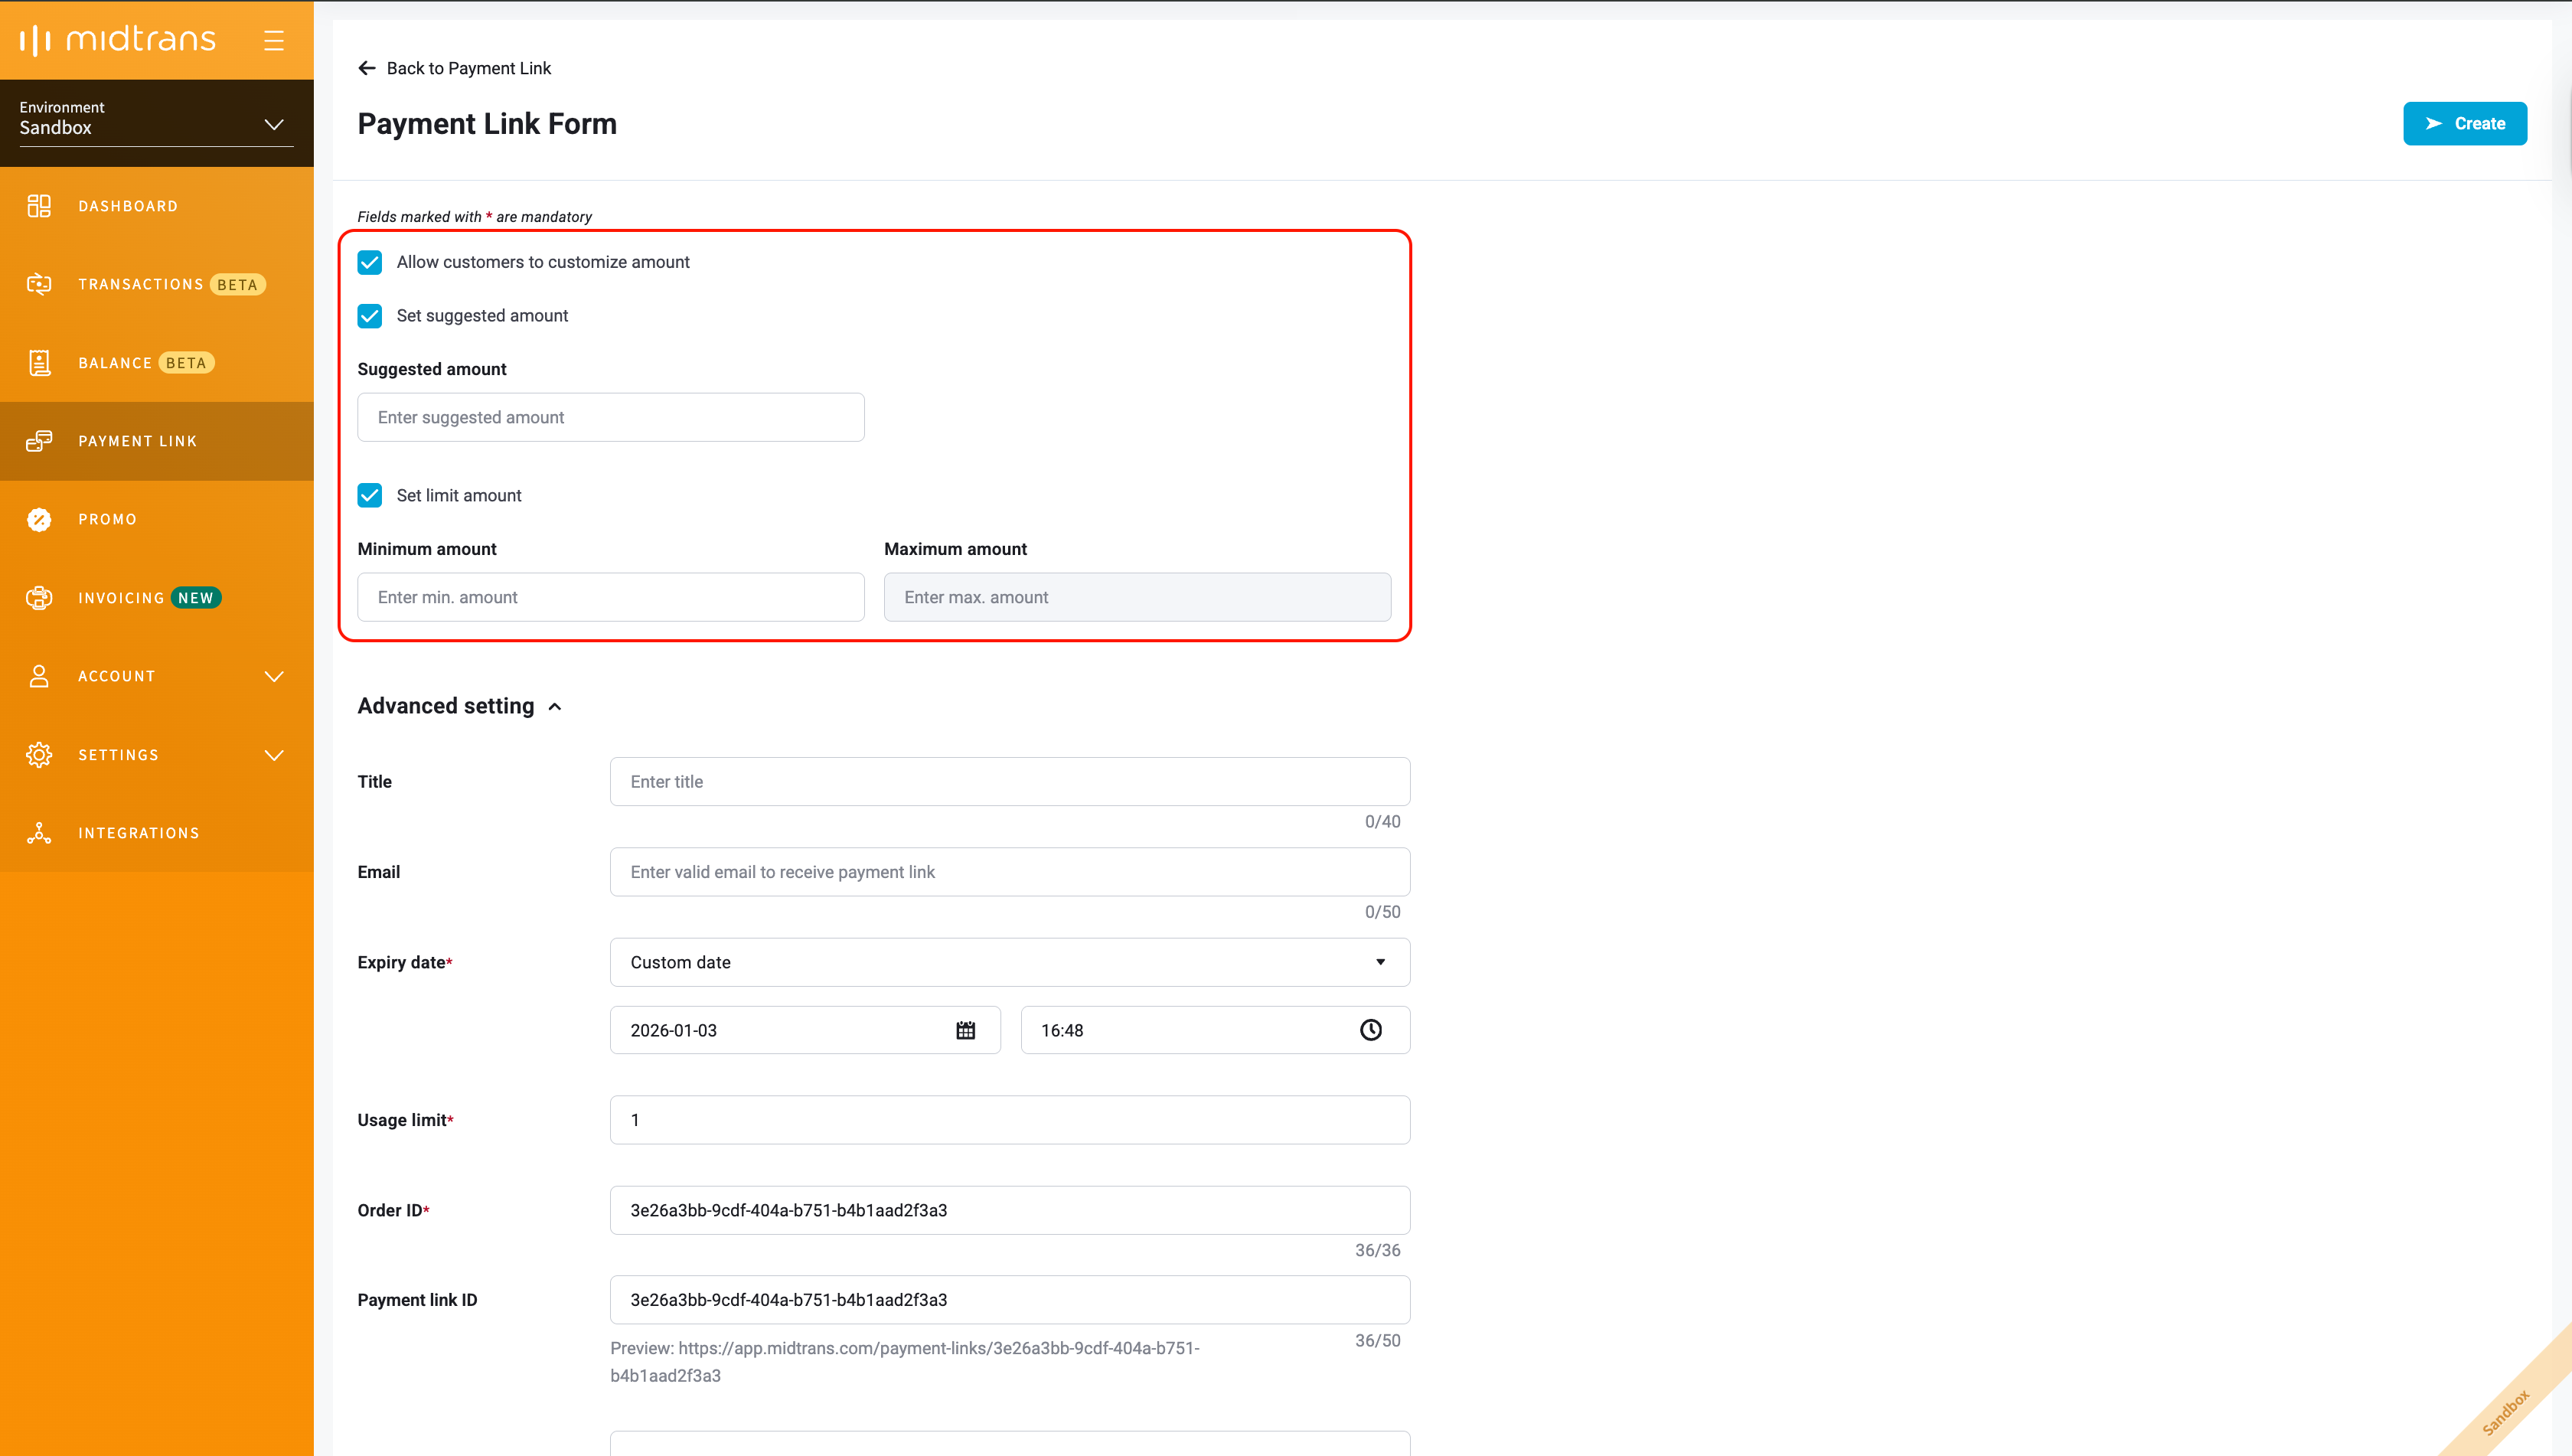
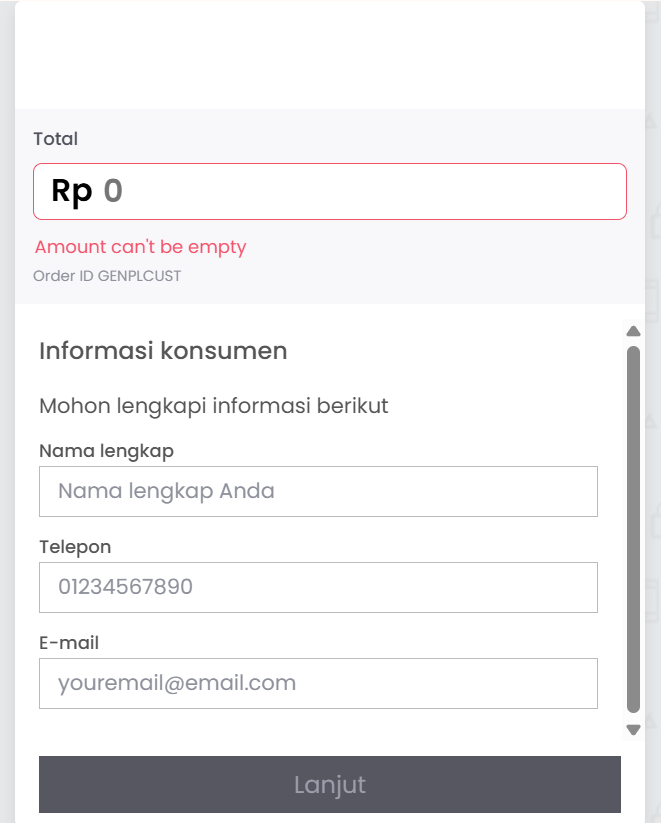
Dynamic amount support
You can also create a payment link where customer can define the amount when making payment instead of it being predetermined by merchant when creating payment link via the feature 'Dynamic Amount'. This is useful for usecases e.g. donations, repayments, tuition payments, down payments, preorders, and many others.
This feature is available for both dashboard creation flow, bulk create flow, and API creation flow.
To do so when creating payment link via dashboard, follow the steps below :
- Click Payment Link on the left sidebar.
- Click Create button.
- Tick
Allow customers to customize amount - Fill in additional information as necessary :
- Suggested amount : amount that you can suggest for your customer to pay. When filled in, payment link's amount will be filled in with the prefilled amount, but can still be changed by user. This is useful for your customers when the amount to be paid is usually the same for every payment, however in some cases there might be some exceptions. This reduces possibility of human error in inputting the correct amount in customer's side as well. Preset amount is optional.
- Set limits : min and max amount that you can set as the bottom and top boundary - customer will not be able to input amount lower or higher than the set boundaries. Limits are optional
- Click Create as usual and share the link to your customers.
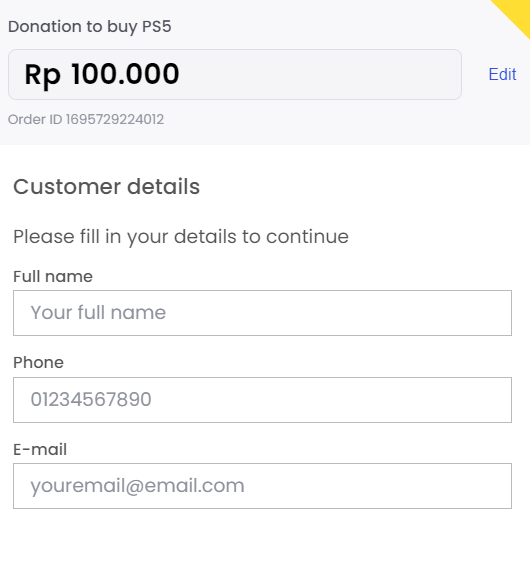
Your customer then will see the following screen when they first open the payment link page (below example is when a preset amount is set) :
NoteYou cannot input product / SKU details when creating a payment link with Dynamic amount feature.
Bulk Create Payment Link
You can also create payment links in bulk by uploading a CSV file containing the details of the payment links that you want to create. To do so, go to Dashboard > Payment Link then click the Create Button > Bulk Upload.
You can find the CSV templates to fill in order to create payment link via the top right Download CSV Template button.

The following information are mandatory to be filled in :
| Field name | Description / Notes |
|---|---|
| gross_amount | Amount without decimal or currency marker |
| first_name / last_name | Fill in either first name or last name |
| item_details_quantity | Cannot be in fractions. Item quantity multiplied by item price should match gross amount |
| item_details_name | Max 255 char, string |
| item_details_price | Amount without decimal or currency marker. Item quantity multiplied by item price should match gross amount |

Once you've uploaded, you will see the 'Processing' status. Click 'Refresh' to check for the latest upload status - if status is successful, you can download the details under 'Action' column to check which payment links are successfully created and if not, what are the errors. You can also retrieve the payment link URLs for successfully created payment links via this CSV.
Optional : Setup Default Settings
To access the Payment Link Settings page, go to Payment Links page > click the Settings button, or go to Settings menu in the navigation bar > Payment Link.
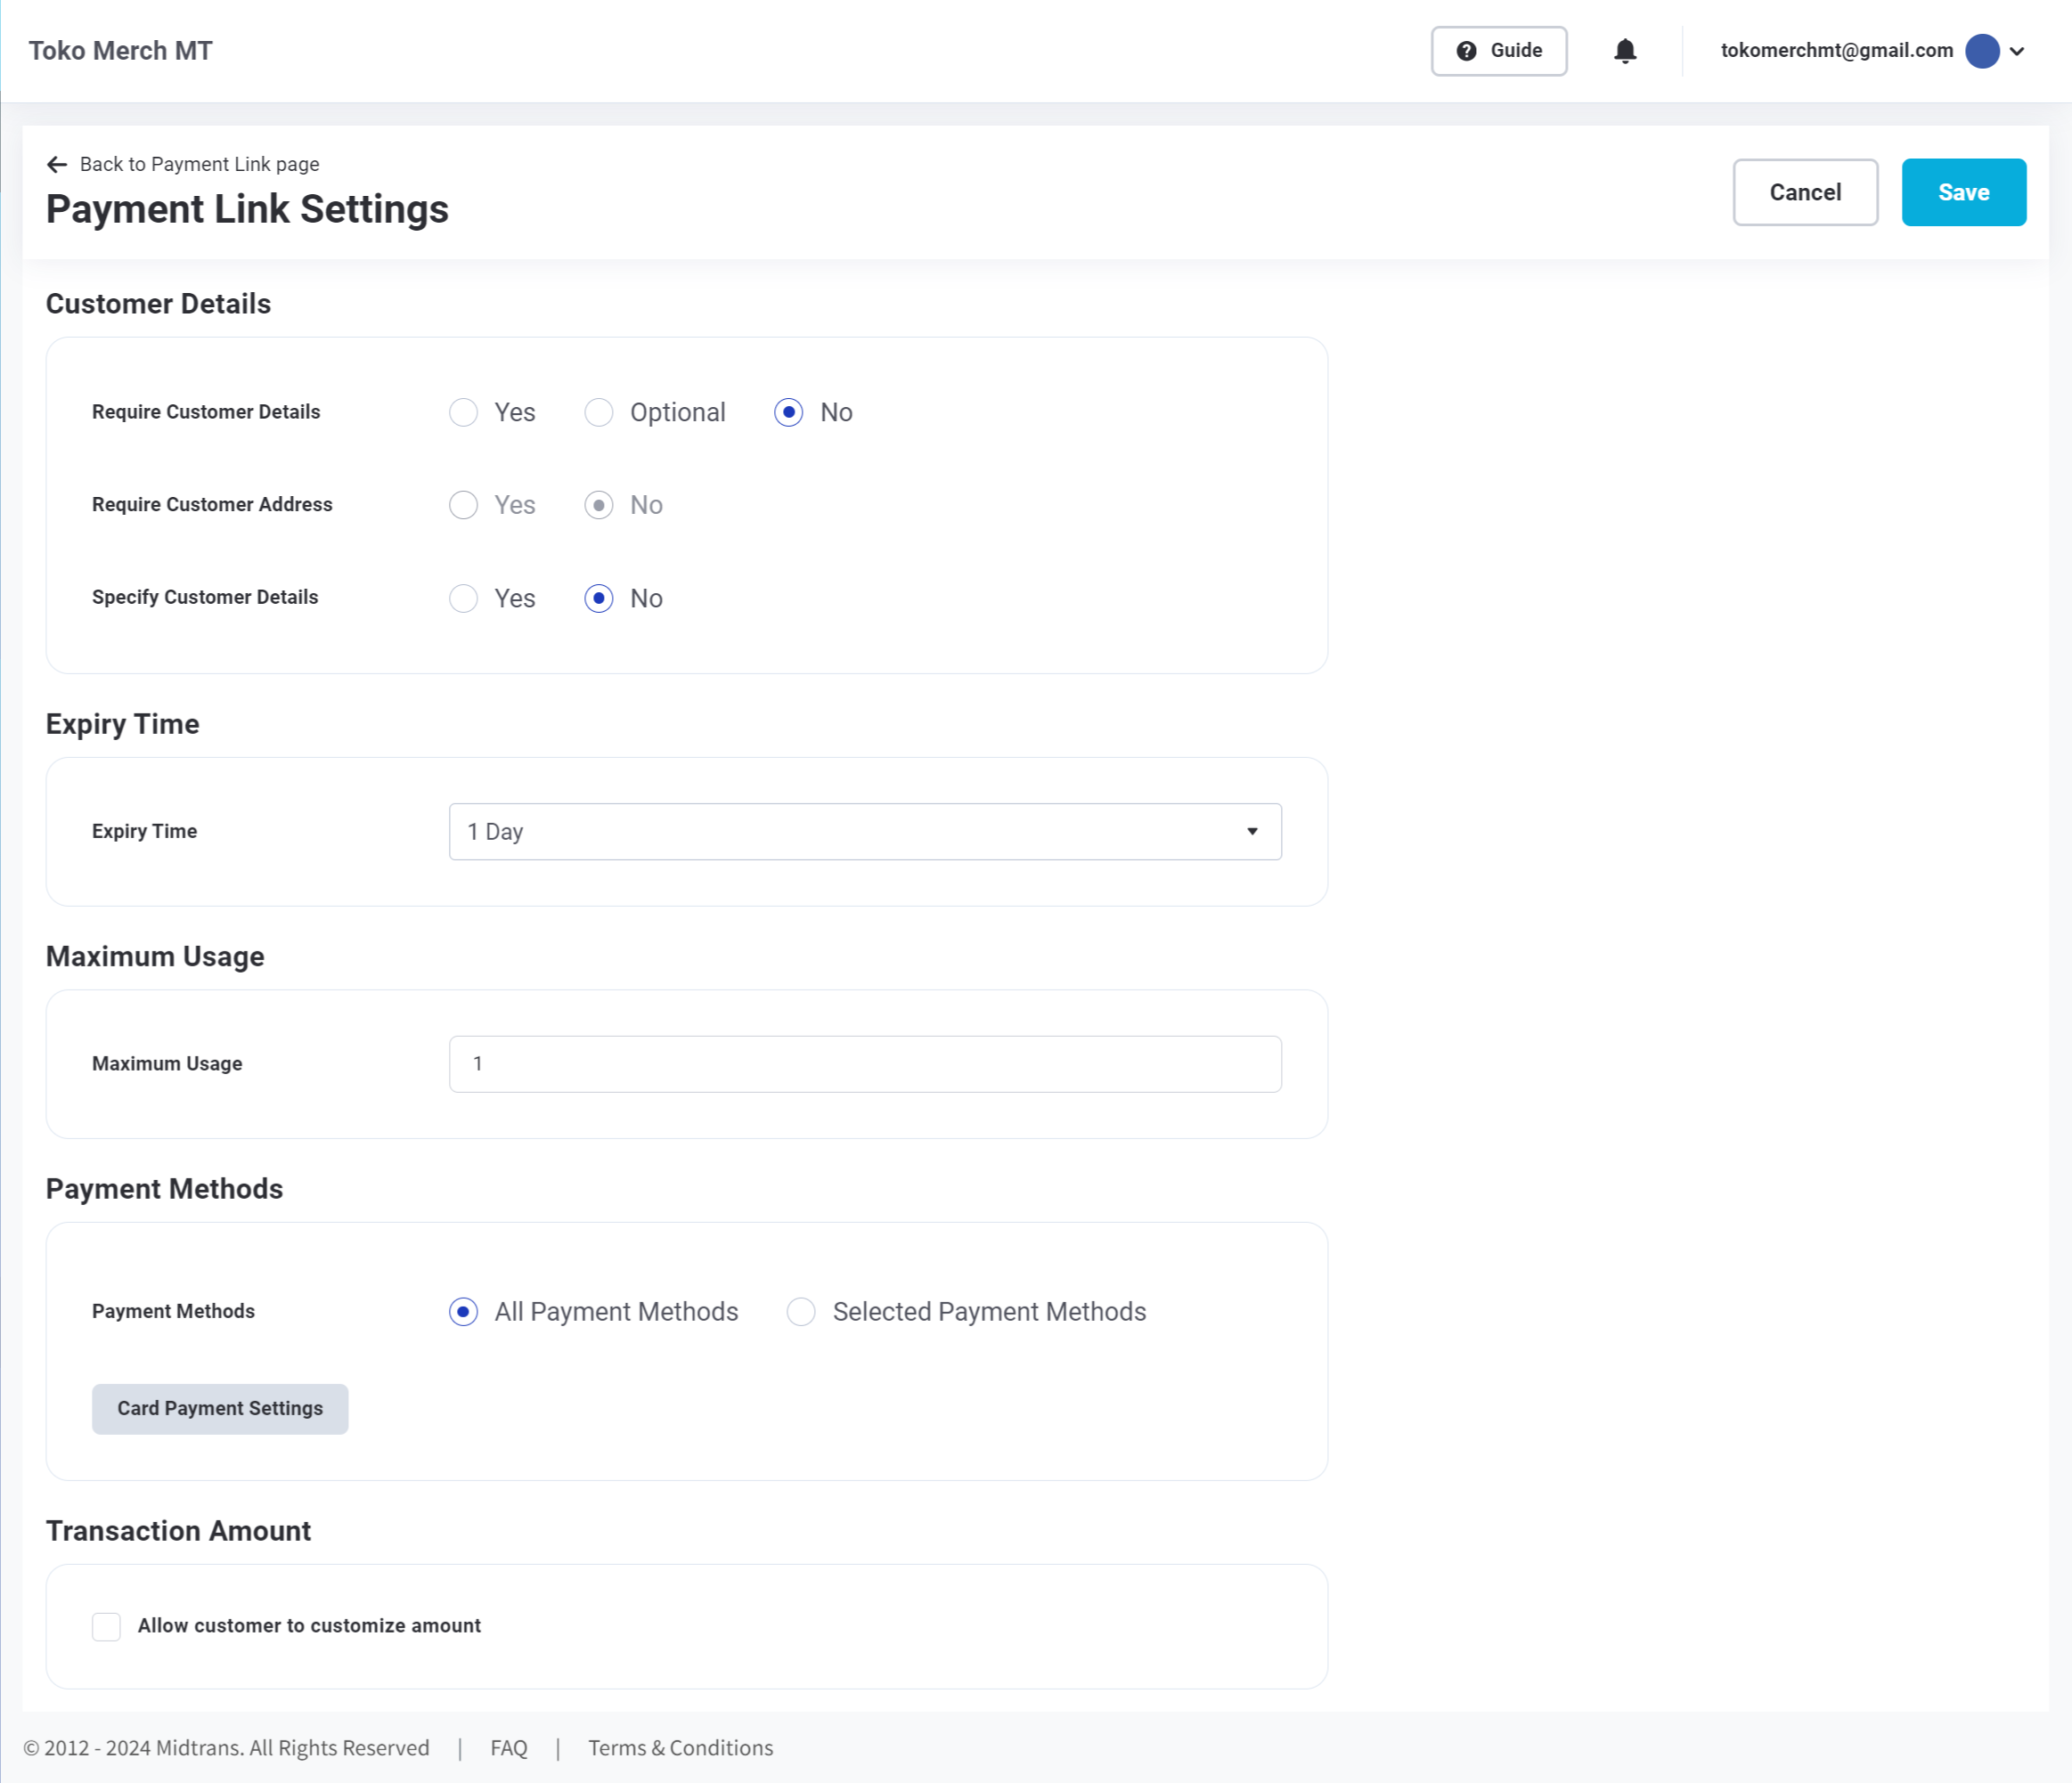
Payment Link Settings Page
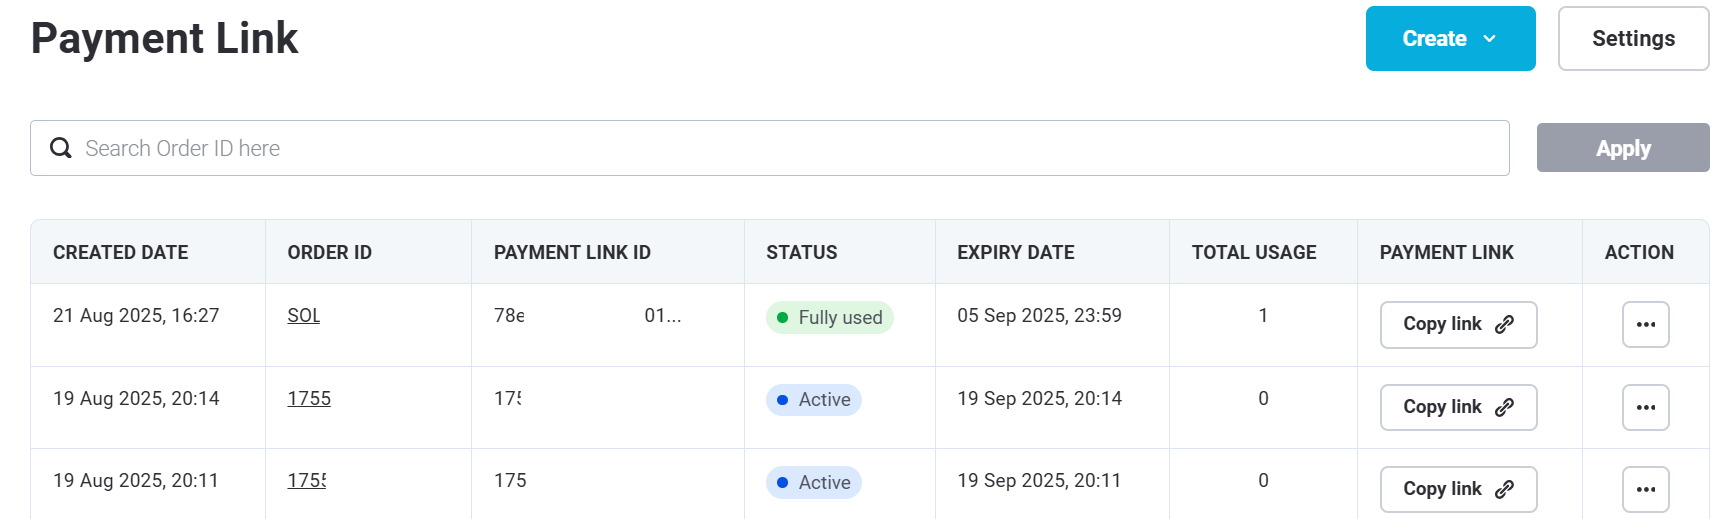
Managing Payment Link
After creating the Payment Link, you are redirected to the Payment Link List page where you can view a list of Payment Links created. You can copy and share any of your links to your customers. You can see details of the links as well as you can delete your links from this page. In the detail page, you can:
Track Orders: View the total number of orders generated by the Payment Link. Clicking the view details will redirect you to the transaction page for a detailed transaction breakdown.
Text Template: Copy a ready-to-use message template pre-filled with your payment link. You can quickly copy and send this official format to your customers via chat or email without drafting a message from scratch.
QR Code Sharing: Instantly download a unique, high-quality QR code automatically generated for your Payment Link. This allows you to accept payments seamlessly across both online and offline channels:
- Online: Share the QR Code image directly in customer chats or social media platforms.
- Offline: Print and display the QR Code on cashier desks, event booths, catalogs, or brochures.
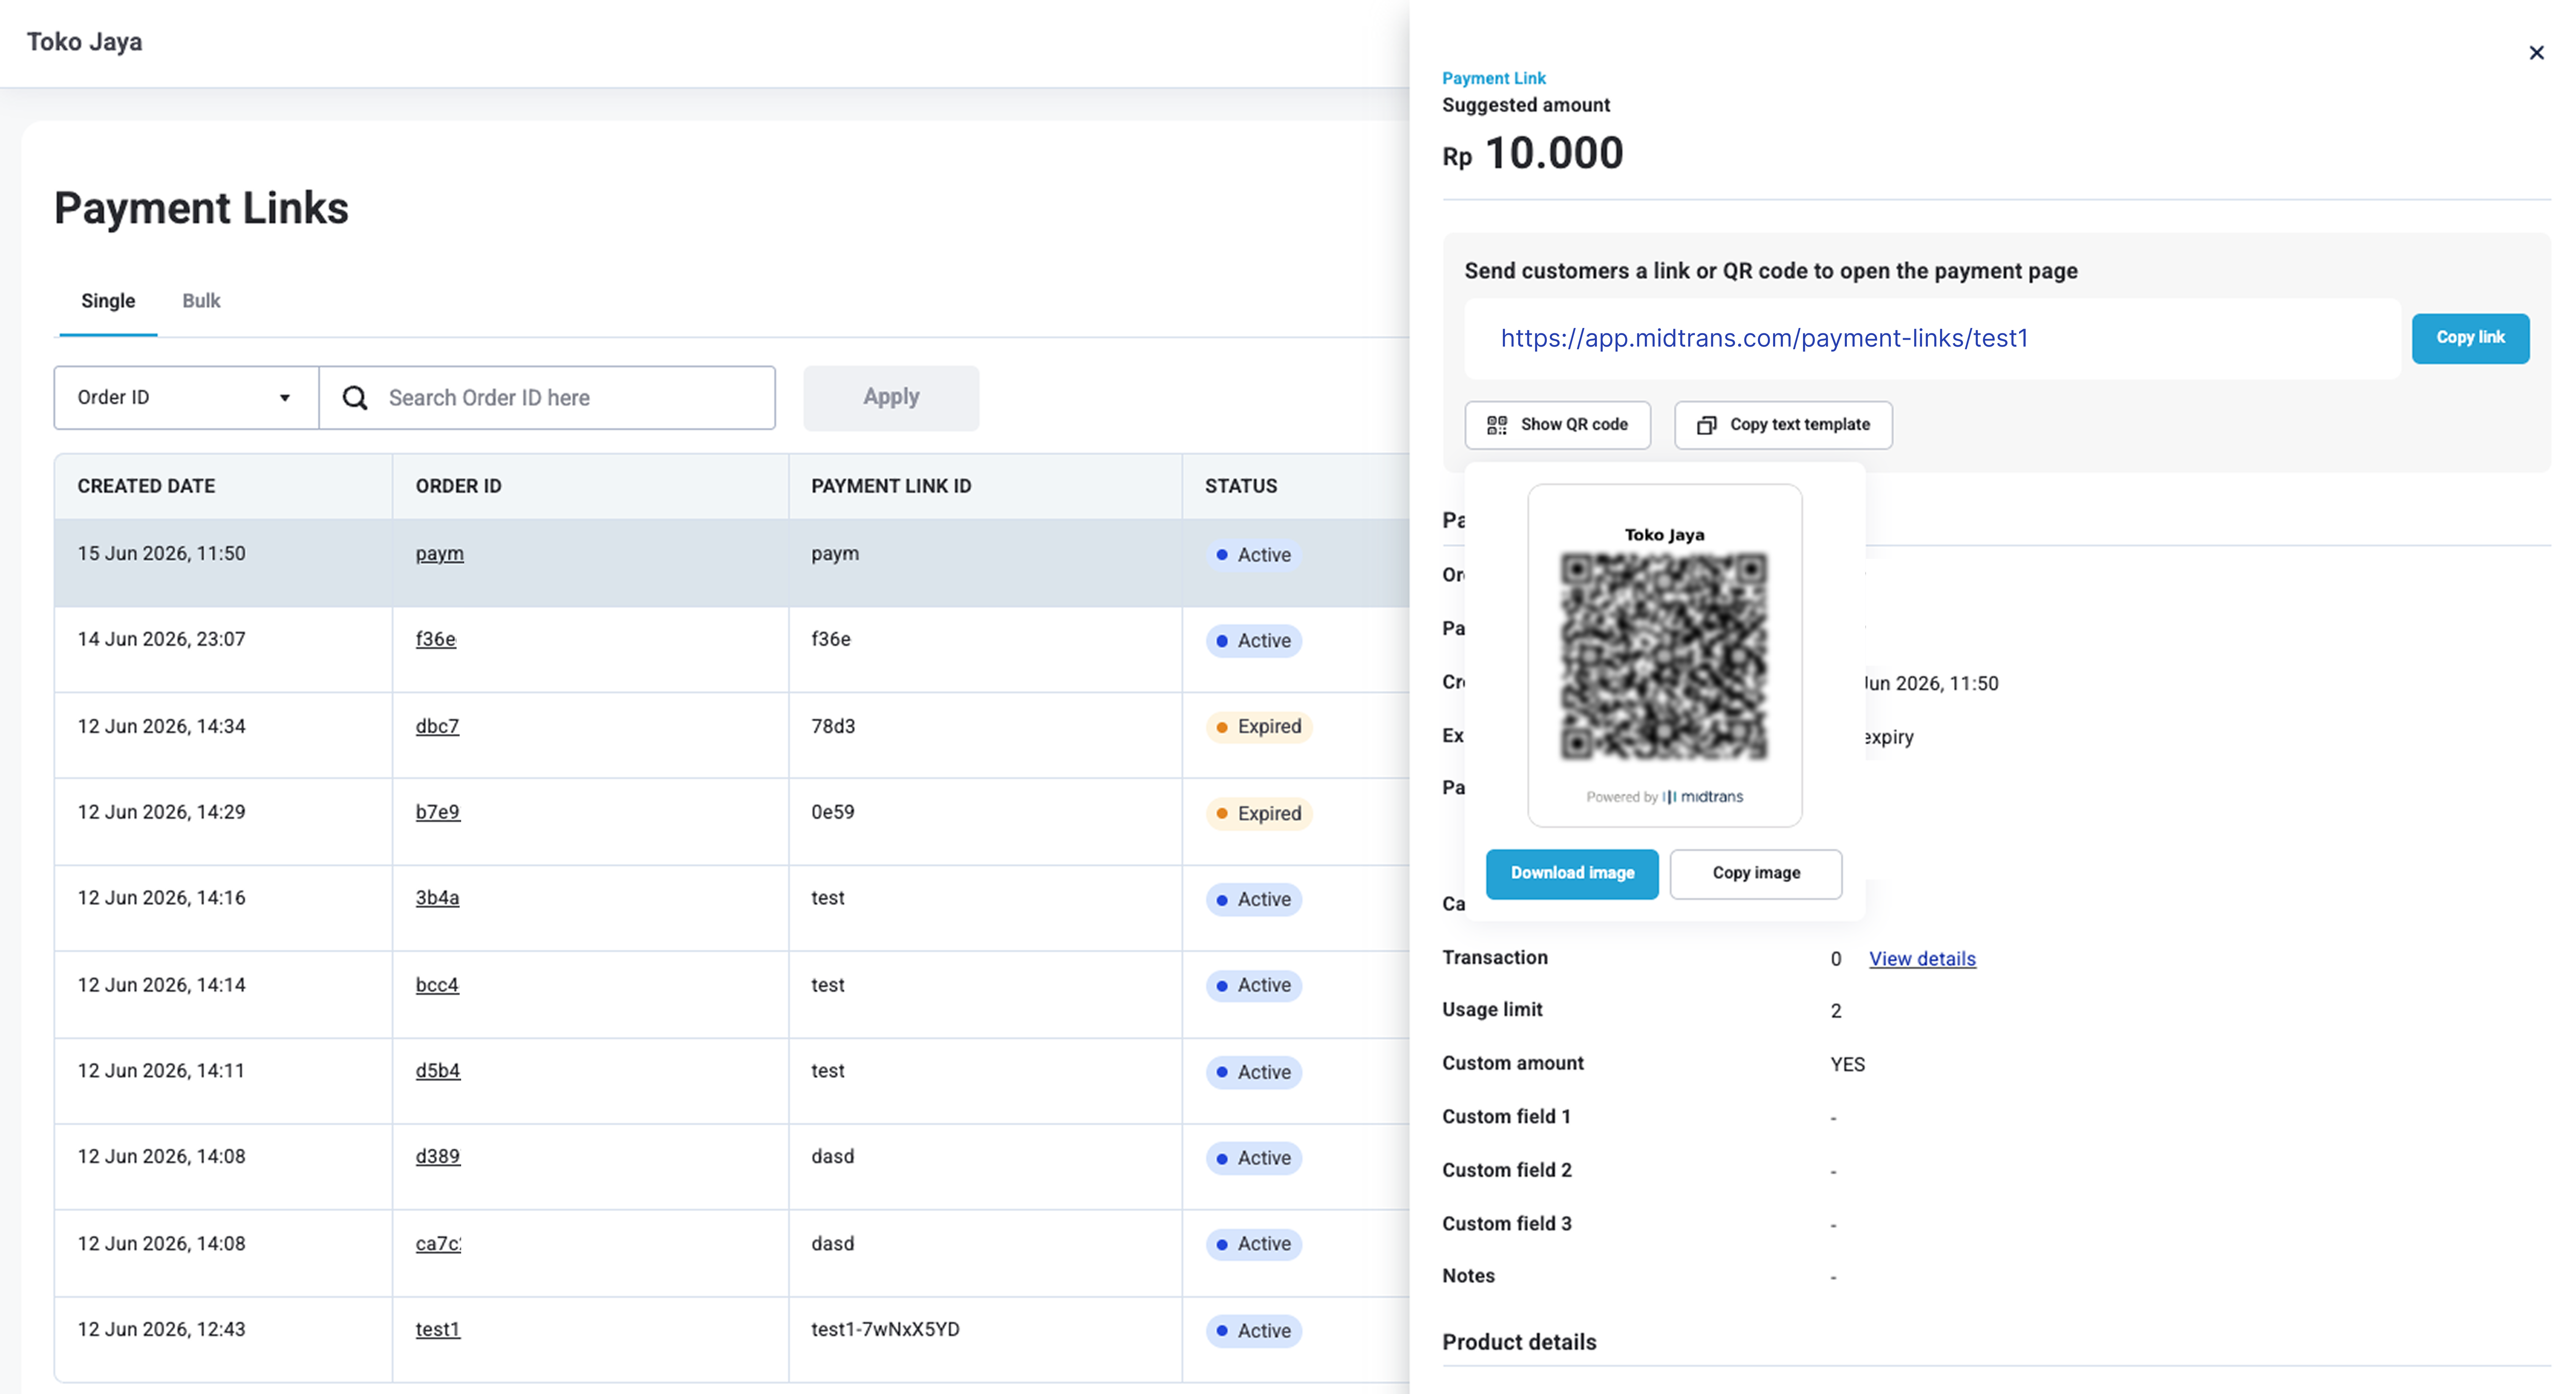
Note: You can turn off QR Code Generation in Payment Link via Payment Link Settings.
Payment Link Page
When you send the Payment Link to customers, they can open the link and it will direct them to Midtrans Payment Page. If there is no specified customer, the customer first needs to enter their details such as Name, Phone, and Email to continue. Next, the customer needs to select a payment method and follow the payment instructions. Once the customer has completed the payment, you will receive a notification of the transaction.
Next Step
Sign Up for Midtrans Account
Sign up for a Midtrans Merchant Administration Portal (MAP) account, to get access to your own account dashboard, and Sandbox environment and to test around for free on Sandbox.
If you are planning only to use Payment Link without any other technical integration (non-programmer or don't have any website), most of the time you only need to:
- Sign Up,
- Learn how to create payment link explained above,
- Briefly understand the Midtrans Dashboard.
If you are also planning to use other technical integration method, you may want to explore more integration options.
Optional: Payment Link via API
If you need to create payment link programmatically via API, refer to the following guide.
Updated 17 days ago